Misinformed as to the actual strength at Sepulveda, Savary finds himself facing 3500 infantry formed up and entrenched on the high ground adjacent to the town rather than the 1200 that are expected. Nevertheless the Fusiliers push forward, knowing that Lasalle’s cavalry will soon be arriving on the Spanish flank…
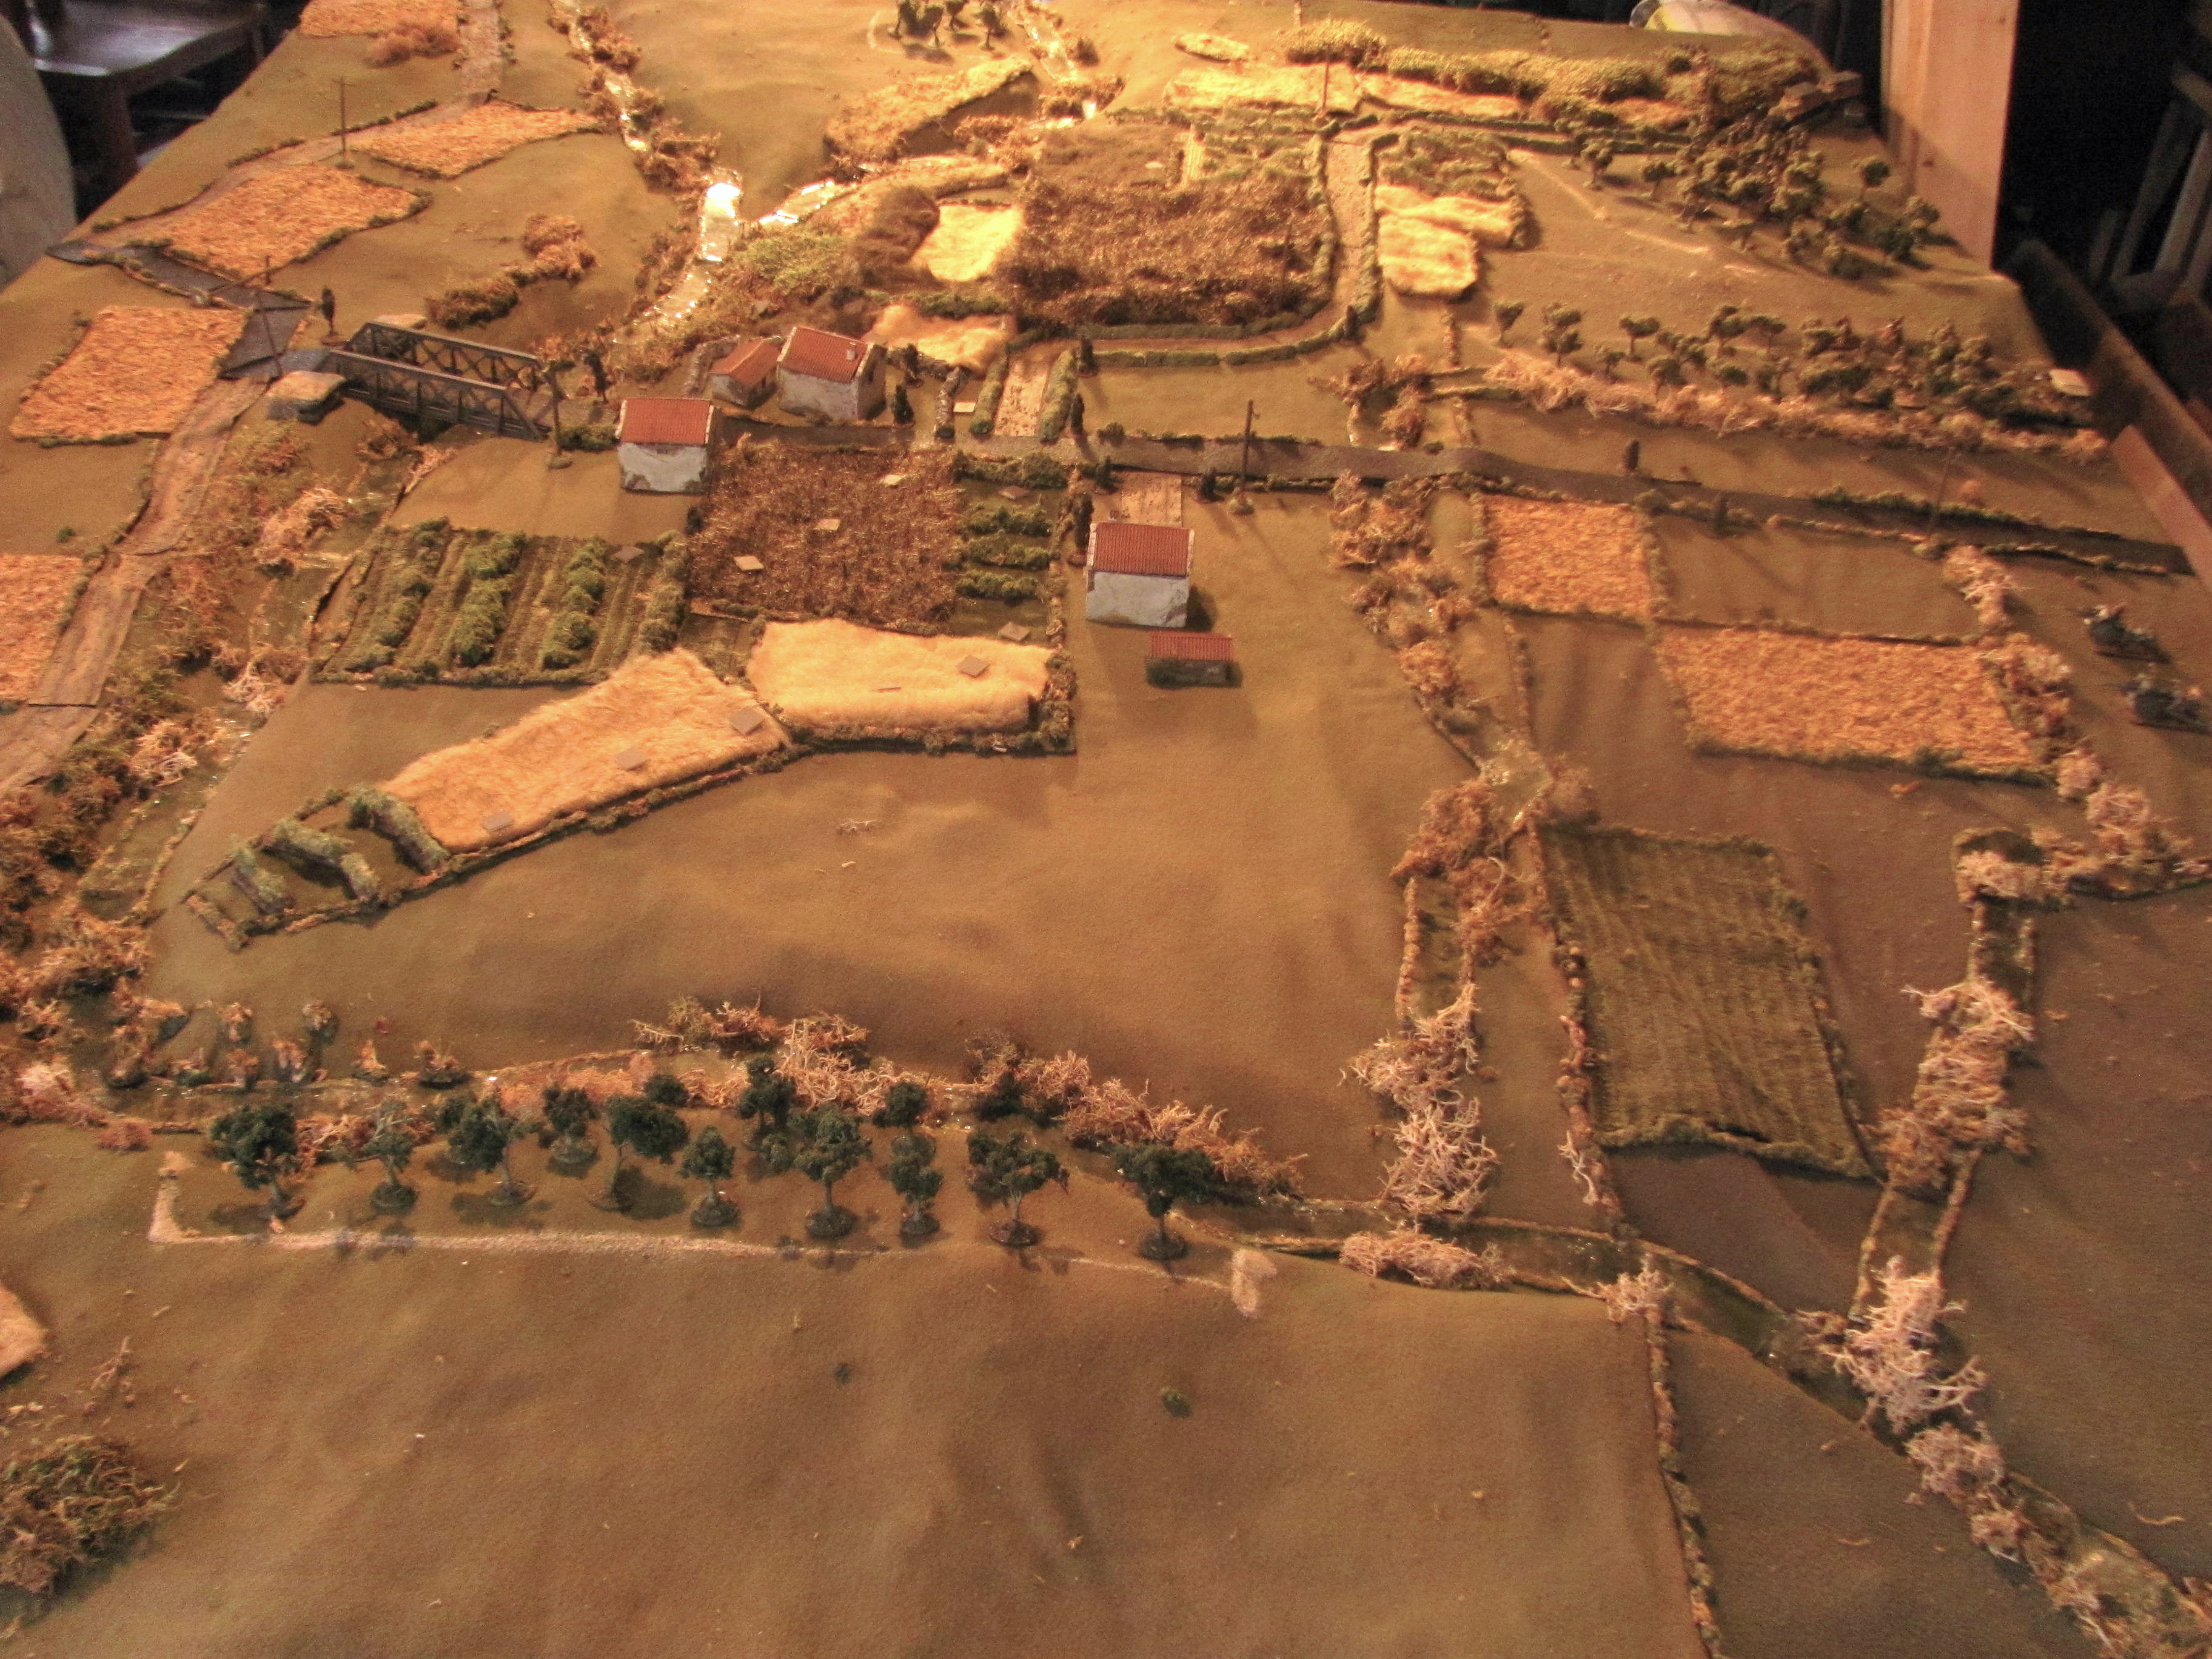
The scenario posed some interesting challenges. The meseta on which Sepulveda sits is almost entirely surrounded by deep, steep-sided gullies, with no obvious line of retreat for the Spanish (we decided the gully would serve as the board edge). Only a few avenues of attack are open to the French commander (Alan) and the town itself is surrounded by sturdy medieval walls. Brian utilized some rules I had developed for fighting in linked built up sectors and added a few of his own around knocking down gates by cannon and sapper - just for the sheer fun of it!
We played on a 6’ X 4.5’ board, using my 1/72 figures and the Over the Hills ruleset.
 |
| The scenario map. In our game the French all entered close to where the 1/2 Fusiliers enter, as their arrival area was optional. Lasalle's cavalry enters later at 1. |

The Battlefield
Sepulveda lies at the bottom of the photo, bordered by cliffs to the east and north (bottom and right). The main Spanish line spans the meseta with the Spanish cavalry (other than a small contingent on their left flank- bottom) positioned on the right flank (top). The Rio Caslilla, a shallow stream, runs along the front of the meseta (left), with French access broken up by massive spurs of free standing rock bordering the stream. The Rio Duratón, which circles the rest of the high ground, is traversed by a road that mounts the meseta in a break in the cliffs upper right. It is by this road that Lasalle’s cavalry will arrive.

Sepulveda
The town is surrounded by sturdy medieval walls, and the land drops off steeply to the left and behind.

From the high ground south of Rio Caslilla
The Spanish lines as seen from the French side of the Caslilla, with the stream in the foreground.

Spanish left in front of Sepulveda
In front of Sepulveda, on the Spanish left is positioned a Walloon Guards battalion (3° Reales Guardias Valonas) and a small contingent of the Spanish line cavalry regiment, Montesa.

Spanish centre
The Spanish centre is held by Jaén/1 and 3, entrenched and with a mixed battery in front.

Spanish left
The two large Irlanda battalions, 1 and 3, also entrenched stretch across the ridge of the meseta with the Spanish cavalry (Alcantara, Carabineros Reales and the remainder of Montesa) on the Spanish right. To the rear (top right) is the militia unit, 1° Vols. de Sevilla.
French advance on Sepulveda
Savary’s own brigade, four battalions of Guard Fusiliers, enter the field in front of Sepulveda. Savary has decided to throw the full weight of his force in front of the town, hoping to quickly thrust his way through Jaen’s entrenched lines and cut the rest of the Spanish on the meseta from retreating to the town.

Montesa charges 2/Fusilier-Chasseurs
The Montesa cavalry charge past Savary’s left battalion who, in closed column, fire some sporadic fire into their flank as the Spanish strike the second battalion. This battalion fails to form square but still manages to drive off the Spanish horse in close combat! The Walloon battalion (off right) retreats to the safety of the town walls.

Friederichs arrives
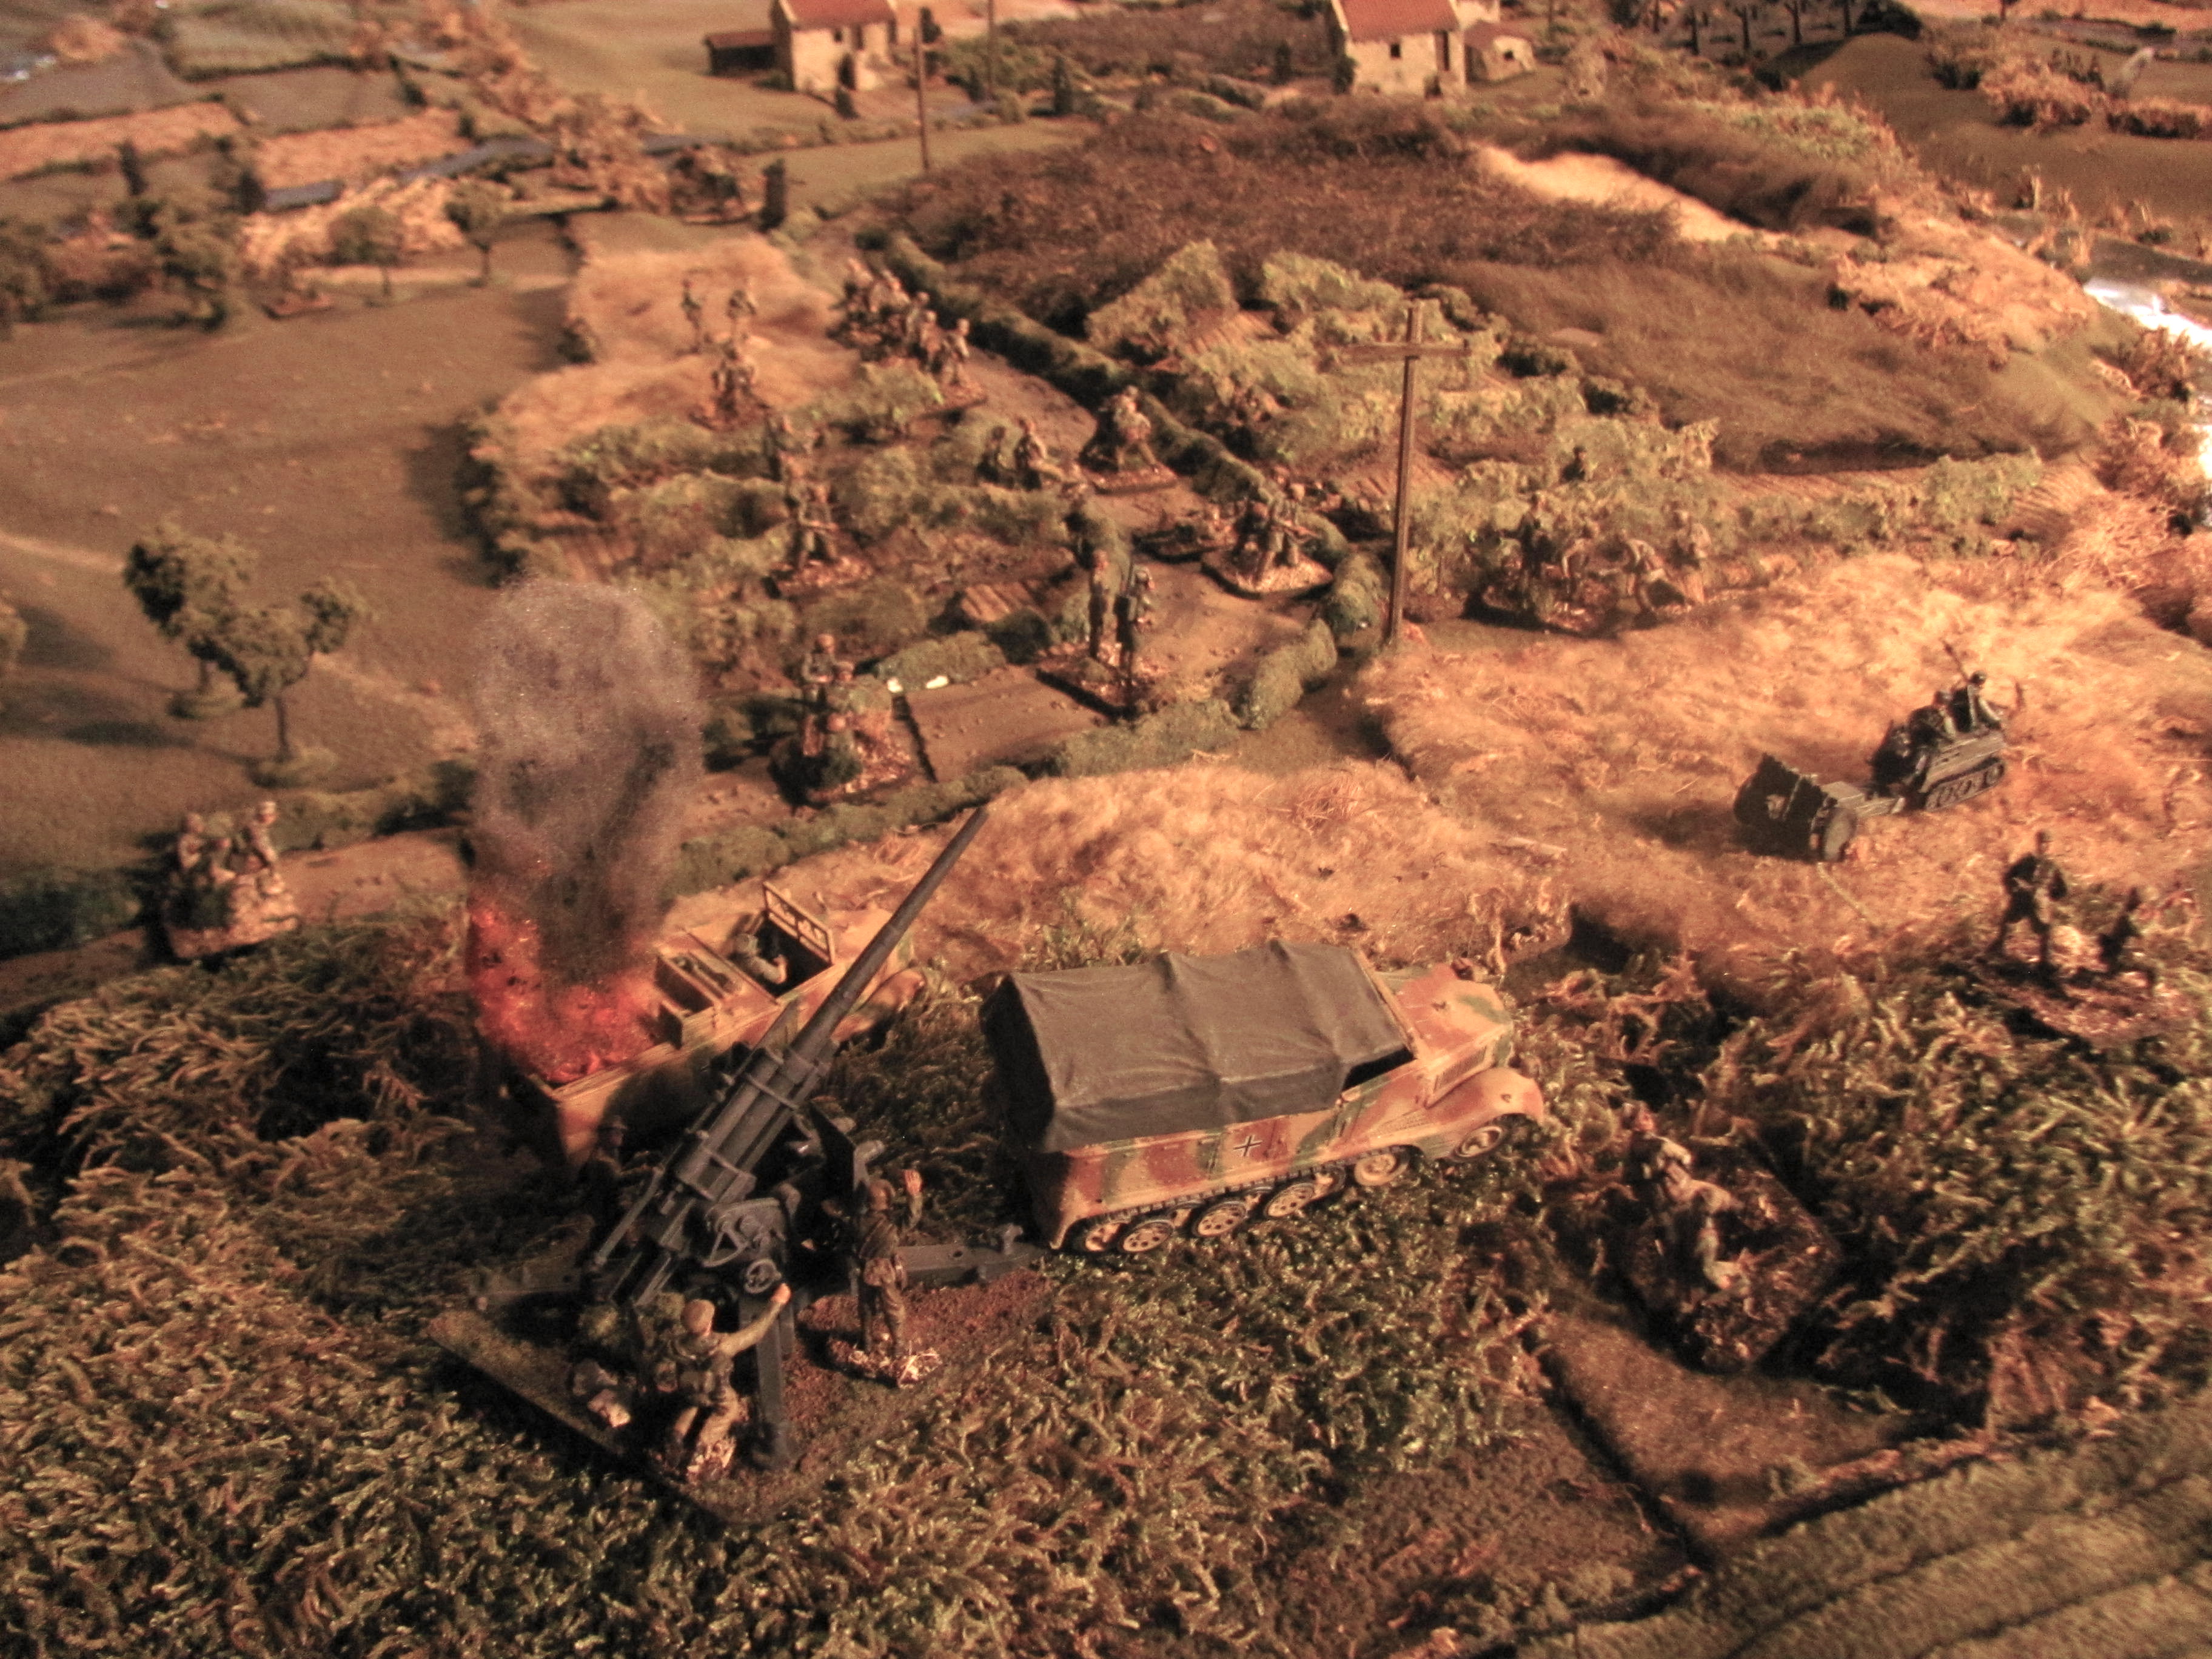
Hard on Savary’s heels Friedrich’s two battalions, with a half battery of Guard artillery arrive on the field.

Spanish guns beat back the French advance
Withering fire from the Spanish guns drive back the encroaching French, holding them at bay.

Irlanda and 1ºVols. de Sevilla march to Sepulveda

Sarden, the Spanish commander, on seeing the French forces mass in front of Sepulveda, brings in his far right, Irlanda, along with the Sevilla militia, to bolster the town.

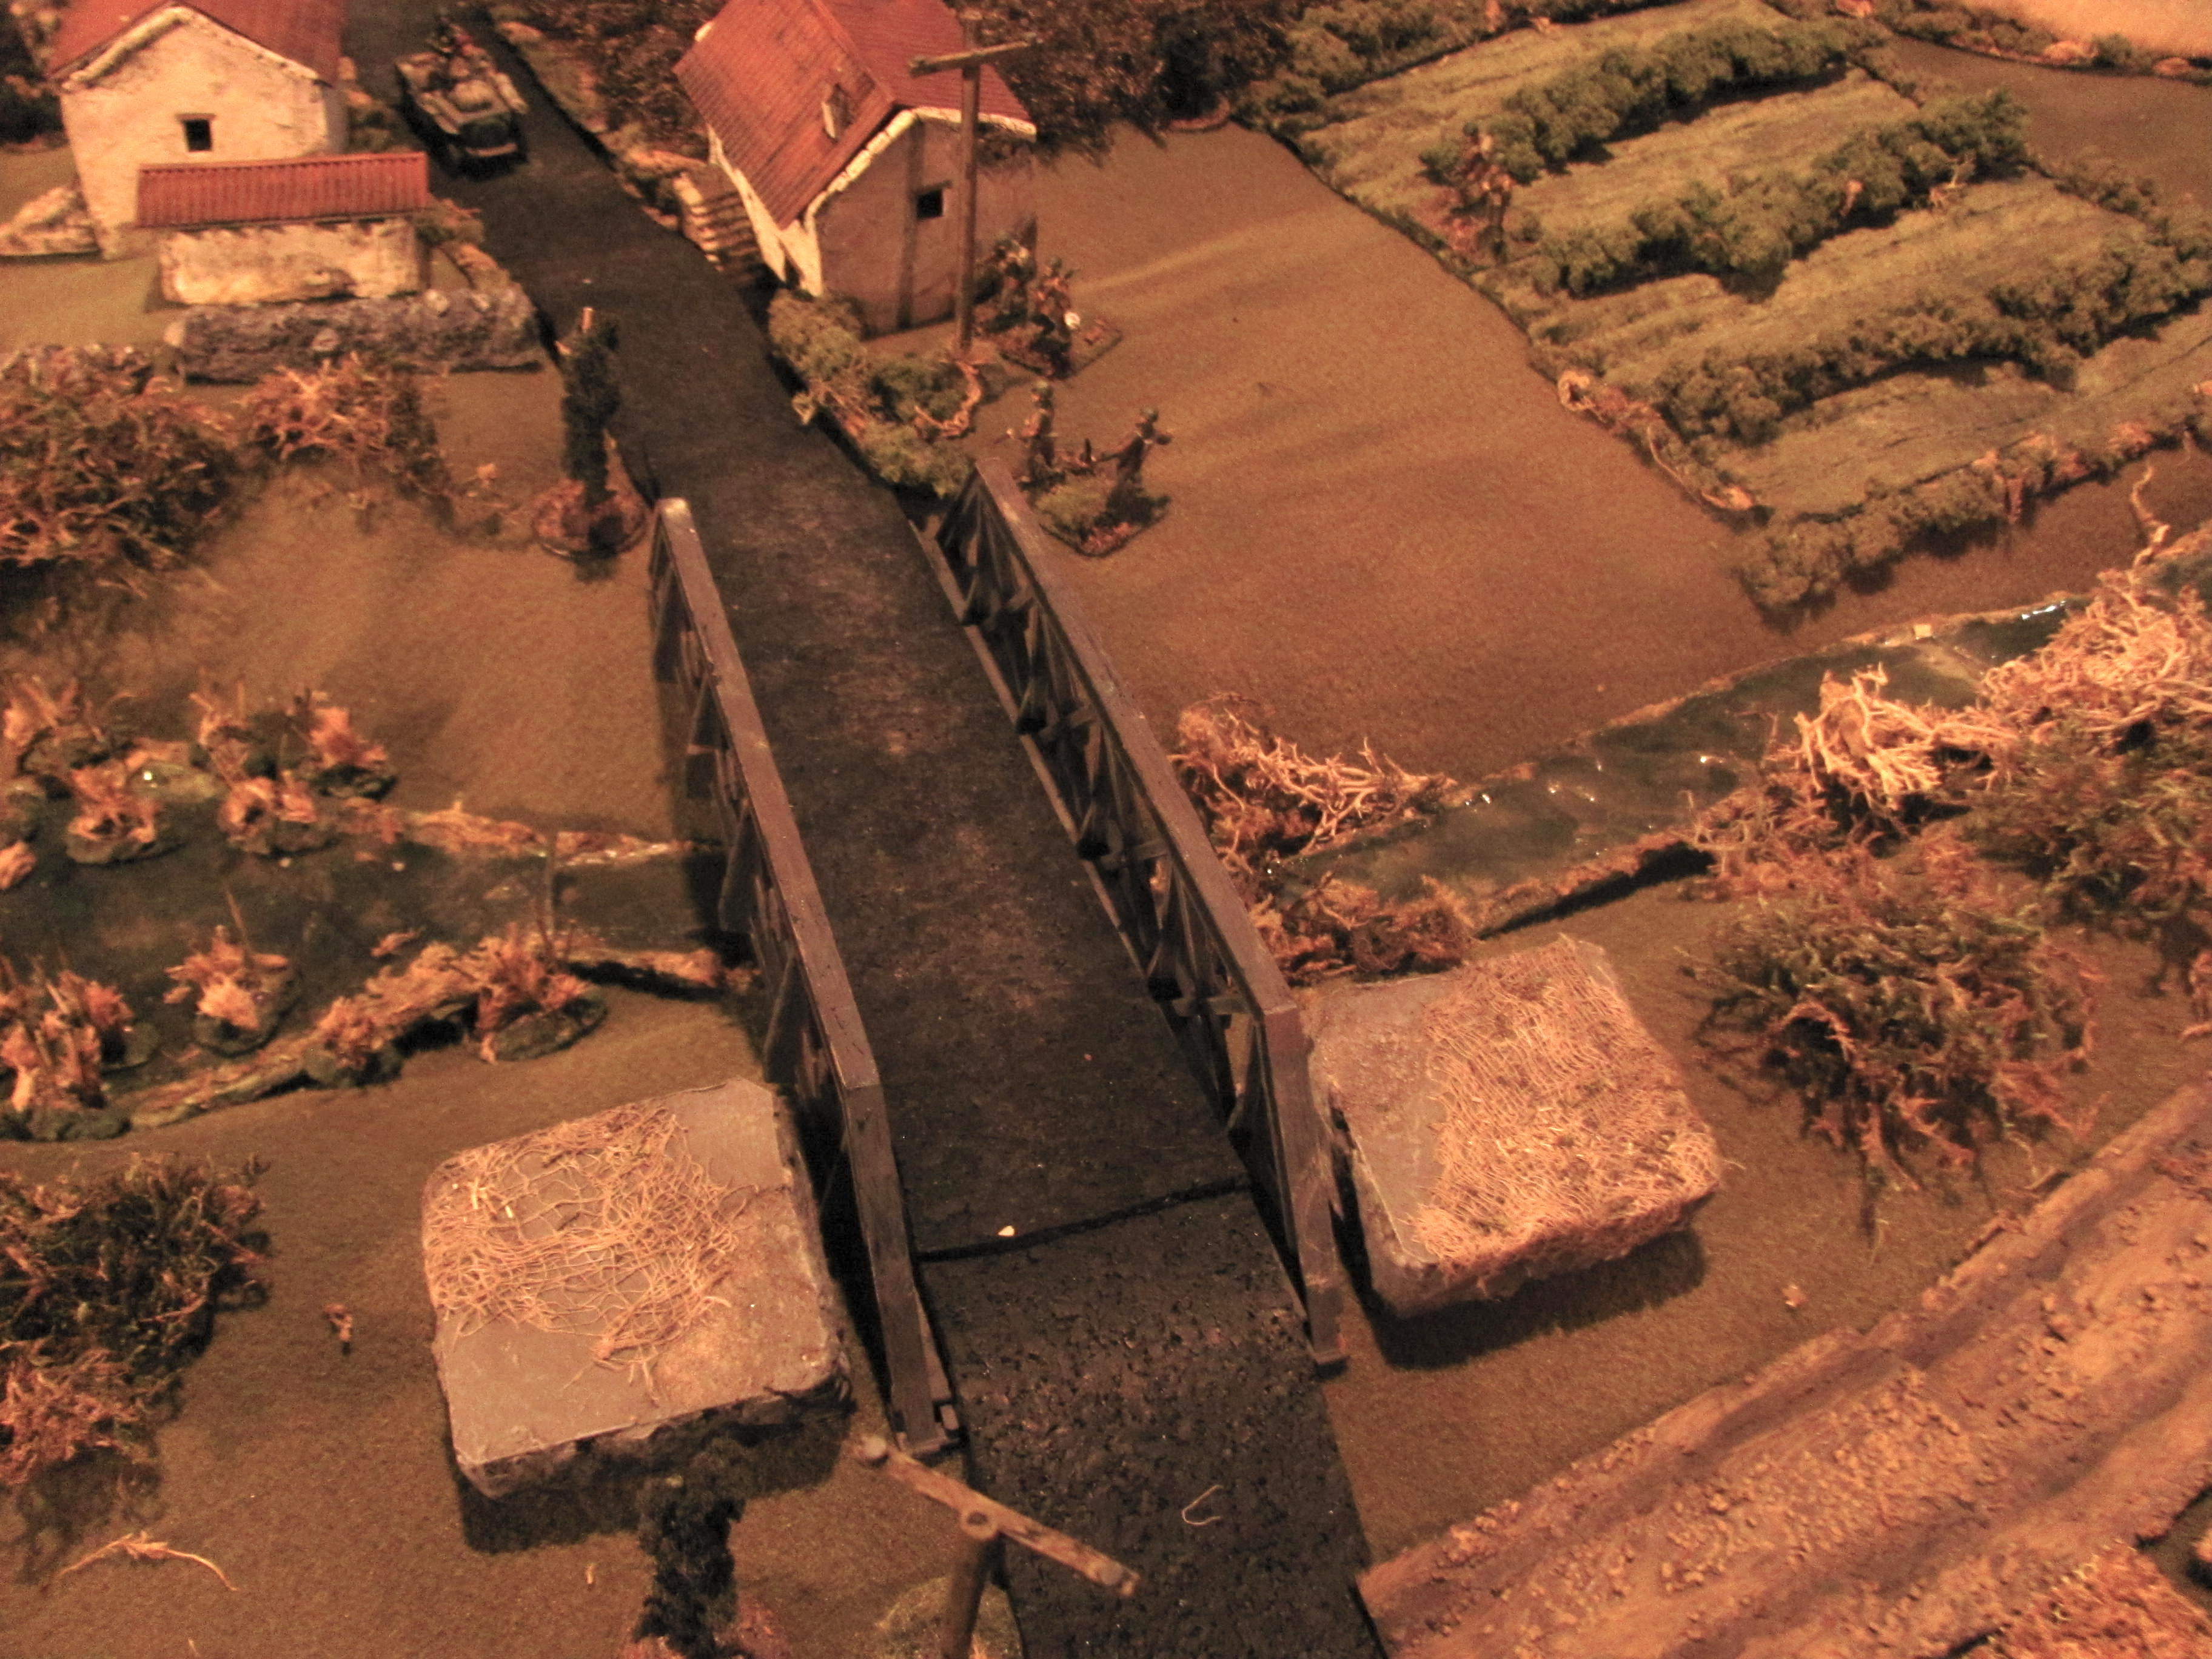
Walloons retreat to the town
Although failing to cause any real harm, the Spanish horse buy the Walloon Guards enough time to consolidate behind Sepulveda’s walls.

View of French attack from the high ground
Spanish guns continue to pound the French as Savary’s artillery arrive, upper right.

Irlanda and Sevilla occupy Sepulveda
Meanwhile, Spanish infantry flood into the town.

Overview
In this overview, at the bottom left, French infantry and Spanish cavalry reach an impasse as the French close up their columns on this flank and keep Montesa pinned close to the town walls. The French here are, at the moment, being held at bay by the Spanish guns, supported by Jaen’s entrenched double line.
Sepulveda has been packed with Spanish troops, in expectation of a French assault on the town while upper right Mariano’s Spanish cavalry guard the road that accesses the rear of the meseta.

Guard artillery smash the front gate
On their first attempt the French guns shatter the town’s gates.

Savary's ADC dashes past the Spanish lines...
Savary sends an ADC off to find Lasalle, who has still failed to arrive.

And meets Lasalle as he crosses the Duratón
The ADC meets Lasalle as he arrives at the Duratón and urges him to press forward in support of Savary’s attack. Brave Lasalle needs no encouragement and personally leads the charge of his Dragoons and Chasseurs against the Spanish horse.

French assault Spanish guns
Meanwhile, the French, buoyed by the shattering of the town gates, charge forward in skirmish formation to assault the Spanish guns that have been giving them such grief.

And overrun them!
They survive a blast of canister and a volley from Irlanda (who have been ordered out of Sepulveda to replace Jaen in the entrenchments) and destroy the guns!

Montesa kept at bay by French closed columns on French right
Deadly French musket fire keep the small Spanish cavalry contingent at bay and out of the fight.

3/Fusiliers-Chasseurs assault Spanish lines and are repulsed
The Spanish line holds solid as the first French assault in column is hurled back.

Cavalry clash at the rear of the meseta, Lasalle falls
The French cavalry charge up the steep hill and the 1/9th Dragoons clash with the Cabineiros Reales. Both sides take a thrashing, but the French horse prevail, routing the Spanish. Alas, Lasalle, leading from the front, is unhorsed and falls in the fray.

Alcántara break the first wave of 10th Chasseurs
Alcántara fares better, hitting the 1/10th Chasseurs as they struggle up the steep slope, and soundly thrashing them.

Spanish fall back as French cavalry surge over the Duratón
However as more fresh French cavalry surge over the Duratón, the exhausted Spanish give way.

Meanwhile, back at Sepulveda...
A follow up blast of canister through the broken gate savages the Walloon defenders and sends them reeling back as a French column follows up, charging its way into the town. Both sides settle down to blasting away at each other with musket fire.

Friederichs' 1/Fusilier-Grenadiers also flounder on the Spanish line
A second Guard battalion is beaten back by stalwart 3/Irlanda!

French Guards routed!
And is also routed, passing through the 3/Fusiliers-Chasseurs and causing them to rout as well. Freiderich’s brigade, badly mauled, is teetering…

Savary's sappeurs try to hack down a second gate
Montesa, unable to move forward, retreats, galloping around the walls of Sepulveda towards the far side where the French are taking a beating. Savary sends a column against a second town gate, attempting to hack it down with axes.

Savary in command

Overview
In this overview you can see the French infantry has been beaten back on the upper side of the town and is struggling to break in at the lower edge. They have a toe hold in Sepulveda, but have yet to make headway. Lower right the Walloon Guards have been forced to retreat out of the town while just above them the small Montesa unit can be seen galloping towards the Spanish right in support of Irlanda, who, unknown to the enemy, have just been ordered into the attack by their confident general, hoping to sweep the French clear of Sepulveda’s walls before the enemy cavalry can arrive. Upper right the Spanish cavalry slowly gives ground while the French horse, missing Lasalle’s charismatic presence, just as slowly advance, content to let them give ground willingly.

3/Irlanda taking a toll
However beating off two Guard attacks has taken a toll on 3/Irlanda so Sarden elects to pull them out of the front line and lead the attack with the fresh 1/Irlanda.

Spanish cavalry falling back towards Sepulveda
Cabineiros Reales rally and are back in line.

3° Carabineros Reales crushed by 2/9th Dragoons
The French cavalry commander finally sends his lead unit into the attack. The elite Spanish unit is destroyed but the French, also taking a thrashing and elect not to follow up, content to continue to push the enemy cavalry brigade, broken now, as they continue to retreat towards Sepulveda. As it turns out, the French horse will not be needed…

3/Irlanda destroyed by enfilade fire
Disaster strikes the Spanish as they move to swap around Irlanda’s battalions in preparation for the attack. The French commander, suddenly spotting the Spanish maneuvering outside the town walls, orders his troops to the walls and delivers a shattering volley into their flank that breaks 3/Irlanda as they are retreating.

Montesa ventures too close and is broken by French guns
At the same time, Montesa, arriving on Irlanda’s right flank in support, is spotted by the French guns. Straying too close and caught still in column, the guns shatter the small contingent of enemy horse, who rout.

1/Irlanda goes into the attack - and is broken!
But Sarden’s ill-advised order to attack has already been given. Jaen/3 marches out of Sepulveda in support as 1/Irlanda weathers a second volley in enfilade from the French inside the town. Battered, they survive another volley from the 1/Fusilier-Chasseurs, before a vicious close combat ensues. The French get the better of it and a second Irlanda battalion breaks in as many turns!

Spanish cavalry pushed back to the walls of Sepulveda
The battered Spanish cavalry fall back towards Sepulveda but with no line of retreat, they are doomed. Jaen/3 retreats towards the relative safety of the town walls, but the Spanish army is suddenly on the brink after the loss of Irlanda 1 and 3.

1/Jaén rout out of Sepulveda
A final push by the French inside Sepulveda is enough to break the Spanish army. 1/Jaen routs out the rear of Sepulveda and breaks up as they throw themselves down the steep ravines in their attempt to get away. The rest of the Spanish army follows suit, either surrendering or slipping away. In a matter of moments victory turns to defeat for the Spanish as Savary triumphantly seizes the town.