Saturday, December 31, 2022

23rd Dragoons and all the King's Horse

I finally finished the last unit I needed, the 23rd Light Dragoons, to complete my cavalry contingent for the Talavera campaign. I now have far more horse than I am likely to need for any future scenario, certainly more heavies which did not see a lot of action in the Peninsular War.

This set is the HaT set, full of all its idiosyncrasies which I documented in an earlier post here. But I still was happy with the way they turned out and can now take a break from cavalry for a while and focus on other things.

A bit of history

The 23rd Light Dragoons appeared and disappeared in history a couple of times prior to the Peninsular War. Originally established by Sir John Burgoyne in 1781, it was re-designated the 19th in 1786. The 23rd was resurrected in 1794 but disbanded again in 1802.

In March of 1803 the 26th (raised 1795) were re-numbered the 19th, and saw service in Egypt, Spain and Waterloo, before finally being disbanded in November 1817.

23rd at Talavera

The 23rd spent relatively little time in the Peninsula, arriving June 1809 and returning to England after the disaster of Talavera in November of the same year. It was to go down in the history books as the British light dragoon regiment that charged headlong into a hidden ditch while advancing on French infantry. They managed to rally on the far side of the ditch and continued their advance but by the end of the day had lost nearly half their number.

Here are a few photos of my painting results:


And all the King's Horse...

The completion of the 23rd gives me all the British cavalry I need for the Talavera campaign. They are as follows:

1st Brigade: commanded by Brigadier General Henry Fane: 3rd (Prince of wales) Dragoon Guards and 4th (Queen's Own) Dragoons

2nd Brigade: commanded by Brigadier General Stapleton Cotton: 14th and 16th Light Dragoons

3rd Brigade: commanded by Brigadier General George Anson: 23rd Light Dragoons and 1st KGL

And really, what is the point in going to all of this trouble if you can't have them all on a table at once!


Here are the three Light Dragoon regiments, the 14th, 16th and 23rd.

And a few photos of all six regiments of horse (although only the 1st KGL Hussars were present at Talavera, my Hussars are composed of a half regiment each of the 1st and 2nd.)


Saturday, December 10, 2022

3rd (Prince of Wales') Dragoon Guards

It has been a while since I have posted much in the way of painted figures, but have every intention to catch up on that over the next while. With the completion of my 3rd Dragoon Guards I now have, in conjunction with the 4th Dragoons, the British heavies I need for Talavera.

Once again these are the less than perfect HaT set, requiring a lot of fussy pinning and plume adding, but I still find that their beautiful red coats paint up very nicely and look just fine en masse.

A bit of History

First established as the Earl of Plymouth's Regiment of Horse in 1685, this venerable unit was renamed the 3rd Regiment of Dragoon Guards in 1751, receiving the Prince of Wales (future George IV) designation in 1765. 

The 3rd Guard's Peninsular record is less than brilliant. They were brigaded with the 4th Dragoons (Queen's Own) and landed in Portugal in late April 1809 at the beginning of Wellesley's Oporto campaign under the command of Major General Henry Fane, although they took no direct part in the expulsion of the French from Portugal. It is only when the allied army marches into Spain that the heavies become more actively involved, although even at Talavera they see little if no action in support of Anson's Brigade where the the ill-fated 23rd plunged head long into an unknown dry watercourse.

Their command passes to Major General George de Grey, spending the next two years in relative inactivity, joining Hill's southern army (under command of Beresford as Hill was laid low by malaria) for the Battle of Albuera in May 1811. A reorganization early in 1812 sees them moved to the northern 1st Division Cavalry where they are now brigaded with the the 1st Dragoons and rejoined by the 4th, brought forward from the back area where they had been since August 1811. They are once again in action at the Combat at Maguilla, against a force of French dragoons commanded by Lallemand, where the British cavalry's famously inept leadership (at this point the brigade was commanded by Slade) successfully turned a victory into a defeat through an uncontrolled and chaotic pursuit of the enemy.

Following Maguilla they once again went into a period of relative inactivity, joining Wellesley's army as it marched north into Spain and eventually France in 1813-14, but seeing little if any action before finally returning to England on the 20th of July, 1814 after peace is declared. They were not present at Waterloo.

For more information on their history in the Peninsula: https://www.napoleon-series.org/military-info/organization/Britain/Cavalry/WellingtonsCavalry/c_3rdDragoonGuards.html

Here are a few pictures of the completed unit (two units really, six stands apiece, which accounts for the two command stands with trumpeters). I couldn't find any definitive reference for the saddle blanket (a few post Napoleonic images only) so went with a nice royal blue with gold trim.


Sunday, November 13, 2022

Casa de Salinas - Battle of Talavera, 27th July, 1809

We were back to the Napoleonics this weekend, and more importantly, back to the Peninsular War scenarios written by Jonathan Jones in his scenario book, O’er the Hills. Followers of this blog will know that we have been slowly but steadily playing our way through the entire book in chronological order and our last battle saw Wellesley send Soult packing from Portugal with his victory at Porto.

With that threat dealt with and the newly reconstituted Portuguese forces left to guard the north, Wellesley feels strong enough to turn his attention to Victor’s forces in Estremadura. He connects by message with the Spanish forces in the area under General Cuesta, and they contrive to join forces west of Madrid, bringing Victor’s army to battle before it can be reinforced.

However the mercurial Cuesta proves to be an unworthy dance partner as he is out-maneuvered by Victor, who successfully links up with King Joseph’s reserve and Sebastiani’s IV Corps who pursue the Spanish back towards the British. The British take up positions at the chosen field of battle, Talavera, trying to buy time for the two forces to join.

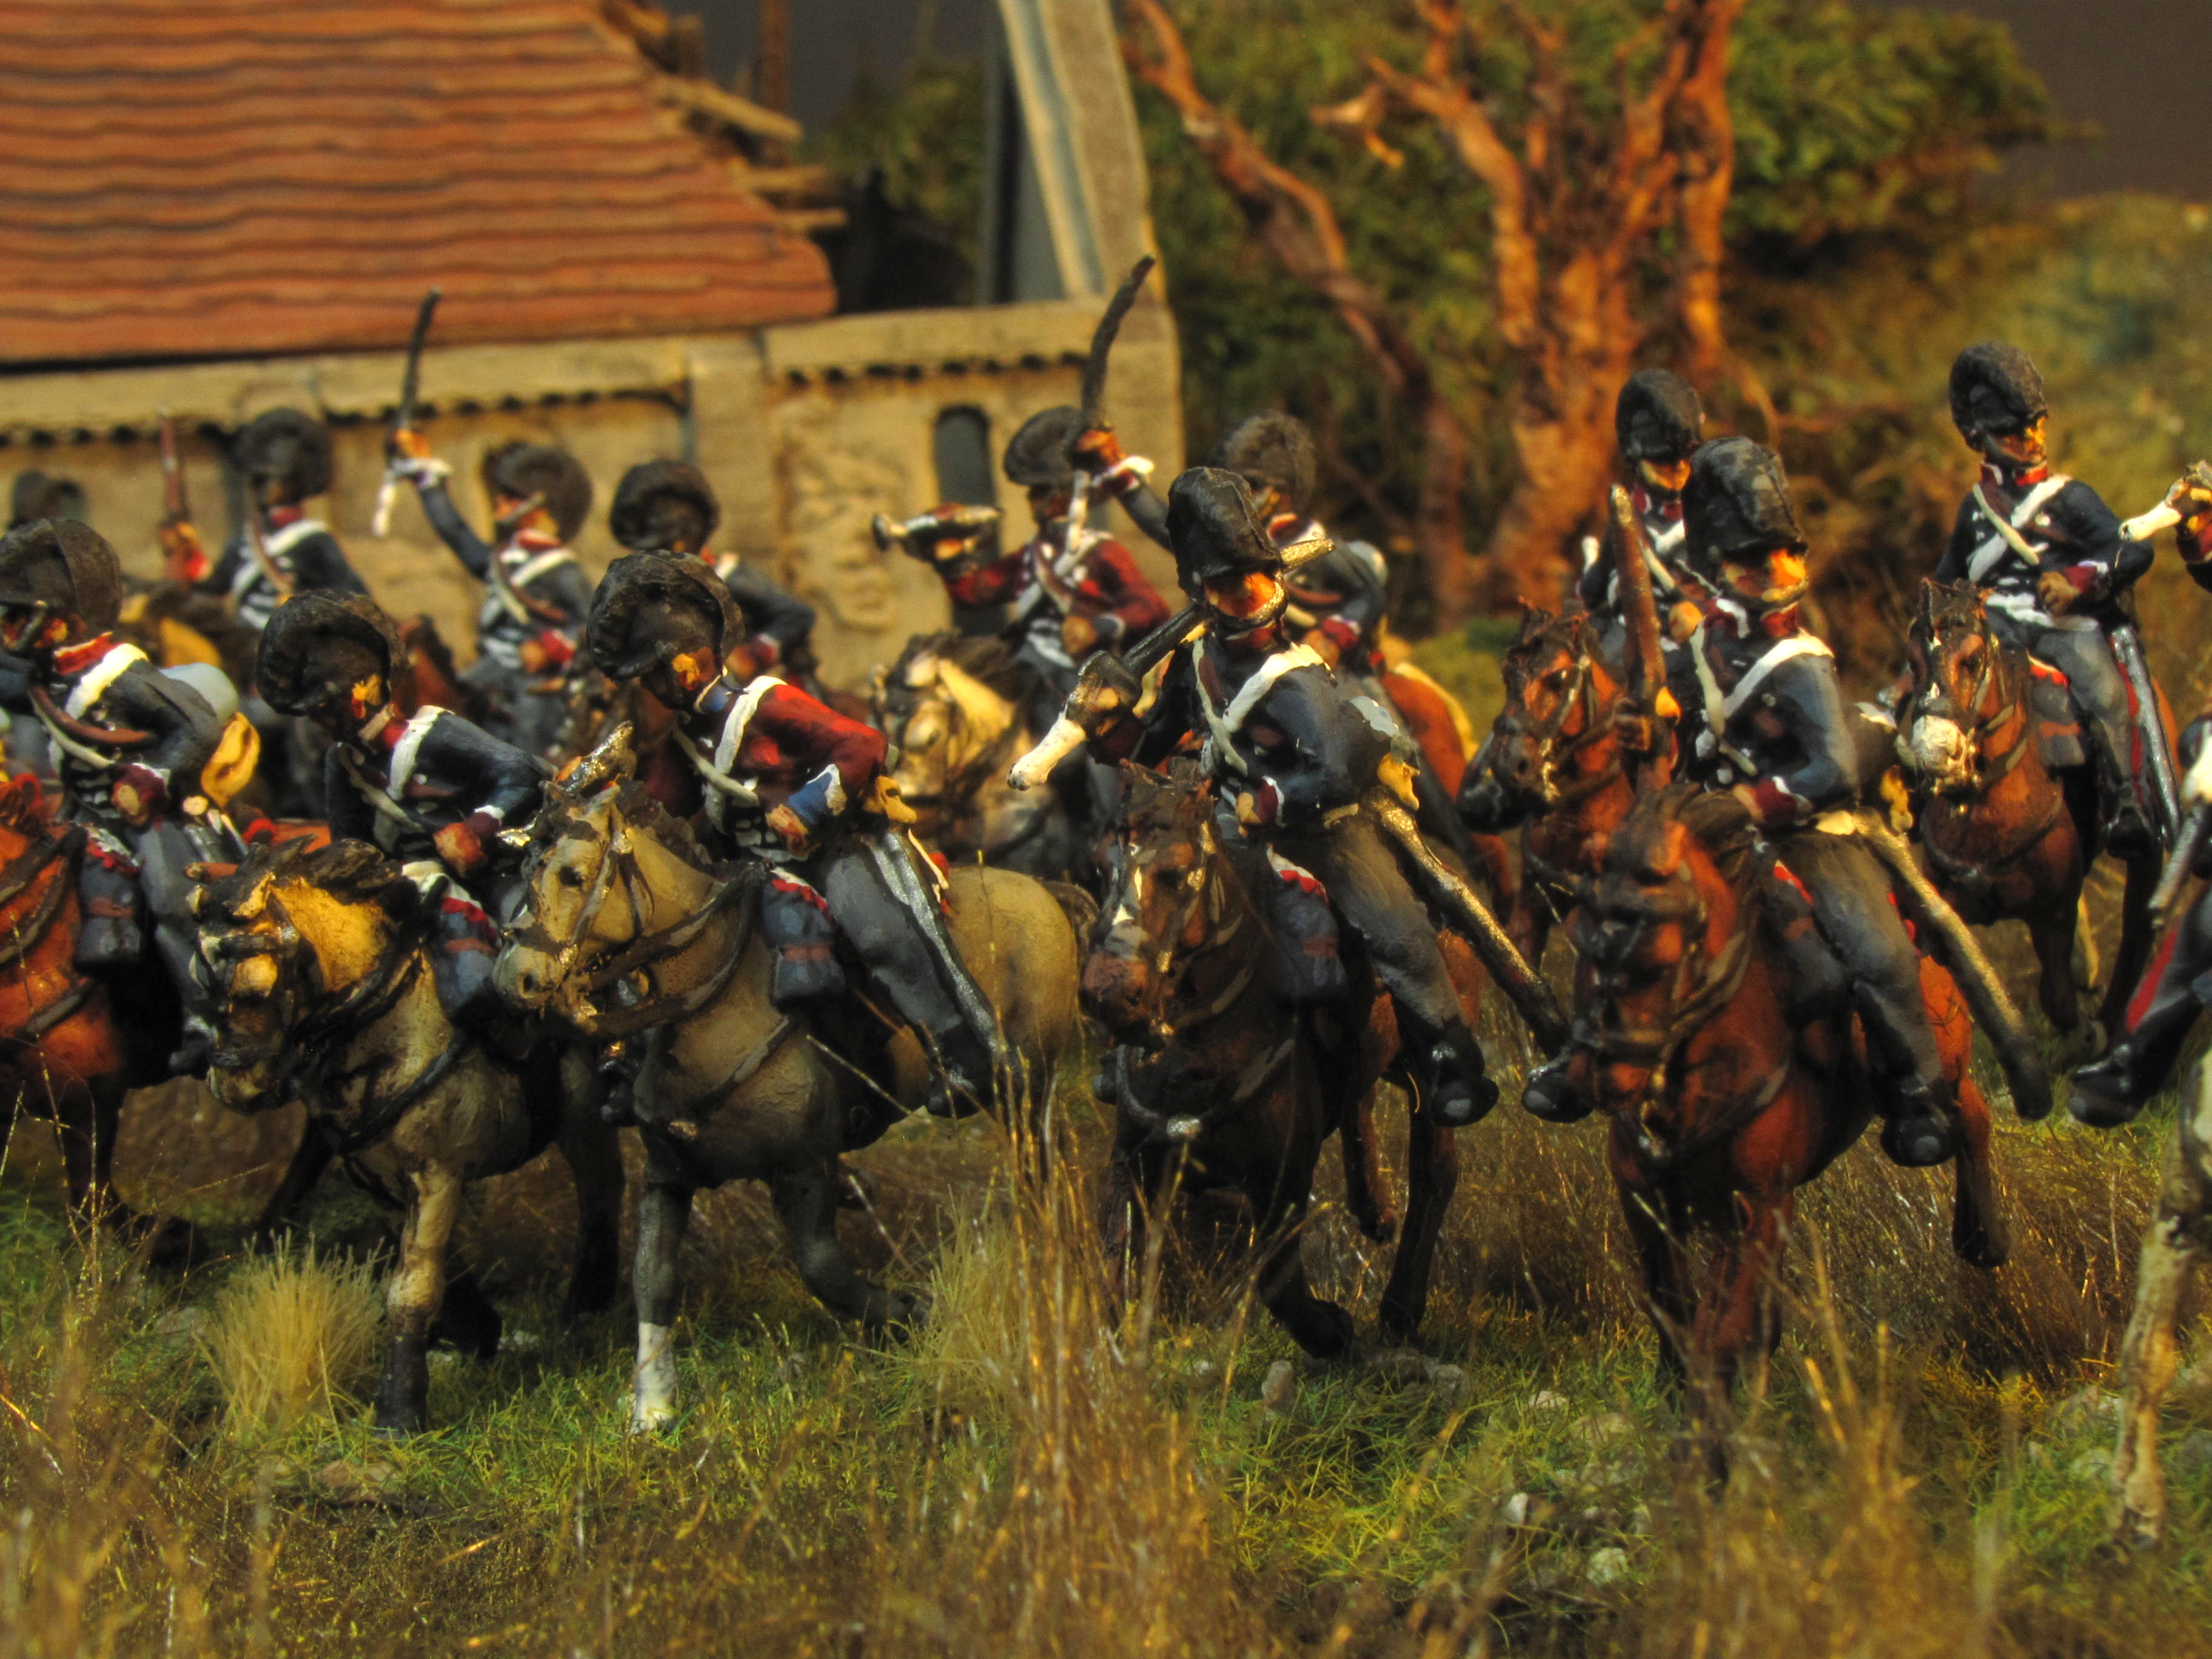
This scenario represents the clash of the British rearguard under Major General Sir Arthur Mackenzie and the French advance guard, namely the 2nd Division, 1 Corps under General de Division Pierre-Bellon Lapisse. The French have managed to advance on the British undetected and launch a surprise afternoon attack that catches the British flat-footed. Interestingly enough, Wellesley himself was present, having gone forward to observe the French from one of the ruined towers at the abandoned farm of Casa de Salinas. The French attack is almost upon him before he realizes it is materializing! We played this on a 6’X9’ table with my 1/72 toy soldiers, using the Over the Hills ruleset. Alan and Phong took the French while I wielded the British. Apologies for the poor photos this time around - the light was marginal on a dark November day in Alan’s coach house.

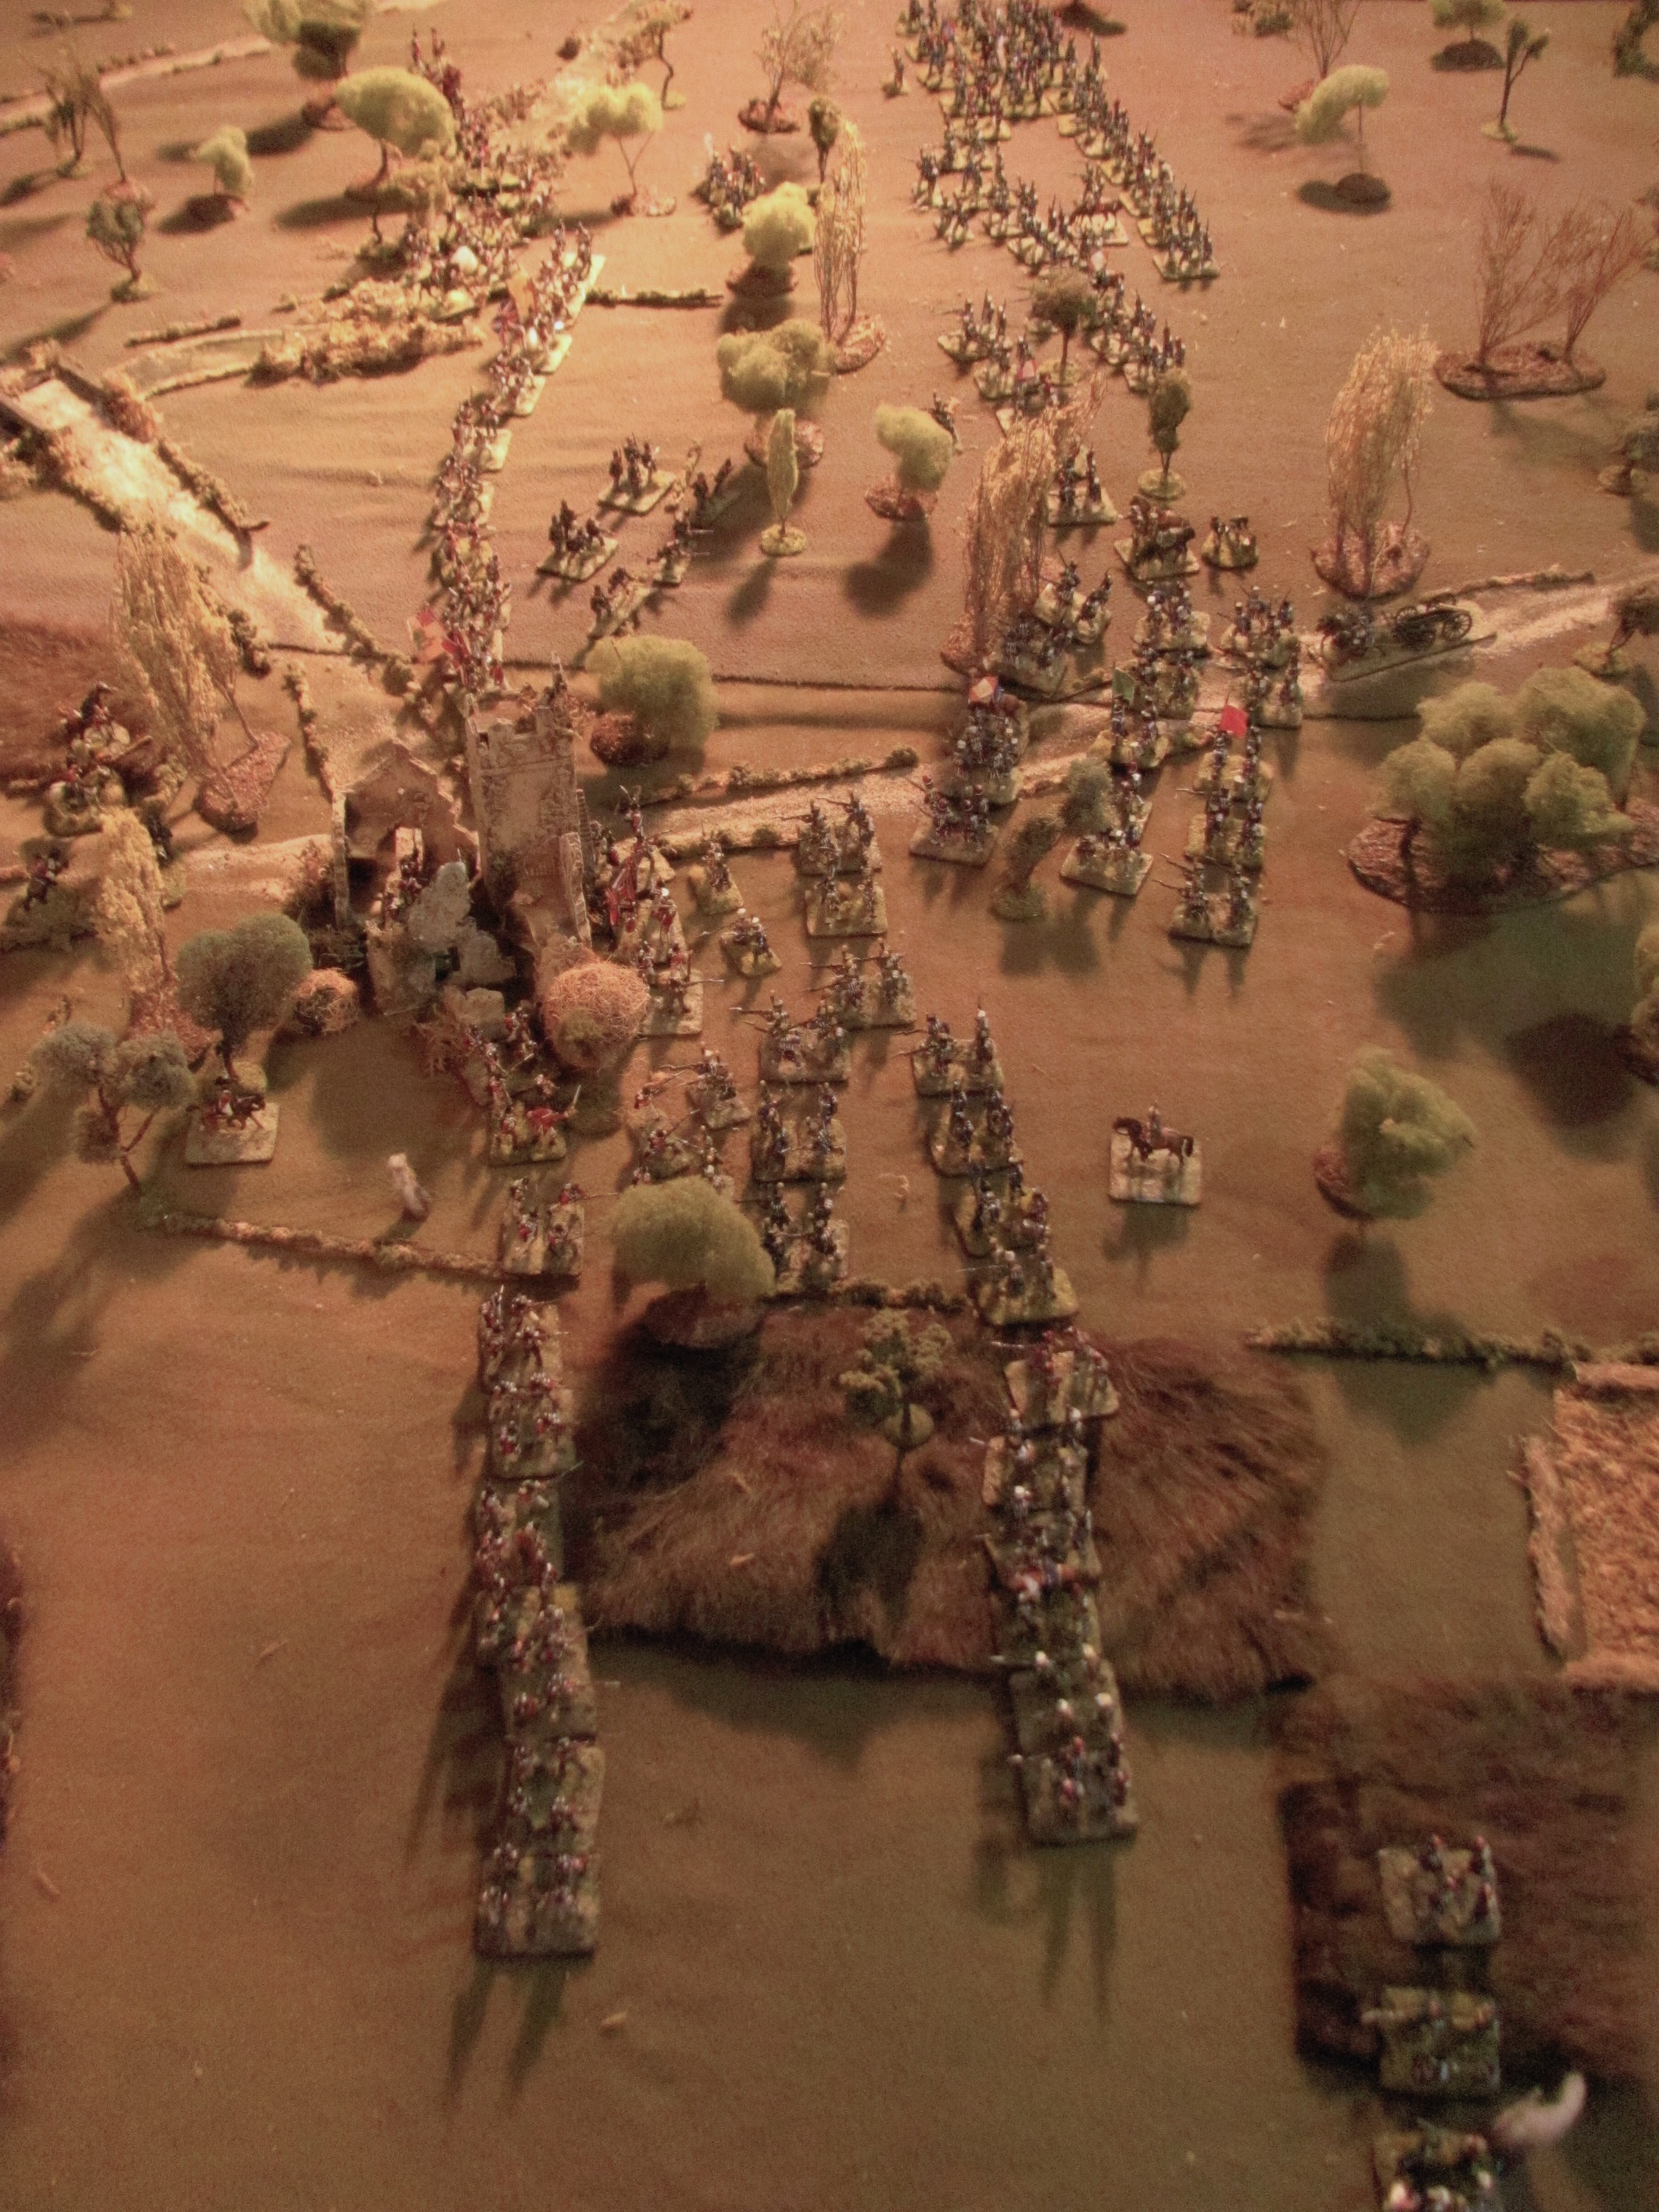
The scenario map showing initial British positions. Laplanne's brigade entered in behind the 16me Legere while Solignac's brigade entered straddling the road. The British were unable to move or send orders until the first exchange of volleys.


1. Napping British

The British rearguard, taking the shade on a hot Spanish summer afternoon amongst the scattered woods and olive groves surrounding the ruined farmhouse of Casa de Salinas (centre left), are completely unaware of Lapisse’s approaching French (upper right).


2. Contact! 

Suddenly the woods are alive with French forces, as the skirmishers on both sides exchange fire. French voltigeurs almost fight their way into the farm, threatening to take Wellesley captive, but the British light bobs manage to hold them off in vicious hand to hand fighting at the gates off the farm.


3. French right

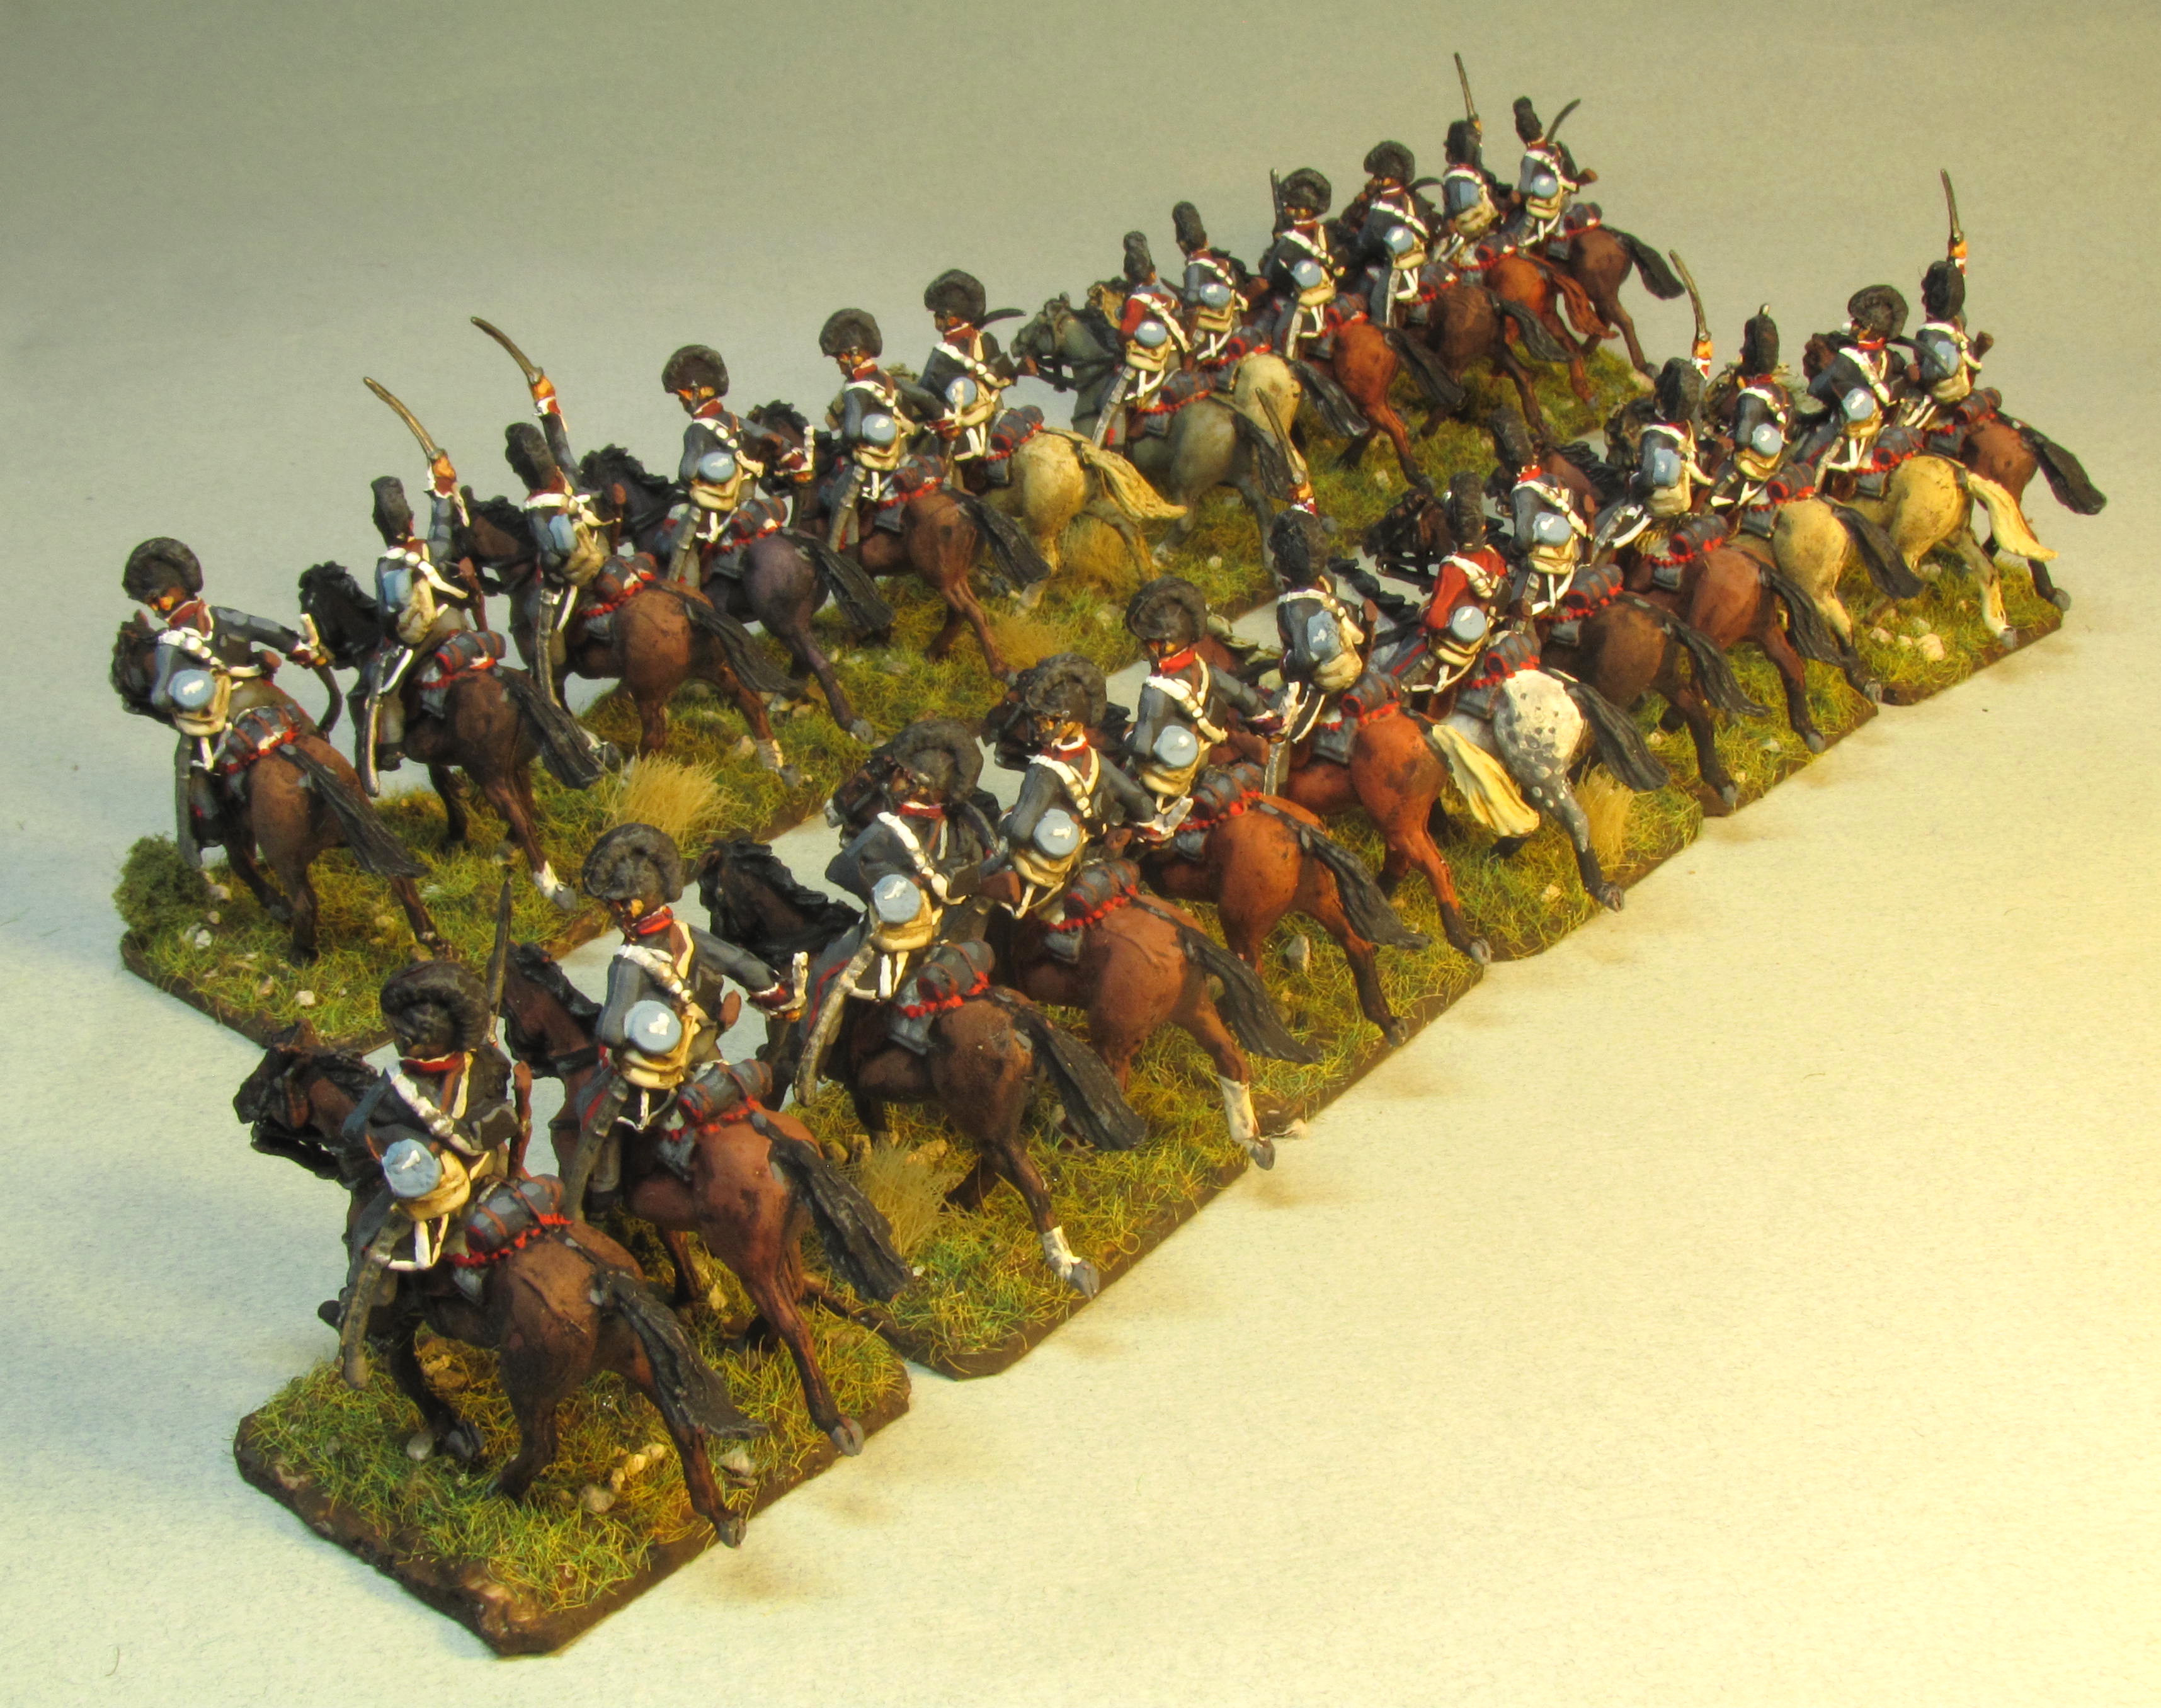
On the French right the six battalions of the 16me Legere and 45me Ligne engage Donkin’s 2nd Brigade (87th, 88th and a couple of companies of 60th Rifles).


4. French left

Solignac’s 2nd Brigade (six battalions of the 8me and 54me Ligne) follow closely behind their skirmish screen with the intention of seizing the farm. The French have a battery of horse artillery with them but it is unable to unlimber in the woods east of the farm and until the farm is seized, unable to move forward.


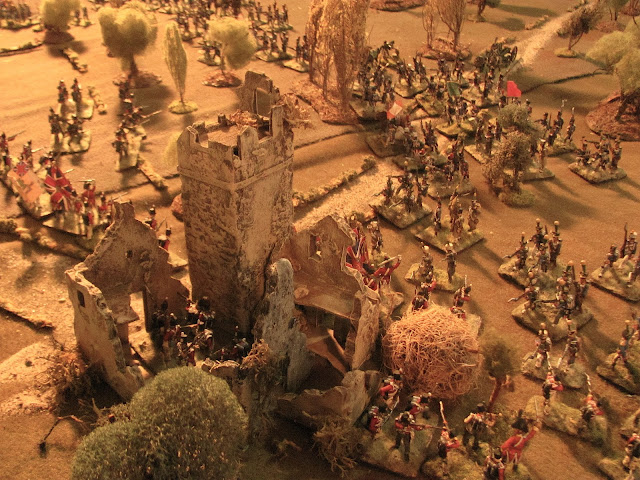
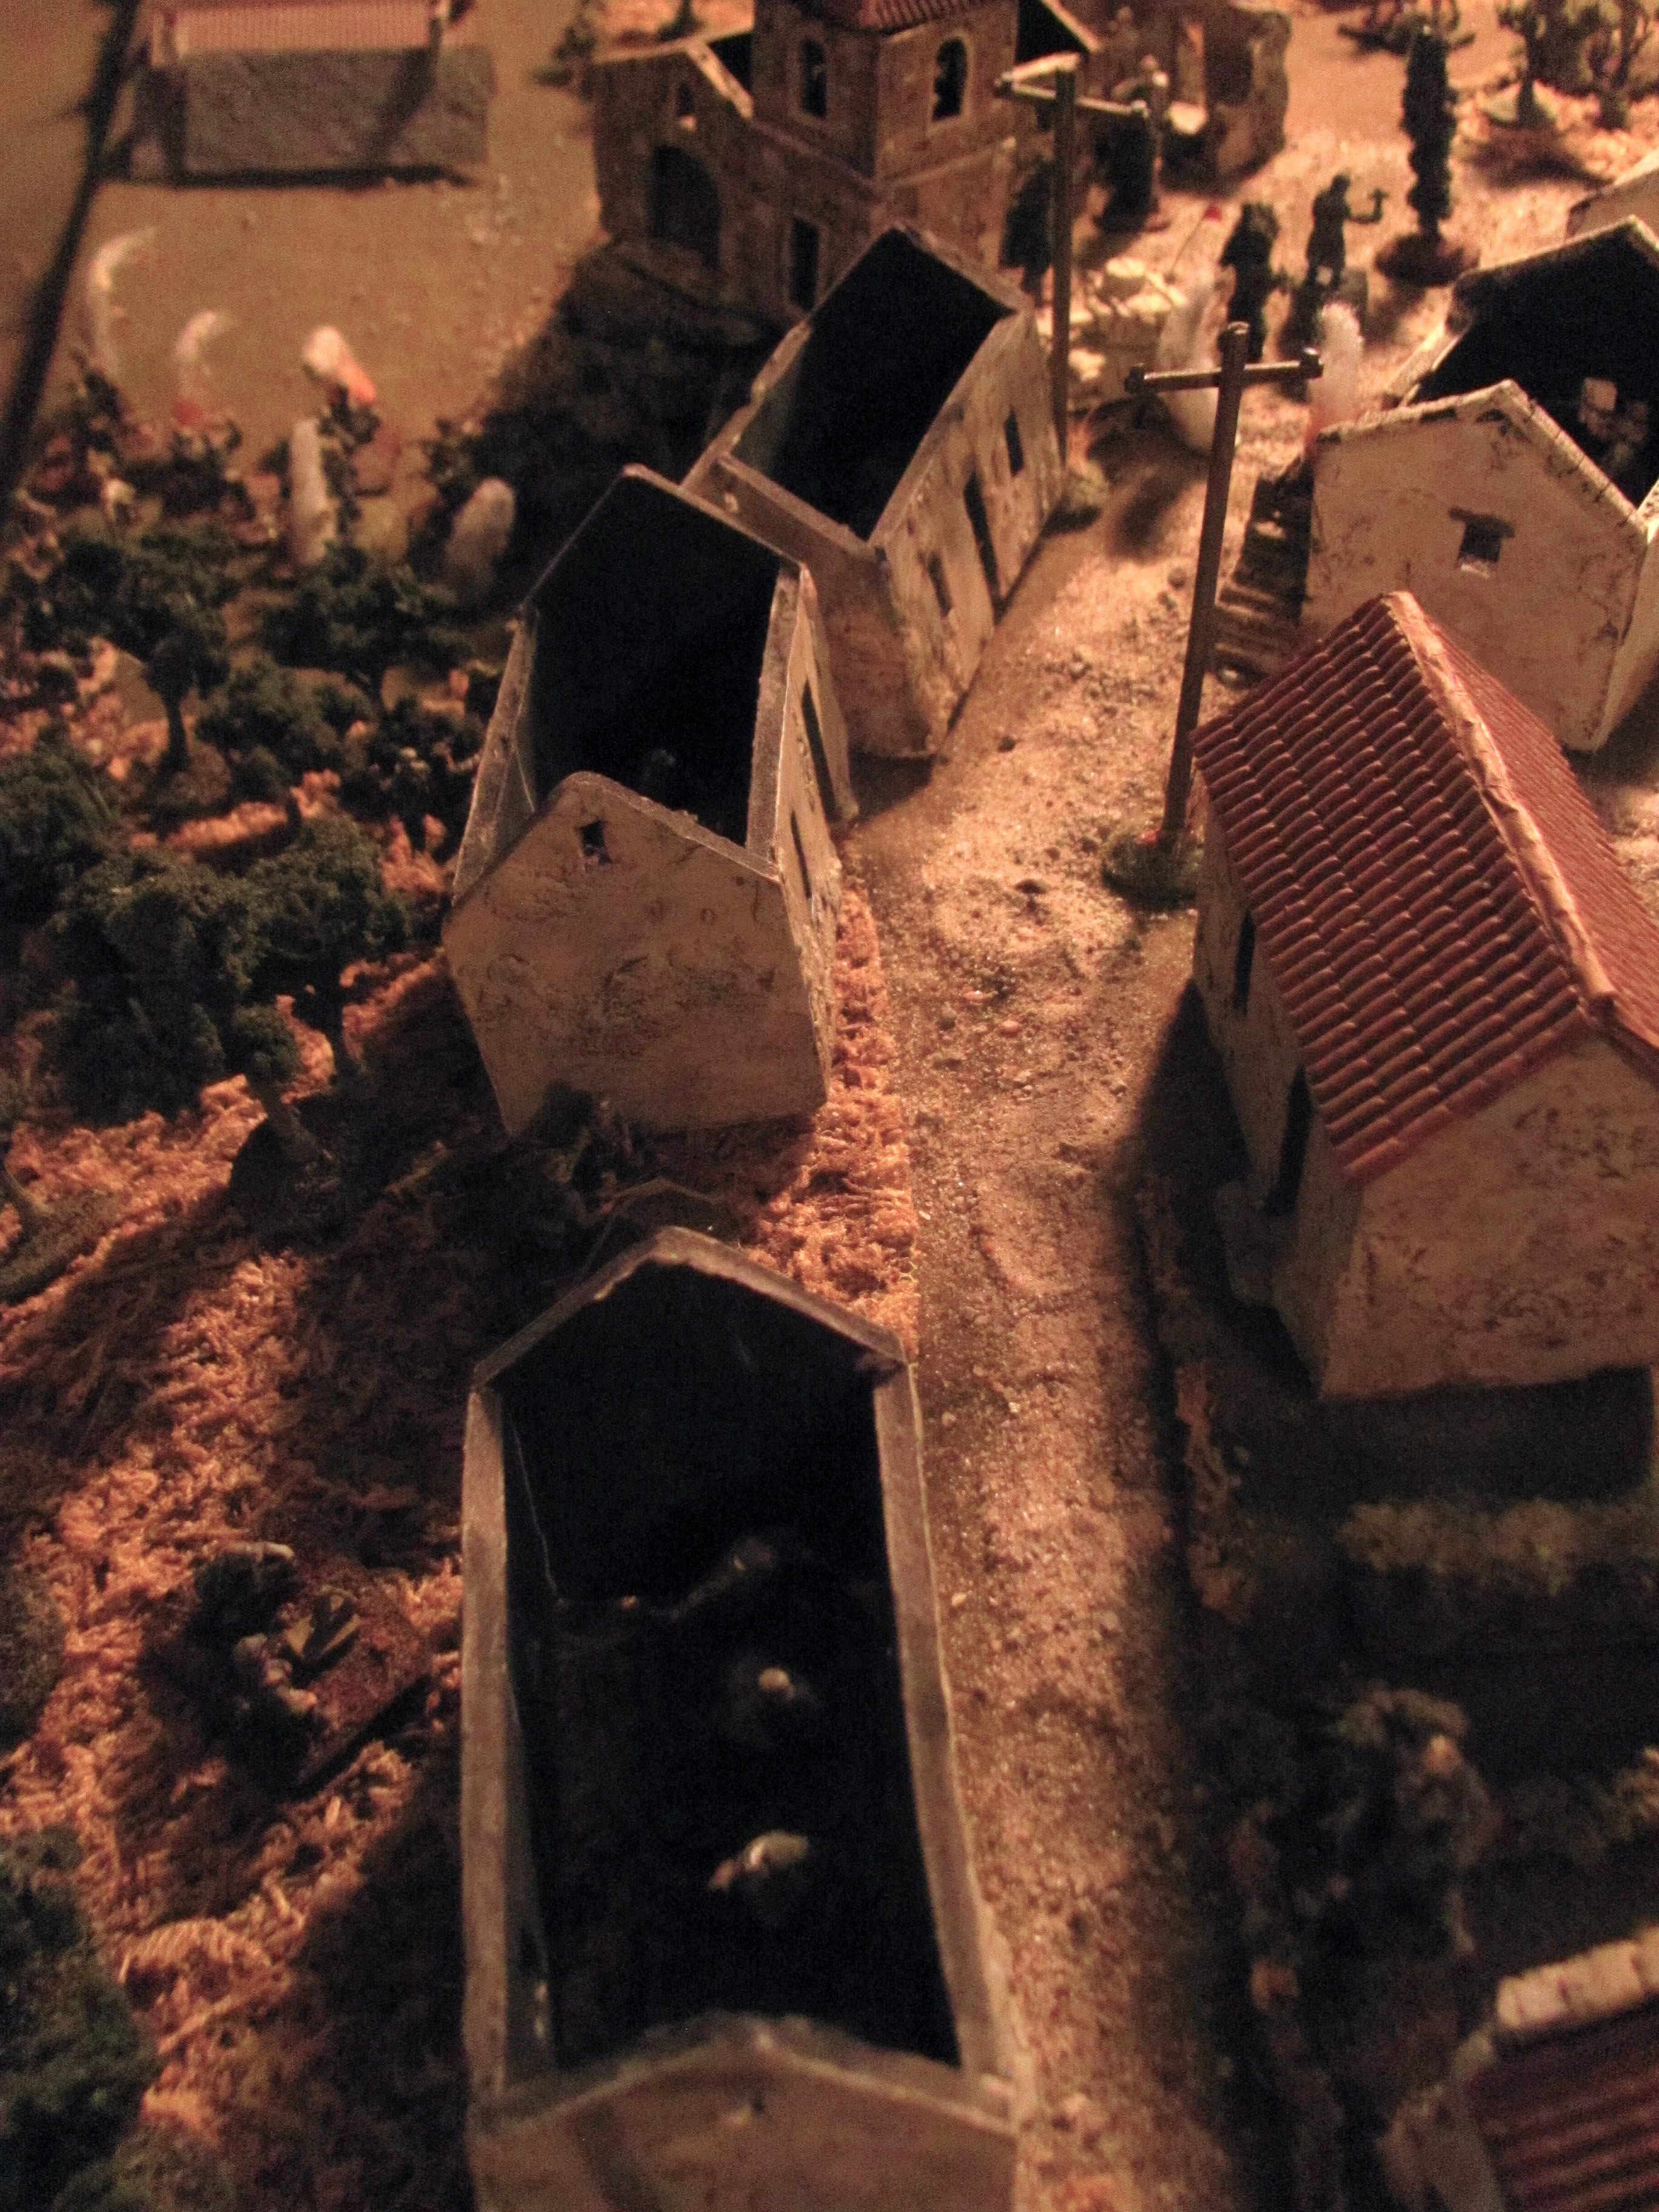
5. 1/45th occupies Casa de Salinas

Finally alerted to the attack Wellesley manages to exit the tower, sending the 1/45th (Nottinghamshire) to occupy the ruined farm and out buildings. 


6. British command

Realizing this is a concerted French attack Wellesley issues a flurry of commands through Mackenzie. The farm needs to be held as long as possible to slow the French advance, but he doesn’t want to fight the French in the woods. To his rear lies Anson’s Light Cavalry brigade, and if the 3rd Division can extract themselves and fall back to open ground then the British horse should keep Lapisse at bay. An ADC is sent out to alert Anson to the French attack and bring him up in support of the British right.

However, Wellesley wants his precious 60th Rifles into Casa de Salinas, so orders them to relieve the 1/45th of their position in the farm.


7. Long ride for the ADC

Anson’s cavalry spot a trail of dust coming from the front lines, soon revealing itself as an ADC clutching orders from the great man himself. But Anson questions the authenticity of the orders, not knowing that Wellesley is with Mackenzie on the front lines, and is slow to respond.


8. Orders mix up

In a further mix up of orders, the 1/45th vacate the farm before the Rifles arrive to take over. With French voltigeurs swarming the woods in front, Guard manages to salvage the situation by throwing his light bobs into the farm before the French can realize that the complex has been abandoned!


9. Solignac’s brigade assaults the farm

Before the British light infantry can get established, Solignac throws his own skirmishers against them. They fight to a stalemate, but badly battered and seeing nothing but French in front, the British garrison panics and routs.

10. 16me Legere advance against the British left

Meanwhile, on the British left Laplanne’s brigade plays cat and mouse with Donkin’s 2nd Brigade. Other than some clashes between the opposing skirmish screens the British, in open order, steadily retreat towards the open ground, loosing long range volleys on the advancing French whose casualties steadily mount.

11. 1st Brigade goes onto the attack

Back on the British right the 60th Rifles, slow to respond, have fortunately arrived at the farm just in time and take over its defence (the third British unit in as many turns now to have it in its possession!) Colonel Guard’s 1st Battalion is sent into the attack, trying to drive back the encroaching French and buy time for the Rifles to get emplaced.

The 2/24th break the 3/54me on the British right and, flush with victory, optimistically surge forward to close with the other two battalions of the 54me.


12. 2/31st broken!

Guard’s 2/31st have less luck, hitting the French on the woods’ edge north of Casa de Salinas. In three rounds of nasty fighting the 1/31st is utterly broken, its survivors fleeing to the rear.


13. 60th Rifles holding off the French

But Guard’s attack has bought time for the Rifles to get themselves in good position in the farm. They drive off one advancing French column with some well aimed fire and repel French skirmishers trying to fight their way in from the east.

14. French 45me go into the attack

On the French right Laplanne’s 45me forms up to attack Donkin’s veteran Connaught Rangers. The opposing skirmishers clash in close combat, and the British get the better of it, routing the French voltigeurs while they themselves withdraw in good order behind their lines.


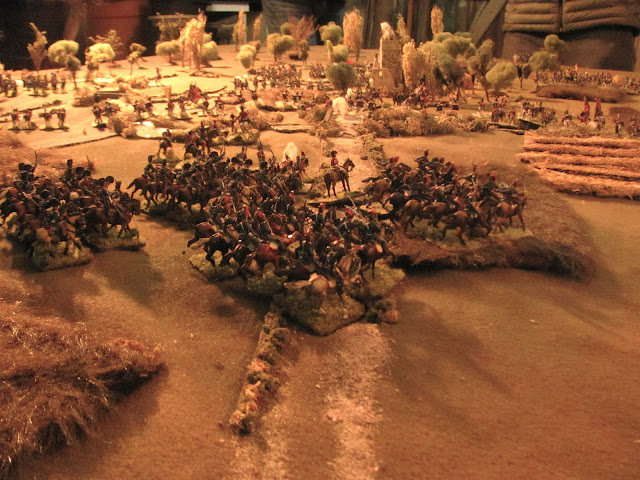
15. British cavalry on the move

Anson, finally realizing that he is sorely needed up front, spurs his brigade forward.


16. Guard’s brigade broken, but so is Solignac’s

The 2/24th’s victory on the British left quickly turns to defeat. They founder on the French line and rout, and combined with the loss of the 1/31st, Col. Guard’s brigade breaks and fails to rally. But Solignac too has taken a beating in its repeated attempts to seize Casa de Salinas, and also breaks and retreats to the rear, leaving only the French right (British left) still relatively intact.


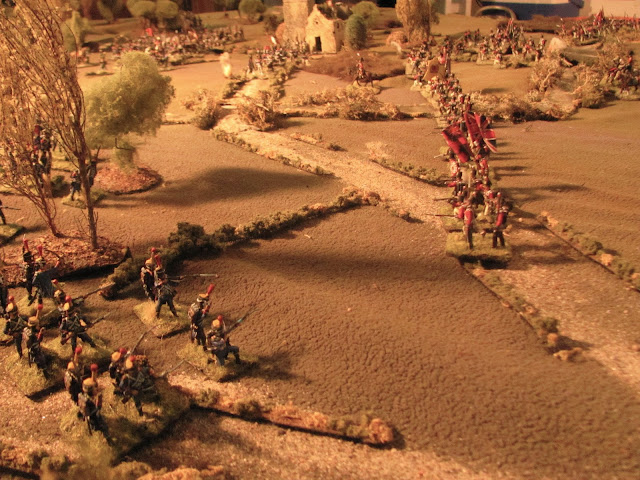
17. Donkin’s brigade in retreat

Despite Guard’s brigade being in retreat, the British are now mostly withdrawn into the open ground with Anson’s horse coming forward in support. All that remains now is for the Rifles to hold out in the farm, buying time for the 3rd Division, bloodied,  to make its way back to the main British line at Talavera.

18. Rifles ousted by 1/45me!

But seeing Solignac’s brigade in retreat and the British slipping away, Lapisse orders Laplanne to seize the farm at all costs so that he can bring his cannon forward to harry the British retreat. Against all odds, the 1/45me launches a last desperate attack against Casa de Salinas and ousts the Rifles from their fortress!


19. Game end

We called it here at the end of the 6th round. On the bottom right Anson's cavalry can be seen riding forward but too late to save Guard's 1st Brigade, broken and retreating. Top right Solignac's does the same while on the left Donkin retreats in good order with Laplanne in pursuit. Centre top the farm has finally fallen to the French.

With the farm taken and Col. Guard’s brigade broken, the French had achieved both of their victory objectives. However Solignac’s brigade was also broken and Laplanne’s brigade had taken a beating in its steady pursuit of the retreating British and was close to collapse. 

We decided, however, that the British intent was to buy some time to be able to extricate themselves and retreat to Talavera in relatively good order, so to go on the offensive against a spent French force that wasn’t wasn’t about to pursue into open ground (Donkin’s brigade was also tottering) made no sense.

The entire game was a whole lot of fun, from the surprise attack at the beginning that very nearly had the chance to capture Wellington to the order mix ups that left the fulcrum of the game, the farm, unoccupied to the final French push that seized the farm against incredible odds.

Saturday, September 3, 2022

Galatas Counterattack, Crete, May 25, 1941

 We were back into the Battlefront WWII scenarios again this week, picking up where we left off with the second of the two Crete scenarios I wrote a number of years ago. Five days after the landing of German paratroops on the island and securing Maleme airfield the Germans have steadily built up their presence on the island. Pushing strongly against the Galatas line, the Germans successfully seize Galatas, ousting the NZ Composite battalion (a battalion made up of anti tank gunners, engineers and support troops) along with 18 Battalion from their positions around the village and successfully threatening the entire Galatas line. 

But before they can consolidate, two Vickers VI’s of the 3rd Hussars do a run through of the town, guns blazing. Returning with the news that the town was “stiff with Jerries”, C and D Cos. of 23rd battalion are queued up for a counterattack, supported by the tanks. An ad hoc company formed of elements recently ousted (18 and 20 Battalions along with the Composite battalion) joins in, eager for revenge.

The battle was fought on a board 4.5’ square in 1/72nd scale, using the BF WWII ruleset. The scenario can be found here. As it was fought at night we used night rules, meaning that all encounters would be at very short range and morale tests done at one rating lower to represent the confusion of the attack. As well the German defenders, although outnumbering the attackers, begin disordered for the first two turns as they had yet to have established their defence and were taken completely by surprise by the night attack!

The Battlefield

The battlefield as seen from the New Zealand side of the board. The German defenders occupy the village, at the top of the photo.


Galatas

The village itself where all the fighting will take place. The objective for both sides is to hold/ take this from the enemy by game's end. 

The Defenders

The German defenders consist of elements of the 1st and 2nd Battalions, 100 Mountain Regiment (front two units) and elements of Ramcke Group made up of veteran German Fallschirmjaeger (back).

New Zealand starting positions

C and D cos., 23rd Battalion, are right on the edge of the village ready for their attack (top) while across the stream the ad hoc company prepares to follow up (right, by bridge). Dug in on the lower left is D Co. of 20th Battalion, not historically part of the attack but available to the NZ player if desired. However, employing these troops limits the NZ player to a draw result at best.


1. Queuing up the attack
Under cover of darkness C and D Cos., of the New Zealand 23rd Battalion creep up through the orchards and vineyards surrounding Galatas. The order goes around to fix bayonets.


2. Galatas' outskirts rapidly taken

German Fallschirmjaeger of Ramke Group are holding the buildings east of the village. They are taken by surprise and rapidly ousted by the Kiwis.


3. Following up

With the buildings secured the Vickers VI of the 3rd Hussars' rolls forward in support.


4. Paras ousted

Seeing the surviving German paras flee back through the village, fear and uncertainty spreads amongst the defenders. (Green chips are hidden unit markers.) The 2nd Battalion, 100 Mountain Regiment, occupying houses deeper in the village, panic and abandon their positions to fall back in confusion towards the main German line.


5. Mountain troops encountered

As the New Zealanders push into the main village German mountain troops of the 1st Battalion scramble to put up a defence.


6. And hold!

The tank is driven off as the defenders put up a solid defence in the town square. NZ troops move in to try and oust them.


7. Ad hoc company advances in support

From across the stream the ad hoc company surges forward in support of D and C Cos.


8. Vickers supports attack on south side of village

Rallied, the Vickers lends its support to troops as elements attack from the south side of the village.


9. Moving deeper into Galatas

Maintaining their momentum and buoyed by the arrival of the ad hoc company, C and D Cos. push deeper into Galatas, attempting to clear the houses around the main square. But the German defence is stiffening after the original surprise and shock of the night attack.


10. 1st Battalion breaks!

The troops of the German 2nd Battalion are finally rallied and scramble back to their positions just as most of the 1st Battalion suddenly breaks and flees into the darkness.


11. Second Vickers called in

But both C and D Cos., beginning under strength, have seen their casualties mounting. Even with the arrival of the ad hoc troops, Major Thompson fears the attack is faltering and calls in for the support of the remainder of the 3rd Hussar troop. (The commitment of the second Vickers means that the best the NZ player can now hope for is a minor victory. Historically the remainder of the 3rd Hussar troop never participated.)

12. Ousted from Galatas

Joining the fleeing paras, the 1st Battalion Mountain Regiment also panics and flees. Although managing to rally, bad maneuver rolls kept both units unable to seriously rejoin the battle and eventually they exited the board.


13. Battling it out on the north side of the town

A vicious battle ensues as the defenders fight to take back the houses on the north side of the square (bottom). A German mortar strike on the position (one of the few successful indirect fire missions managed in the dark) provided the opportunity for elements of the German 2nd Battalion to regain a foothold there. They successfully threw back a concerted counter attack before finally being ousted by the New Zealanders a second time, this time for good.


14. 2nd Battalion moves into positions in the south part of Galatas

Spotting the enemy infiltrating troops through the orchards south of Galatas, 2nd Battalion repositions, placing some units in the gardens on that side while consolidating their hold on the southwestern half of the village


15. Vickers KO'd in close combat

As the second Vickers rolls up in support of this flanking attack it is KO'd in close combat!


16. Mopping up around the town square

But the NZ attacks are relentless and a last concerted push by the Kiwis clears most of the still-occupied buildings in Galatas.


17. Last ditch German attempt to throw back the enemy

The Germans throw everything into a last ditch effort to recover the lost ground...


18. End of battle

But to no avail. A final poor maneuver roll by the German player (the last among many!!) left his 2nd Battalion, now over 50% casualties, disordered meaning the NZ player could claim a minor victory for having ousted any undisordered enemy from the village.

But it had come at a high cost, including the loss of one of their precious tanks and 50% of both D and C Cos. Historically Galatas was retaken by the New Zealanders on this night, at a high cost to both sides but then the position was deemed too vulnerable, and abandoned, much to the disgust of the men who had fought so hard to take it. Crete would be exited by the Allies nine days later.