Last week we played the second scenario in Jonathan Jones’ O’er the Hills Peninsular War scenario book. This is the third time I have played this scenario, and it has always proved to be a very hard nut for the French to crack! This attempt was no exception, but it was still fun to play.
We made a few small tweaks to the scenario. We pushed the French grenadier fatigue hit values up and the British Rifles down to conform with the ratings system in Over the Hills 2nd Edition. We also assigned the small Rifles battalion to Acland rather than Fane as this is where Oman appears to place them. Finally there is evidence that Kellerman’s grenadiers were eventually supported by more guns, so we gave the French an additional battery.
The game was played on a 6’ X 9’ table with my 1/72 scale miniatures using the Over the Hills rules.
 |
| Scenario map, with the French lines of attack indicated. The British movement primarily consisted of shifting their right towards the centre and holding tight. |

1. Vimeiro Hill
The British array themselves in battle order along the heights of Vimeiro Hill as the first French begin to arrive.

2. British right
On the British right the 9th Foot on the ridge line, observes Charlot’s troops as they emerge from the woods. The 52nd stay out of sight behind the ridge.

3. British Centre
The 97th, with the 43rd in reserve behind the ridge, occupy the British centre.

4. Dragoons on far right
The British 20th Light Dragoons, along with a regiment of Portuguese Dragoons are placed on the far right.

5. British Guns
Wellesleys’ 6 pdrs. are at the extreme end of Anstruther’s position. Only hand-hauled in this scenario, they were not allowed to start in an ideal position at the beginning of the fight.

6. British left
Fane begins to the left of the 9 pdr. battery with his 50th in line and the 65th and 50th Rifles thrown out front. Acland’s two company unit of Rifles (in red for this game) is also out front in this picture, before we decided he should be assigned to Acland.
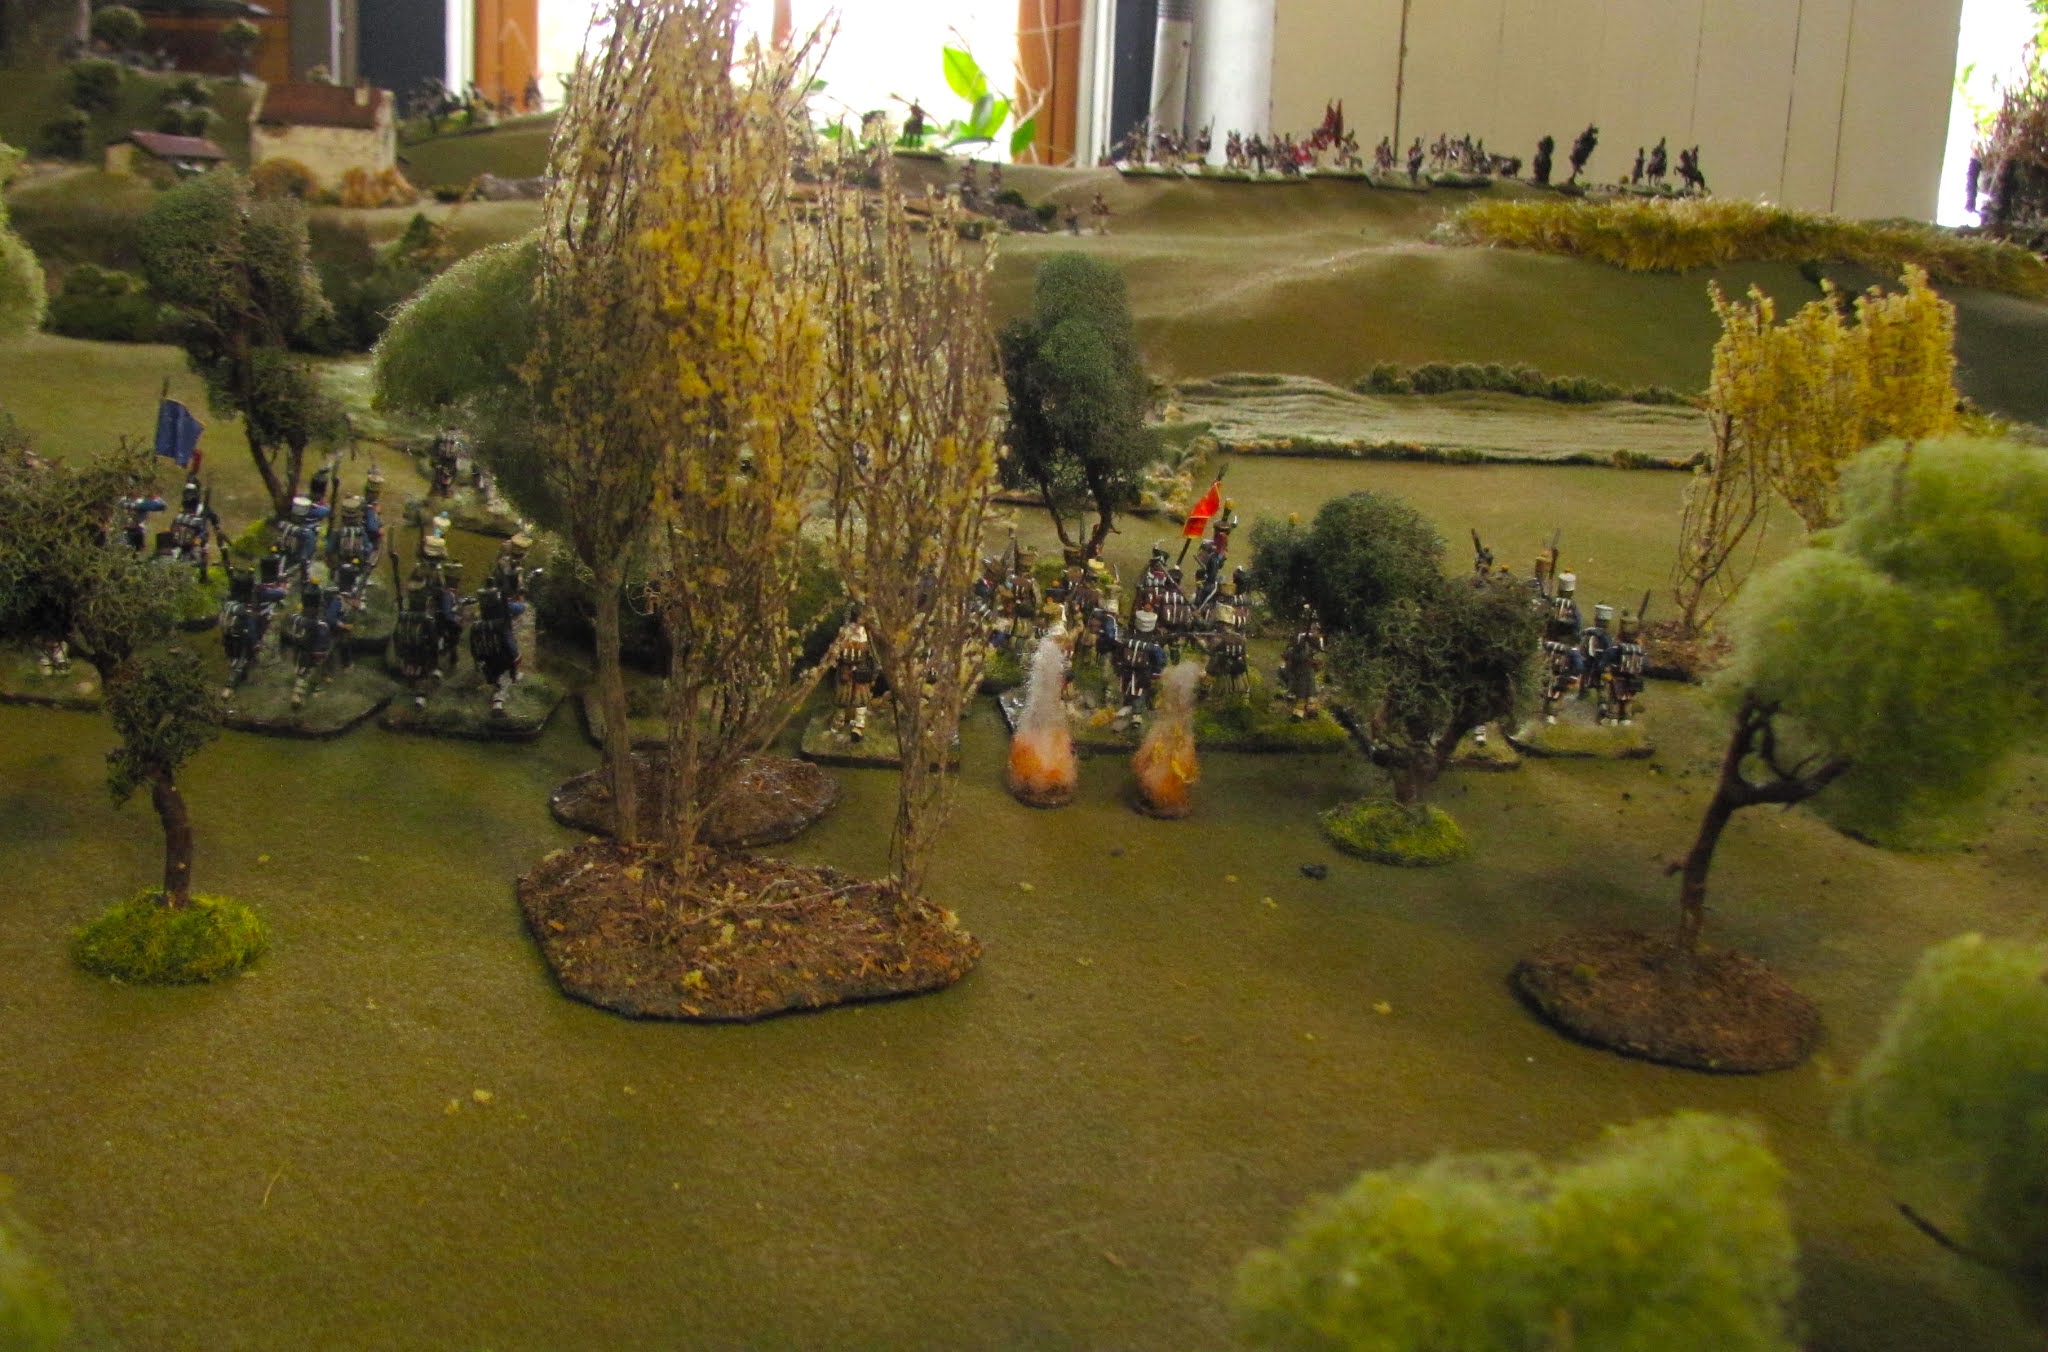
7. Charlot marches out of the woods
Junot’s plan is to send Charlot onto the British far right, hoping to gain the ridge and then roll the enemy up with the help of St. Clair’s and Kellerman’s grenadiers.

8. Thomieres advances towards Fane
Meanwhile Thomieres would demonstrate on the British left, pinning Fane and hopefully drawing off the Allied horse to this flank with the help of the Dragoons.

9. French right (Overview)
Thomieres advances in column with his voltigeurs thrust out in front while the small Swiss battalion (4th) march up the road towards Vimeiro.
 10. Allied cavalry sallies forward
To buy time to draw Anstruther’s brigade and the 6 pdrs. closer to the centre, Wellesley sends out his cavalry towards Charlot, who responds by forming square with the 3/82me.
 11. British 6 pdrs. open fire on Charlot
The British gunners begin hand-hauling their guns in from the far right, pausing occasionally to fire a salvo at Charlot’s brigades.
 12. Anstruther marches to centre
Anstruther moves towards the centre (left) while Fane pulls back his skirmish line as French dragoons arrive on the French left (top right)
 13. British right
The Allied horse shift left as well, maintaining their presence between Charlot and the guns. In the upper left the French grenadiers arrive.
 14. The 97th form line behind the British 9 pdr. battery in the centre
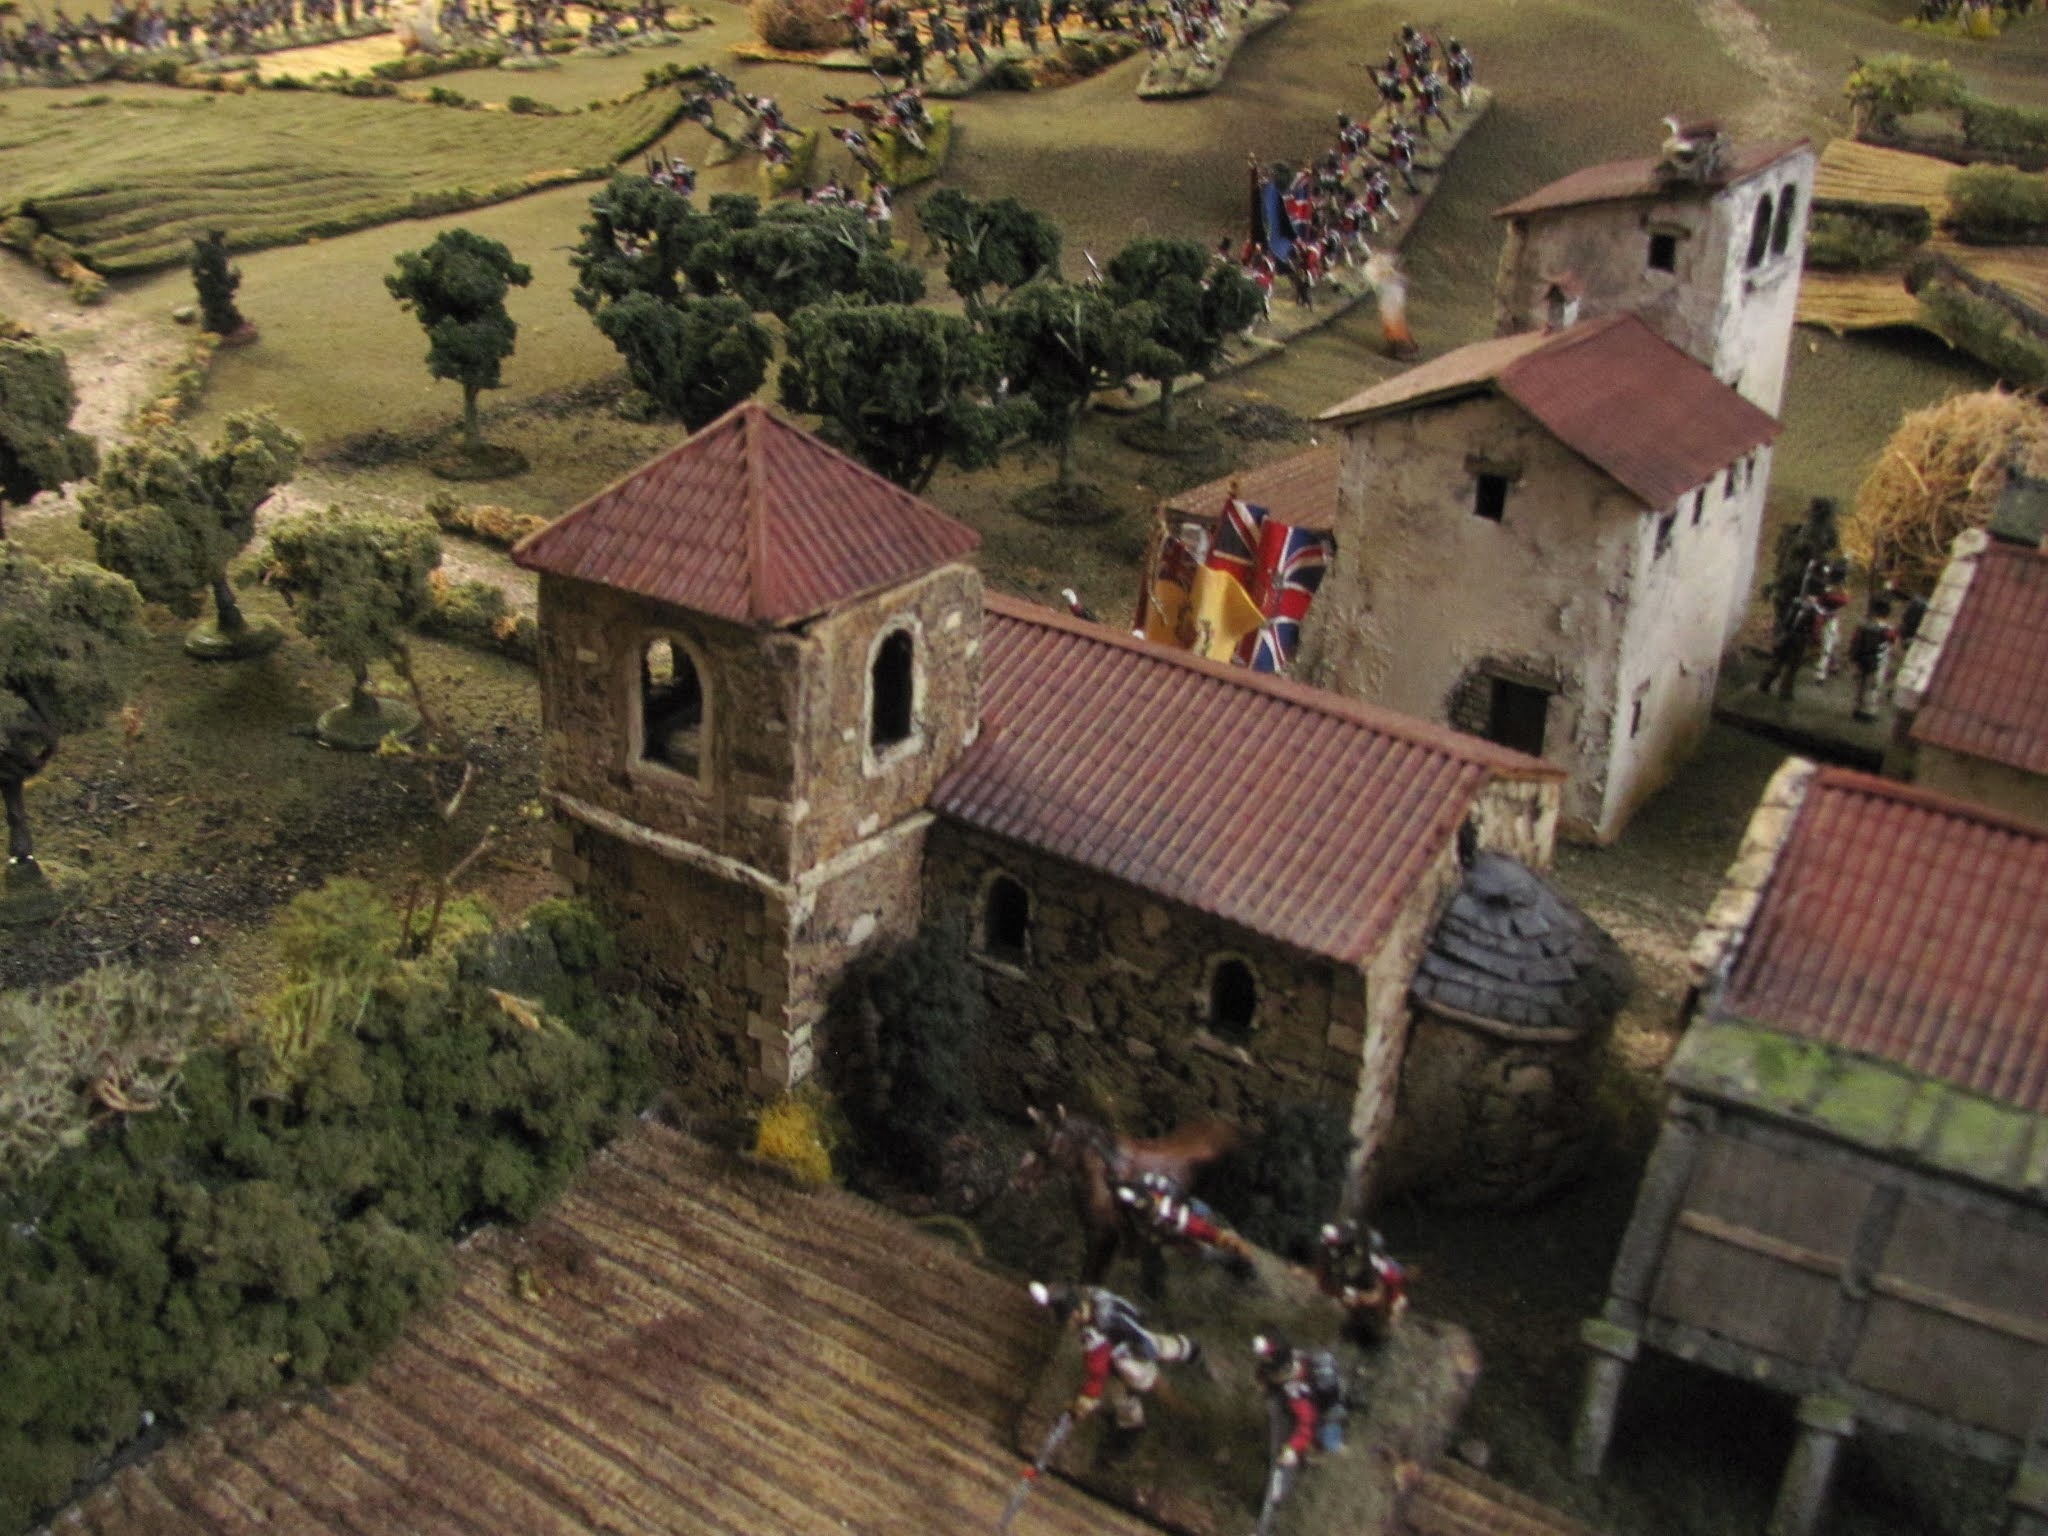 15. Acland occupies Vimeiro
Meanwhile, on the British left, Acland arrives to garrison Vimeiro with his four companies of the 20th while his 2nd link up to Fane’s left.
 16. French Dragoons arrive
The 5me Provisional Dragoons appear before Vimeiro as the 4th advance in column on the right side of the road.
 17. Grenadiers march on centre
Kellerman’s grenadiers and guns also arrive, advancing behind and to the left of Thomieres’ troops, who are now shaken out into line.
 18. St. Clair’s grenadiers follow up Charlot

19. Overview (French)
In the foreground Margaron’s brigade of dragoons, now in columns of squadrons circle in on Fane’s left while above them Thomieres, now in line, demonstrates at Fane’s front.
To the left of the small woods in the centre Kellerman’s grenadiers advance while above that St. Clair and Charlot also advance.
Far top centre Charlot’s 3/82me, no longer in square, maneuver onto Wellesley’s right while avoiding the Allied horse, who are protecting the 6 pdrs. (top right) making their slow way back towards the British centre.
 20. Dragoons sweep in on British left while Swiss approach Vimeiro

21. Overview (British)
Upper right the 6 pdrs. link up again with Anstruther’s brigade before Charlot can contact them. Freed up, the Allied horse gallop to the British left, with the Portuguese moving in front to threaten Thomieres while the 20th Light Dragoons (centre right) form column of squadrons on the ridge in support of Fane and Acland (bottom right).
 22. Close up of British left
Fane and Acland have put the 50th and 2nd into squares with supporting fields of fire on the British left while the 95th form a skirmish line out front (our house rules allow skirmish troops to evade horse if within 6” of formed troops and give no Zone of Control to squares).
Bottom right Acland’s skirmishers have moved into the orchards in front of Vimeiro to harass the French Dragoons’ flank.
 23. Brave Swiss
Spotting the British skirmishers firing from the orchards, the 4me Regiment de Suisse begin to cautiously advance past the vineyards on the village outskirts, eventually driving Acland's Rifles into Vimeiro.
 24. Acland’s Skirmishers in orchard
 25. British squares
 26. Bringing up Kellerman’s guns
 27. Thomieres demonstrates in front of Fane
 28. French left closes
With the Allied horse gone Charlot and the grenadiers begin to close in on Anstruther. Upper left the 3/32me take some heavy shelling from the 6 pdrs. on the ridge.
 29. Charlot’s skirmishers crest ridge
In advance of the 3/82me, still making its circuitous route to the ridge, Charlot’s voltigeurs close on the British 6 pdr. battery.
 30. 52nd and 43rd moved over in support
In response to the arrival of the French on this flank Anstruther sends back his 52nd and 43rd to engage. The French are driven back with heavy casualties but the 52nd slips out of command range and is unable to follow up.
 31. French Dragoon regiment broken
Margaron sends in his first regiment against the 20th, but the flank fire from the squares coupled with the 20th’s countercharge destroys it.
 32. A second clash
A second attempt is made but this too is driven off. Both sides, winded, fall back to recover.
 33. 9th breaks 3/32
Meanwhile in the centre Charlot’s 3/32me and the French grenadiers clash with Anstruther and Fane’s 60th Rifles. A series of attacks and counterattacks leave the 60th broken on the British side and the 3/32me and one of St. Clair’s grenadier battalions broken and one of Kellerman’s battalions routed on the side of the French.
 34. Grenadiers clash with 97th
St. Clair’s second grenadier battalion clashes with the 97th, who is routed. But a counterattack by the 9th (on right) breaks St. Clair’s second battalion, leaving only Kellerman’s grenadiers on the field.
 35. 9th watches as Kellerman's grenadiers fall back
The French attack has left a huge hole in the British centre, but at too great a cost. Kellerman falls back to regroup as Wellesley hastens to stop the routing 97th from leaving the field.
 36. 1/50th square is threatened
As the French attack on Anstruther loses steam Junot attempts to force the British left. Thomieres’1/86me shifts left and forms column of divisions, preparing to try to break the 50th’s square. At the same time he begins to shift two of the three remaining regiments of French horse to the centre.
 37. Thomieres' voltigeurs exit
Earlier Thomieres’ voltigeurs, badly mauled by the British 9 pdrs., had routed and now exit the field. But Thomieres still has two intact battalions plus the small Swiss contingent.
 38. Portuguese dragoons trapped in front of own lines
The Portuguese dragoons find themselves trapped and unable to maneuver in front of Kellerman’s guns, which, inching forward, have moved into canister range.

39. Overview
At the bottom - In front of Vimeiro the Swiss still occupy the orchards, just out of sight of Acland’s 20th and Rifles holding tight in the village.
Above this Thomieres 2/86me cues up a charge on the 50th’s square while just above the Portuguese horse suddenly find themselves boxed in in front of the French guns.
Centre top Anstruther and Kellerman battle it out while at the top right Charlot’s remaining battalion faces off against the 52nd and 43rd.
 40. French guns charged
In a desperate move to break out the Portuguese horse charge the French guns. Fire from both the 1/86me square and the guns decimate them and they flee the field.
 41. 50th square is driven back but survives
The 65th Rifles move back into line between the two squares in support, but Thomieres’ attack drives back the 50th square. Amazingly, however, the square survives. Thomieres pays a big price for a small victory as simultaneously and in support, the 1/86me charge the British cannon, and are driven back with heavy losses.
A second charge routs the 50th, and this time a French Dragoon regiment charges the cannon and in turn are driven back and eventually broken by canister fire.
 42. French attack on British right collapses
Despite the 2/86me success in finally routing the 50th the left flank attack collapses. Thomieres 1/86me are routed by a volley and charge by the 95th while a third dragoon regiment is routed by small arms fire from Acland’s troops on their flank.
 43. Final clash
In a final and spectacular clash between the remaining dragoons on both sides, the French break the British horse…
 44. 9th broken!
And carry their charge on into the 9th, who are overrun and scattered.

50. Final overview
At the bottom Thomieres brigades and all but one of the Dragoon regiments are routed or in retreat, with the sole exception of the Swiss, bottom right, cut off and surrounded by Acland as his forces move forward from Vimeiro. Above the last French dagoon regiment falls on the rear of the British 9 pdr. battery after it broke the 20th Dragoons and the 9th Foot. The battery will also fall to this regiment before they, too, withdraw from the field.
So with St. Clair gone, the Dragoons broken (two units broken, one routing) and Thomieres broken (one large battalion at 11 FH routing and the voltigeur battalion at 5 FH routed off the board, leaving only the second battalion at 11 and the Swiss at 4) the French have had three out of five brigades broken, forcing them to withdraw. The British, on the other hand, have had one brigade lost (the horse) with two others having lost one battalion each (the two routing battalions were rallied), leaving them fimly in control of both Vimeiro Hill and Vimeiro village.
As was mentioned at the outset, this has proved a hard nut to crack in three games now. The terrain of Vimeiro Hill render the horse less useful than they might normally be, and, as was historically the case, Junot, by splitting his forces fails to have the troops necessary to defeat the British at Vimeiro. The hill itself in this game, allowing the British to form a very tight perimeter, meant that the French would only overcome one line of defence to come up against another.
Next time we plan to take on the linked scenario from the book representing the flank attack at Ventosa. Perhaps this time the French will have more success!
A stunning looking game, great terrain. Only played this battle once, in 15mm using Black Powder rules if I remember correctly.
ReplyDeleteThanks, Tony. It played out well in OTH (which JJ's scenario was written for). As the French player is still getting accustomed to the rules we dispensed with orders.
DeleteBill, a beautiful table and a pleasure to read.
ReplyDeleteThank you, Norm. And thank you for taking the time to read it! I’m surprised anyone would...😁
DeleteLovely narrative very nice field of battle well done
ReplyDeleteThank you, Pete. The tables are always a pleasure to build and the reports just value-added for me, as I get to play through the game a second time and create order out of the chaos of the fight.
DeleteHi Bill,
ReplyDeleteEchoing the comments above, what a fantastic looking game you have produced, well done. Yes Vimeiro Hill is a real tough nut for the French to crack, reflecting what a terrible battle it was for them in reality and the French only saved from a British pursuit afterwards by the interference of Dalrymple and Burrard, so I was interested to see how your tweaks affected matters.
I’m not sure there’s much else you can do to benefit the French especially after Junot has split his army with no contact between the two wings, and your French force certainly seems to have given a good account of itself despite its losses.
Great write up and I will put a link up on JJ’s when I get a minute.
All the best
JJ
Hi JJ,
ReplyDeleteAgain, thanks so much for the great scenarios. It is a terrific resource for our Peninsular war gaming. I'm glad you enjoyed the report. The British will doubtlessly miss the loss of all of their "eyes and ears" - perhaps that contributes to Dalrymple and Burrard's reluctance to pursue. :0)
Bill
either you don't like making scenery or someone brought his minis
ReplyDeleteCryptic! I confess to enjoying making scenery and the minis are mine.
DeleteThat fight between french dragons and british light dragoons is a real moment of history! Very nice, indeed.
ReplyDeleteThank you, Philotep. That bit was an interesting stand off, with the British Dragoons sheltering behind the British squares to fend off the vastly superior number of French Dragoons.
DeleteReally enjoyed reading this AAR and going back through your earlier battles.The look and layout of your games is fantastic.
ReplyDeleteI am thinking of taking up the OTH Rules. I hope you don’t mind if I ask you a question? From your photos I can’t see there are are any markers on the table to record fatigue. How do you go about this in your games?
Hi Morty,
ReplyDeleteI would certainly recommend OTH. I like a lot about these rules, and there are a number of options to make games as simple or complicated as you like. The fatigue hits are probably the most interesting aspect to OTH, but I also like very much how skirmishers are represented on the table top.
To answer your question, those small explosions markers you see in the pictures are individual fatigue hits with figures representing 3 or 5 depending on whether they are prone or standing. I’m not a big fan of plastic markers or dice on the table. The explosions are a carry over from my WW II gaming, but next game I’m shifting over to bushes mounted on washers - hopefully not too subtle!
What a fabulous game on such a beautiful looking table! Always great to see such wonderfully painted 1/72 figs in action. Your photographs are tops and add to a really entertaining report.
ReplyDeleteRegards, James
Thanks, James. And I'm glad you enjoyed the report!
DeleteOne word, gorgeous! I have fought over this ground more than any other, I think.
ReplyDeleteThanks, Jonathan. Me too, four times now!
Delete