Thursday, June 29, 2023

Pajar Vegara Redoubt, Battle of Talavera, 28th July, 1809

We moved on to the fourth scenario in O'er the Hills, Jonathan Jones Peninsular War scenarios book, the attack on the Pajar Vegara Redoubt. After the failed morning attack on the British left Victor was back at it, launching a major attack a few hours later. This scenario is just a small part of that larger action, intended as a pinning attack by Leval's 2nd (German) Division on the British right which ended up drifting closer to Talavera, emerging from the olive groves in front of the Pajar Vegara Redoubt at the intersection of the Anglo/Spanish lines. 

The game was played on a 6'X4.5' table using my 1/72 scale toy soldiers, including the newly minted German Division, the result of several months labour at my painting table. As always, we used the Over the Hills ruleset.

The scenario map. The redoubt commands a low hill in the centre of the battlefield and is the objective of Leval's IV Corps, 2nd Division. The British forces are bottom left, the Spanish bottom right, well back from the guns in the olive orchards. Although the Portina Stream is dry and presents no real obstacle, on the right of the battlefield are the stonewalled enclosures marking the outskirts of Talavera.


The Anglo/Spanish line

The Anglo/Spanish forces begin the battle west of the Portina stream, a dry creek bed which had little impact on the battle. These forces are just west of Talavera, in and around the orchards, and mark the intersection between the Spanish and Anglo armies. On the east side of the Portina (left) a redoubt has been hastily built housing an Anglo/Spanish battery, the Pajar Vegara Redoubt. It commands a low hill in this area. To the south of this (top of picture) can be seen the edge of the walled enclosures that indicate the outskirts of the town.


The Redoubt

The redoubt house a British battery of 3 pdrs. and a half battery of Spanish 12 pdrs.


The Redoubt, looking east towards the orchards which are still concealing the advancing enemy.


3rd Spanish Division on Anglo/Spanish right

The Spanish general, Portago, forms up his troops in attack columns, with his light infantry (Cazadores de Antequerra) spread out in front in skirmish formation. These are followed by his provincial militia (Badajoz and Guadix) and safely back where they can get up to no mischief after their fiasco the previous night (firing a hasty volley at a French cavalry patrol and then running off, looting the baggage train on the way), three newly raised and untested militia battalions, two from Badajoz and the third the Imperial of Toledo. The El Rey Line Cavalry Regiment are positioned at the rear.


British on left

Campbells’ troops (1st and 2nd Brigades, 4th Division) are arrayed in open order in the orchards west of the Portina, on the left and to the rear of the battery.


German Division advances through olive groves

Leval’s 2nd (German) Division of IV Corps has arrived in the olive groves just north of Talavera. Originally intended as a pinning move on the British right the broken ground seems to have caused them to drift further south, emerging directly in front of the Pagar Redoubt. The 3rd Brigade (Hesse Durmstadt and a small Frankfurt contingent) are on the German left (top) closely followed behind by 4th Brigade’s Poles. Centre is 2nd Brigade (Dutch, in white, approaching road) while on the right (bottom) marches Baden and Nassau.


German right wing

On the German right Leval’s 1st Brigade (Baden on left and Nassau on right) move in columns of companies to the edge of the orchards with their cannon following on the road. The Dutch (2nd Brigade) take the centre (far left of photo).


German left wing

The 3rd Brigade (Hesse Durmstadt and a small Frankfort contingent) march forward rapidly through the enclosures bordering Talavera, followed by the Poles. (Historically the Poles were not used in this attack but they are made available as a scenario balancing option, with their use calling for the redoubt to be held for two turns if taken.)


Hmmmm...  Waarom zijn er kanonnen?

As the 2nd and 3rd Brigades’ skirmish line reaches the orchard edge the redoubt’s guns open up. Leval is surprised to find his troops emerging directly in front of the Anglo/Spanish battery!


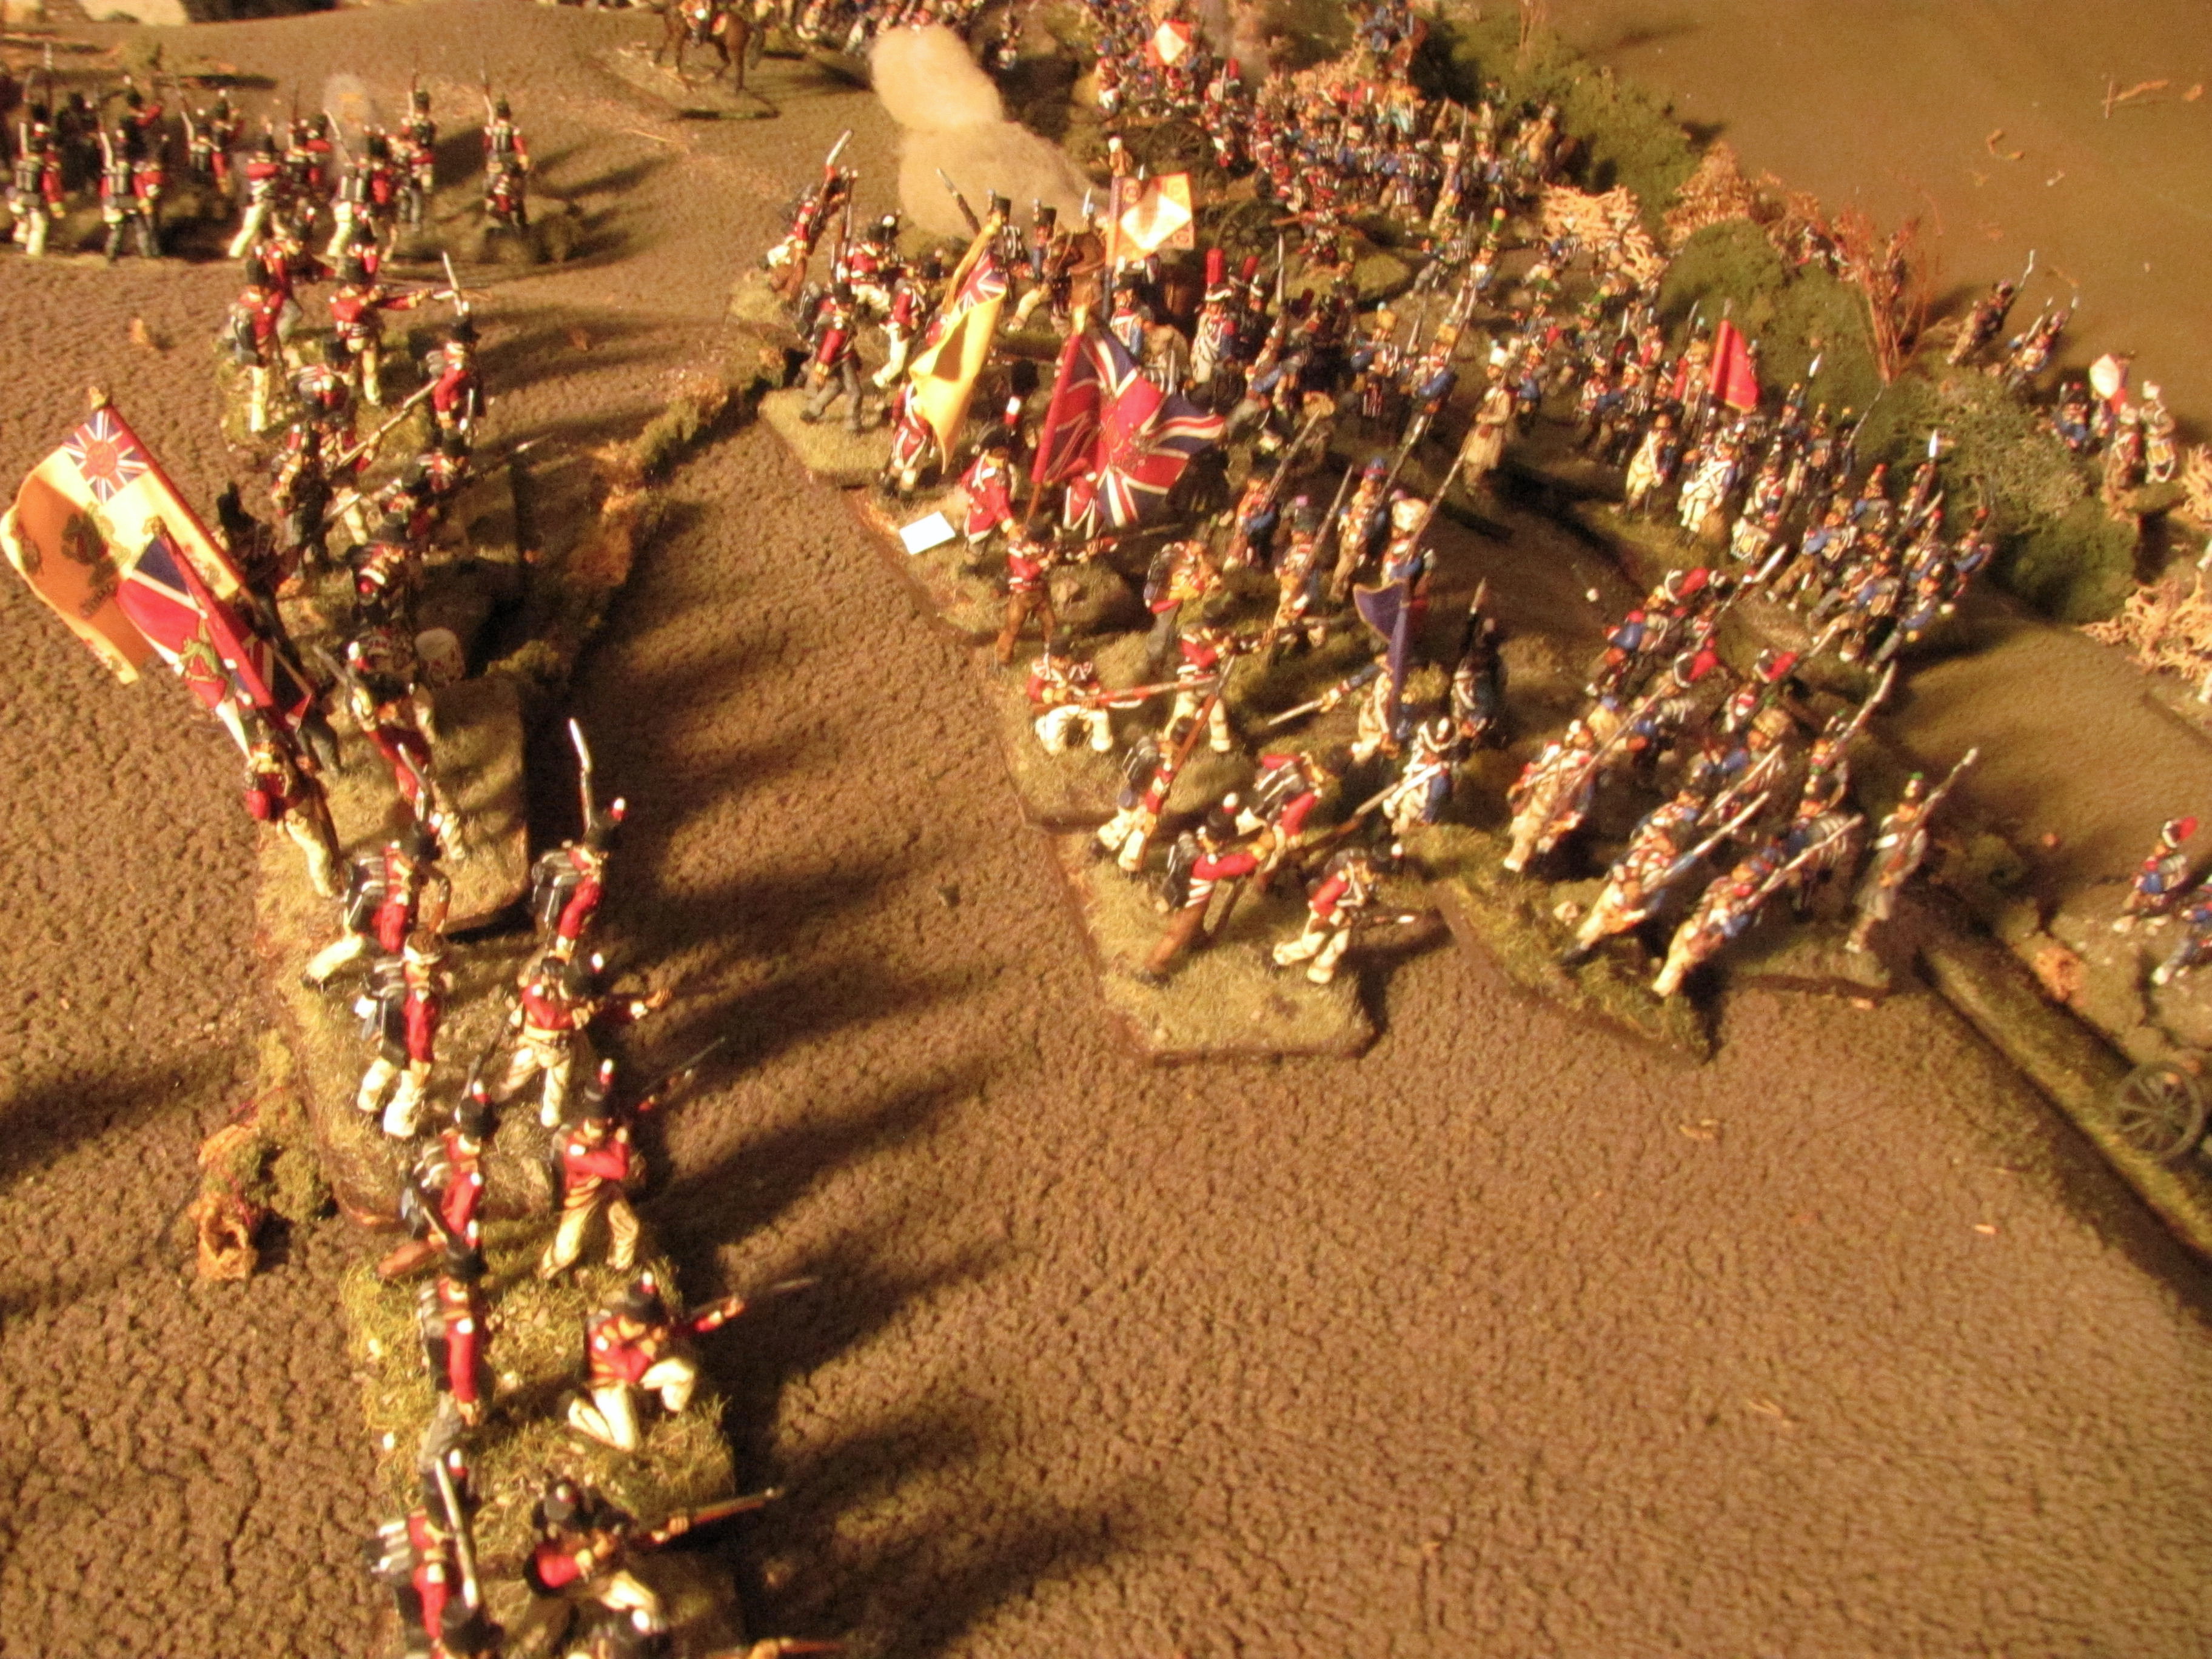
British light bobs skirmish with Nassau voltigeurs

Campbell quickly advances his line abreast of the redoubt, throwing his light bobs on to his left flank to engage from the banks of the Portina as the enemy emerge from the orchards.


Frankfurt and Hesse take up position in the enclosures

Leval’s troops manage to reach the stone walled enclosures south of the redoubt, narrowly beating the Spanish 2nd Cazadores de Antequerra who begin firing on the enemy lines sheltered behind the walls. It is Leval’s intention to use this strong position on the flank to anchor an attack by the Poles on the redoubt. Meanwhile the 1st and 2nd Brigades on the German left would pin the British and occupy the fire of the enemy guns.


Poles following up

With the enclosures occupied the two Polish battalions move up in support.


Dutch skirmishers in front of redoubt

Bad timing and an order mix up brings the 1st and 2nd Brigades out of the orchard and into the open. The Dutch skirmishers begin to exchange fire with the redoubt.


Allied guns in action

The British 3 pdrs. shell the Dutch while the big Spanish 12 pdrs. turn their attention to the enemy cannon, now emplaced to their front.


Poles also take up positions in the enclosures

As the Polish battalions move in next to the 3rd Brigade their voltigeurs also advance on the redoubt.


Overview

On the left Campbell has managed to get his British troops drawn up into three lines abreast of the redoubt, while his skirmishers (far left) engage Nassau from the banks of the Portina. In the middle Dutch skirmishers storm the guns while to the right the Spanish commander Portaga has his Badajoz Provincial Militia drawn up in two lines guarding the guns’ south flank. To their right the Spanish light infantry skirmish against the enemy which has taken cover in the enclosures bordering the town, while the Spanish cavalry have maneuvered forward, waiting for an opportunity to charge (far right, bottom). To the rear Portaga has his three battalions of raw militia arrayed in column, not wanting to risk them in the front lines.

Top left Nassau, Baden and the Dutch form up just out of the orchards, threatening the British, while the German guns (three batteries) engage the enemy at long range. Top right, 3rd Brigade and the Poles get ready to attack the redoubt in strength, but the presence of the Spanish cavalry are making it difficult for them to venture forth.


Dutch voltigeurs storm the redoubt

As the Spanish 12 pdr. turns to engage the enemy on its flank the Dutch voltigeurs take advantage of this to storm the guns. 


First attack driven off

But they are thrown back and routed in the face of the 3 pdr. fire.


Nassau line advance on British left

Nassau troops in line advance on the British skirmishers, driving them off their flank. But the skirmishers quickly return and continue to pester the German right with musket and rifle fire.


El Rey charge Germans on Spanish front

The lead squdarons of Spanish cavalry see an opening and charge the 3rd Brigade’s small skirmish battalion. This is easily routed but the Spanish horse are broken as they clash with the Frankfort battalion, well-ensconced behind the stone walls.


Granjean rallies his troops

The Hesse Darmstadt commander Granjean holds his troops steady in the face of cannon fire from the redoubt, as the remaining squadrons of El Rey move forward to threaten the French left.


Baden storms the redoubt 

With time running out, the Poles unable to move forward in face of the Spanish cavalry and Leval clamouring for the redoubt to be taken, Baden takes over the assault on the enemy battery. But the first attack is driven back and the troops routed.


2/7th Foot driven back by a devastating volley

Myers’ 2/7th volley and charge some enemy skirmishers encroaching on the flank of the redoubt. The skirmishers slip back but before the 2/7th can retreat to its original position it receives a devastating volley from the Dutch that drives it back onto its supports, reeling.


Baden driven off a second time

An attempt by Baden’s second battalion is driven off by a massive blast of canister as the Spanish 12 pdr. swings back into action on the front.


Baden routing

This second failed attempt by Baden has taken them out of the battle as both battalions rout to the rear.


El Rey scatters Leval's right

With Baden routed Leval finally throws his Polish reserve into the fight. But the Spanish cavalry is ready for an assault on this flank and sweeps away the lead Polish battalion, which fails to form square as it ventures out from the enclosures. In the following chaos the Spanish horse overruns Granjean’s battery, which had pushed forward close to the redoubt under cover of Baden’s attack and scatters the Polish voltigeurs, finally creeping forward after being routed previously. The German Division’s left flank attack is over before it had begun!


Final Dutch attack driven off

In one last desperate attempt to storm the redoubt the Dutch 1/2me almost manage to fight their way over the barricades, only driven off at the last moment by a very battered but determined British gun crew in hand to hand fighting.


Game end

With the failed Dutch attack Leval threw in the towel. Both flanks of the Anglo/Spanish line were still holding firm and the Poles were now teetering on the edge of being broken as was the Baden/Nassau brigade. Time had run out and the German Division prepares to withdraw, after bravely tying to storm the redoubt in no less than five separate attempts.

We all agreed this was a very tough nut to crack. The presence of the Spanish horse was able to pretty effectively tie up the entire German left flank and both Campbell’s British and Portago’s Spanish were happy to stay put and let the enemy come to them. Finally, the redoubt was a formidable feature to be taken and even if it had fallen, would have been difficult to hold as there were still significant Allied reserves available for a counterattack. 

Interestingly enough our result, even with the inclusion of the Poes, was quite close to the historic outcome, including the successful El Rey cavalry attack towards the end sending the enemy packing.

Saturday, May 13, 2023

Dawn Attack - Battle of Talavera, 28 July, 1809 Part 2

 We finished off this scenario over three more evening sessions of three hours each - so about 20 hours gaming in total! Only a wargamer would think this was a good thing. If you haven't seen Part 1 of the report it can be found here, but to briefly recap...

A devastating opening bombardment broke Low's KGL brigade, badly damaged Langwerth's and destroyed Rattberg's battery. Ruffin's division then led off the attack with an assault on the left flank of the British lines, trying to seize the Cerro de Medellin, supported by Beaumont's cavalry which looped around to attack the rear of the lightly held British left.

In a surprise move, Perrin shifted Solignac over to the French right to support Ruffin, but in an order mix up Ruffin went straight up the Medellin rather than following Beaumont in a more looping movement. This created a traffic jam and as a result Solignac came up the centre of the Medellin against Tilson's brigade.

On the French left Lapisse held back Laplanne's brigade as Latour-Maubourg's Dragoon division clashed with Fane's British cavalry division, now in the attack. That division was weakened by the dispatch of Anson who was hustled off to the British left to counter Beaumont's move to that flank.

The scenario map again...

The first session ended with the British hard-pressed by the French left and centre and Beaumont's cavalry threatening to sweep in behind the British lines, which had essentially formed a massive square on the top of the Medellin!

So, picking up where I left off in the last report...


1/29th's volley and charge shattered by a volley in line from the French

Stewart’s 1/29th (facing Meunier and Barrois on French right), trying to reagin the initiative, is driven off with a devastating volley and the brigade breaks. 


Anson's horse routs the lead squadrons of Beaumont's light cavalry brigade

But fortunately Anson brigade has arrived just in time to shore up the British left. The 23rd LD charge and break the 5me Regt. de Chas. a Cheval and rout the lead squadrons of the 2me Hussards as well. Beaumont's brigade breaks but the final exchange routs the exhausted 23rd as well. However Beaumont manages to rally his remaining horse in time to meet the follow up charge of the 1st KGL Light Dragoons.

Beaumont in full retreat

However the 1st KGL LD crush Beaumont's last unit, sending them routing. As a result Beaumont's cannon, supporting the attack on that flank, was also forced to limber up and retreat, relieving a bit of the pressure.


Routing 23rd LD

Anson's victory does not come without cost, as the 23rd LD's rout as well.

Cavalry trade off on British right

A slug fest develops on the other side. The lead French dragoon brigade is broken, fails to rally, but then the subsequent wave of French horse destroys the exhausted lead Guard squadron. Eliott's battery, blocked by a swirl of cavalry, prepares to limber up and move to higher ground.


But waves of dragoons continue to wash forward to meet British cavalry attack

With reserves either side the fight goes on.


Solignac's columns charge Tilson's 2/48th

In the centre Tilson’s 2/48th takes the brunt of Solignac's attack, breaking Solignac’s skirmish battalion, routing a second, before routing two more of Solignac’s line battalions sent in to attack in column. They finished with destroying a limbered French battery which had thought it was moving up behind the front lines. So they had a very good opening period.


Ruffin's right goes into square

With Anson's horse now threatening and the French horse artillery guns moving off, the 2/9th Legere form square, with the farm anchoring the other end of the 3/96me's line. With his flank now protected Ruffin, having paused for a moment to regroup, sends his troops back into the brawl, especially in light of the mauling Solignac has just endured at the hands of the British 2/48th.


Overview British left

On the left Stewart's 1/29th and Battalion of Detachments, still in the front, begins to withdraw as Langwerth's 1st and 2nd KGL (behind, centre) arrive to take over their positions. Top right Tilson's brigade still holds firm, although worn down by the French attacks.


4th Dragoons tangle with the next line of French 

The British heavies continue to tangle with the French Dragoons, routing the second wave of Latour-Maubourg's division as Stapleton Cotton dispatches his Light Dragoons (top left) to threaten Laplanne's flank. Laplanne throws a couple of his battalions into square to counter this threat.


2/48th stormed a second time!

Another wave of French infantry columns pour up against the British centre, this time driving back the weary 2/48th on to their supports.

2/48th destroyed

For once French columns carry the day, destroying the 2/48th but then pausing to lick their wounds rather than carrying on into the fresh 3rd Buffs standing in support on the ridge. But this attack is enough to break Tilson's brigade, which now joins Low's and Stewart's in withdrawing as the British throw in the last of their reserves, Donkin's 87th and 88th, to plug the gap in the centre.


Perrin in the thick of it

On the banks of the Portina Perrin and his headquarters are in the thick of it directing the main attack as seemingly endless columns of French march on the Cerro de Medellin.

1/29th driven back

In a second successful charge in columns of the day, Ruffin's troops crash into the 1/29th, already retreating from the field, pushing them back into Langwerth as he advances to the position.


Lapisse's attack rolled up!

Buoyed by successes on the French right and centre, Lapisse desperately tries to break Hayse' battery of 6 pdrs., which has been holding up the advance of Laplanne's brigade along with a few of Donkin's light troops on the British right centre. A first head on charge is routed by canister but as his troops form up for a second attempt disaster strikes.

Stapleton Cotton, on the flank and waiting for such an opportunity, charges his 16th LD's forward in column of squadrons. Laplanne's flanking voltigeur battalion hastily tries to form square but are dashed aside. In the ensuing chaos the Light Dragoons slam into the flank of the battalion preparing to attack the battery, break a third column also advancing up the Medellin and finally smash into a fourth before coming to a halt. In the blink of an eye four battalions are destroyed and Laplanne's fresh brigade is in danger of collapsing.

Overview

With both sides barely hanging on, things have certainly improved for the British! Lower right the opposing cavalries pause in their on-going clashes to regroup. Above them Laplanne will rally next turn, but with only half of his original force, and all driven back over the Porrtina as a result of the 16th LD's crushing rout of his lead forces.

On the Cerro de Medellin top left the British look stronger than they are with three brigades now in full retreat, but Donkin and Langwerth arriving just in time to stem the tide. 

Far top left Anson's 1st KGL Hussars hover, threatening the French right.


Barrois' 96me charges Langwerth's 1st KGL

Once again columns are sent against line, and, despite a crushing volley and charge from the KGL, the columns triumph. The 1st KGL is sent reeling backwards and, still weakened from the initial French barrage, Langwerth's brigade is broken! But the two 96me battalions are also nearly spent and need to pause to regroup.


Payne sends Cotton's LD's to the front

With Fane's heavies close to breaking after dispatching two of the French Dragoon brigades, Payne takes advantage of the French regrouping their surviving dragoons to pull the heavies back, moving Cotton's 14th and 16th LD's into the front line.


French batteries not finding their targets

As the remnants of Laplanne's brigade stumble back over the Portina the French guns deliver some desultory fire, unsuccessfully trying to silence Heyse's battery in the centre.


Anson's 1st KGL Hussars sweep down on French skirmishers

On the French right Barrois' skirmish battalions venture too far from their supports as the waiting KGL Hussars sweep down off the Medellin. 


Another trail of destruction on the French right

History repeats itself on the French right as the first skirmish battalion fails to form emergency square and the Hussars sweep the fleeing voltigeurs ahead of them, rolling up a second ad hoc skirmish battalion and the 2/96me before ending the charge catching the 1/96me in column, still recovering from breaking Langwerth. Barrois' brigade is broken! 


 Donkin's 87th POW charges down the Medellin

In the final act, the 87th POW Own Irish, faced with Solignac's centre battalions having been forced into closed columns by the 16th LD's charge, seize the moment to volley and charge, breaking one battalion and crashing into a second. However Solignac was already broken and in withdrawal over the Portina.


Game end

The French commander, Alan, threw in the towel at this point at the end of Turn 10. We rolled to see the fate of Solignac and Barrois, and although Barrois rallied, he only had one remaininng battalion and that about to be destroyed by the 1st KGL Hussars. That loss would put the French over the fatigue hit threshold needed to continue fighting.

But the British were close to breaking as well. Fortunately Langwerth rallied, but if he had failed and Anson's horse had suffered two more hits and failed to rally, the British would have been pushed over the edge as well! The loss of the heavies, also possible if they had been charged a final time, would also have pushed the British well over the threshold.

So a battlefield recap. 

Bottom right the last brigade of the Dragoon Division, now under command of a nameless underling after the loss of Latour-Maubourg, face off against the still fresh light dragoons of Stapleton Cotton as they prepare to charge the French left. 

Above Laplanne's surviving battalions, now regrouped have all retreated back over the Portina and can do little in the face of the British horse.

Above those, centre, the 87th have swept down the Medellin and engaged Solignac's brigade, now in full retreat, while upper right Barrois is destroyed by the KGL Hussars, leaving only Meunier, with a single fatigue hit, still in play!

But on the left on the Cerro de Medellin the British are not in much better shape, with three brigades of infantry in full withdrawal and Langwerth only hanging on by his toenails after being drummed back by Barrois.

If you are still reading this, I hope you enjoyed the report. It was a gruelling 20 hours or more of playing time, but well worth every moment and the battle ebbed and flowed - a lot of fun, and great to have all those toys finally on the table. Thanks, JJ, for yet another extremely enjoyable scenario, and thanks Alan, Phong and Brian for showing up at the table. On to the Battle for the Redoubt, Talavera Part 4.