Background
The Battle of Barrosa (known as the Battle of Chiclana by the Spanish) was fought near the Torre de Barrosa on the Gulf of Cadiz on March 5th, 1811.
Following the Battle of Ocaña the Spanish had been driven from the south of Spain with the Supreme Junta finally taking refuge in Cadiz. Bolstered by British and Portuguese troops and aided by the British Navy the city went into a state of siege as Victor surrounded it with troops and emplacements on the landward side.
A plan was developed to break the siege by sending an Allied force to Tarifa deep behind the French lines to the east. Under the incompetent command of the Spanish general Manuel la Peña, with Sir Thomas Graham in command of the British/Portuguese rearguard this force landed and began to make its way towards Cadiz.
Victor became aware of the Allied approach and set a trap, blocking the way forward to Cadiz with Vilatte’s division while Ruffin and Laval were sent to fall on the Allied flank and rear. Graham, wanting to leave a strong rearguard on the high ground of the Cerro de Puerco was ordered by la Peña to join the main Spanish force to the northeast instead. Moving along a track through a pine woods rather than the coastal road, Graham became aware of the French force approaching behind.
Realizing that Victor’s trap could well send them all into the sea, Graham took the initiative to ignore la Peña’s orders and turn to confront the enemy behind. By this time the Spanish rearguard under Cruz Murgeon had also abandoned the high ground so Graham, in a desperate attempt to forestall the French while he got his force turned around, sent Dilke’s light battalion under Browne to attack Ruffin’s division forming up on the high ground. To the same end Barne’s massive light battalion along with the Portuguese were sent to the northwest through the woods to block Laval. And so the battle commenced.
This scenario deals with Graham's rearguard action and was solo played on a 6+' X 6+' table in 1/72nd scale miniatures. The scenario can be found here.
 |
| The scenario map, with the table gridded for 15mm play. |

Cruz Murgeon and Whittingham’s cavalry.

Graham receives news of the French advance.

Browne’s battalion sallies out to return to the Puerco while Dilke’s brigade marches back out of the pine forest.

Meanwhile on the other side of the hill French dragoons sweep around towards the coastal road while Ruffin’s division quick marches to seize the high ground abandoned by the Spanish.

Victor views the enemy from the northern slope of the Puerco. He sees a small Spanish force with some horse astride the coastal road and a lone British battalion moving across towards the Puerco. But his own forces, an entire division (!) are already now almost on the summit with Laval’s force poised to descend from the north. The trap is ready to be sprung!

Dilkes’ Guards emerge from the pine forest and form up in line while the artillery moves through the forest along the path. Wheatley’s brigade (foreground) thrashes through the woods, with the line following the more nimble composite flank battalion (Barnard) which moves swiftly in skirmish order.

French dragoons show up on the coastal road threatening Browne’s light infantry still advancing towards the hill. However with Whittingham’s cavalry in front and orders only to advance to this position Dermancourt’s hands are tied.

Ruffin’s division beats Browne handily to the high ground but climbing the hill has left his troops disorganized and exhausted.

Regardless Ruffin sends out his grenadiers to drive Browne’s skirmishers (who have quickly moved up the hill and away from the French cavalry) back before the Guards can get in the fray.

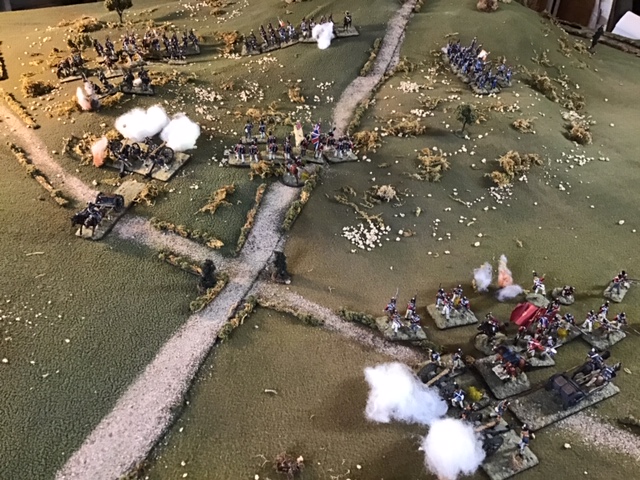
Overview. British guns now in position in preparation for Laval’s arrival (centre).

Browne and Dilkes’ small Rifle detachment are driven back while Ruffin tries to get regrouped.

Dermoncourt’s light infantry hoof it across the Puerco to join the cavalry.

Dilkes pushes the 1/2 Foot Guards through Browne’s skirmishers to confront Chaudron’s grenadiers while Browne forms line and joins with the Coldstream/3rd Foot in support. Rifles move into enfilade and harass from the flank as the grenadiers retreat and form line.

On Wheatley's front Barne’s flank battalion bursts from the woods and manage to form line just as Laval arrives.

“They were supposed to be here!”
Victor, trying to get Dermoncourt’s brigade moving, sends out new orders but the ADC gets lost en route somewhere on the far side of the Puerco.

Laval arrives in column without skirmishers deployed thinking that the enemy is still far away. He finds Barne’s troops shaken out into line and two batteries of British artillery deployed against him!

On the Puerco Dilkes’ 2 Guards charge and are drummed back soundly by Chaudron’s grenadiers. Barrois (lower right) drives the small Rifles detachment off the grenadiers’ flank, taking up position on their right.

On their turn the British hold position, but a devastating volley from the Coldstream/3 Guards drives Chaudron’s second grenadier battalion back with heavy losses .
To Ruffin’s left Dermancourt finally gets Victor’s orders to advance and threaten the Spanish but is slow to react. His light infantry form line to confront Dilke’s left while they await orders.

In the other engagement, Laval, on seeing Barne’s large light brigade drawn up in line by the woods and nothing but guns in front of him takes the initiative to change his advance orders to attack. His troops leap forward in response and two battalions in column engage Barnes. They fight to a draw and all stagger back.

However, as the French fall back the British guns let lose at short range. Two of Laplanne’s battalions, 1& 2/8th are savaged (two ones!) and both are driven back.

Meunier’s troops shelled.

Meanwhile, Graham in frustration has sent over his ADC to beg with Cruz Murgeon to give Dilkes some help! Will Cruz Murgeon oblige? Will the ADC get lost? Stay tuned!

Dilkes’ 2 Guards charge and are drummed back soundly by Chaudron’s grenadiers. Barrois (lower left) drives the small Rifles detachment off the grenadiers’ flank, taking up position on their right.

On the Puerco Dilkes sends his Guards on for another go at the grenadiers. He has drifted out of command range of Graham who is desperately trying to keep the two halves of his army under control so their moves were halved. Still enough to close, however. But the Guards find the doughty grenadiers impossible to dislodge from the high ground, who countercharge, and they are once again thrown back onto their supports (now down to 3 FH’s from 13! Grenadiers down to 4 from 9).

On the British left Laplanne’s 1/8th, broken by the artillery fire rout through Meunier’s troops advancing in support. Barne’s light brigade, cheered by the chaos brought about in Laval’s ranks by the Royal Artillery and spurred on by the arrival of the 87th and 67th in support, volley and charge, sweeping the 2/8th from the field!

Their charge carries them on into the French guns and Laplanne’s surviving battalion (1/45th) and sends that battalion routing as well, the French abandoning the guns in the process.
Satisfied with their work Barne’s composite battalion withdraws onto its supports, as Laplanne’s entire brigade threatens to rout from the field.

Reprieve for Laval!
While Laval and Laplanne hustle back to save Laplanne’s battalions from routing Meunier joined his grenadiers and led them in a charge against Barne’s brigade.

Three rounds of heavy fighting left the grenadiers wavering, but getting the best of the British light infantry battalion, who in turn rout! Laplanne fails to rally the 1/8th and they exit the battle but Laval successfully rallies the 1/45th so for the moment Laval continues to survive. It was very close - if both battalions had routed then the division would have been broken and had to withdraw, so Meunier’s grenadiers saved the day.

Ruffin is unable to follow up with the success of Chaudron’s grenadiers against the Guards as the grenadiers are too battered. But Barrois’ 2/24th, led by Barrois and hoping to sweep away the pesky little Rifle contingent (right) that has been harassing Ruffin’s right, instead is driven back with heavy losses, including Barrois himself who is killed in the mélee. The battalion falls back behind its supports, the 1/24th, at bottom.

On rallying this round Ruffin’s division, despite having 16 die to roll, only rallied off one FH!
Laval’s success on the French right proves short lived as his victorious grenadiers, after sending Barne’s packing, take more devastating British cannon fire. Meunier himself (attached) is killed...


And the grenadiers rout! Even if they can rally, with Laplanne’s brigade broken the surviving battalion will be forced to begin withdrawing from the field (maybe one turn). When it does Laval’s division is down to 50% and Meunier will also need to withdraw. So it is over for the French on this flank.

When it becomes clear that Cruz Murgeon is not going to budge Graham’s ADC takes command of the KGL and charges Dermoncourt’s threatening dragoons who countercharge. Whittingham brings forward the Spanish horse in support. Cruz Murgeon, expecting the worst, withdraws his guns (ran out of ammo) and has his two brigades go into a large square.

The KGL are shattered in three rounds, the ADC is killed (high command casualties this game!) and the victorious French fall on the supporting Spanish, caught flat-footed. But that combat will be next round.

Meanwhile on the Puerco, Dilkes decides to hold the attack to allow his battered Guards to rally but, lacking a “react” rating, can only change that order next round. So both Guard battalions go into the fray, one with only 3 FS!
The Coldstream/3rd are still in good shape, but Dermoncourt’s light infantry have maneuvered to their flank. This Guard battalion takes volleys from front and flank but still forges up the hill to engage Chaudron’s 1/96th.

Again the grenadiers triumph against the 1/2 Foot Guards and this time the Guards break and rout back through Browne’s flank battalion.

The Coldstream/3rd, however, have a spectacular run, destroying the 1/96th and falling on the second grenadier battalion which is still wavering from an earlier volley. It too is smashed and the Guards find themselves on top of the Puerco with nothing but the French guns in front.

Puerco overview.
Coldstream/3rd on top of the hill bottom centre, Dermoncourt’s Legére on upper left, other Guards routing through Browne (top centre).
Remaining French, other than the battered but unmovable grenadier battalion (centre) are wavering (two battalions far right, all this wavering the result of that horrendous failure for Ruffin to rally last turn!) so suddenly things do not look so rosy with Ruffin either! Graham, confident Laval is beat, has limbered up one of his batteries and is sending it over in support of Dilkes (very top).Although the French had some small victories, Laval is on the ropes as his division teeters around 50% losses. Ruffin had been looking in better shape before the second Guards battalion tore the heart out of his division, charging straight to the top of the Puerco.

Below Graham now has a battery playing on Ruffin’s troops while Dilke’s small rifle battalion (in front of guns) becomes isolated from his companions but, out of command, is unable to do much.
The 1/2 Foot fail to rally and continue routing towards the second British battery while Browne’s flank battalion stays firm.

Further up the hill, badly battered and with the 9th Legére firing volleys into their flank, the Coldstream/3rd Guards battalion stares down the French guns...

And charge! The cannon unleash canister and another Guards battalion breaks and flees down the hill.

On Wheatley’s flank the British line go on the attack, pushing hard against the wavering French, while the flank battalion begins regrouping in the woods.

Overview. Upper left, French dragoons stare down the Spanish, neither in a position to engage the other after having fought to a draw. Guards routing left and centre, the Coldstream/3rd directly across the face of Dermoncourt’s light infantry! Lower right Ruffin tries to sweep the Rifles from his front while upper right Wheatley takes the attack to the French.

Ruffin takes the opportunity before the British guns can effectively come into play to try and sweep away the pesky Rifles. But with a devastating volley and then countercharge, the Rifles sweep away the French instead before retiring closer to their guns!

North of the woods the 1/87th charge the French.

Coldsteam/3rd Foot are annihilated as they rout past French light infantry. Unbelievably this is the first and only Allied loss outside of Whittigham’s KGL early on, while French losses have exceeded 50%, other than Dermoncourt who has mostly been unengaged.

And then its over. With the French now withdrawing from both parts of the battlefield the battle is done and the British triumph. On the Puerco both sides had battled it out to a point where they were battered and reeling. Only three French battalions survive intact on the Puerco.

Graham finally manages to rally the fleeing 1/2 Foot, who did not shine in this battle.

Wheatley’s force is wholly intact as Barnard’s flank battalion rallies and surges back out of the woods to help send theFrench packing.

Browne’s flank battalion, along with the Rifles, have stayed solid for Dilkes. And the Coldsteam/3rd, sadly annihilated really won it for Dilkes on the Puerco with their mad charge.
Which really only leaves the Spanish. Raspberries and catcalls see the French Dragoons off as they fall back to cover the retreat of Victor’s battered forces. Cruz Murgeon pats himself on the back and congratulates himself for the stellar job he did holding off the French cavalry and saving the day.

Wonderful report. It is a pleasure to read about this battles you fought. The table and soldiers are absolutely excellent!
ReplyDeleteThanks so much. I enjoy writing the reports - value added as you get to play the game through again in recollection - but it's great to have them appreciated.
ReplyDelete