Over the holidays Alan, Dawson and myself played through the Alcañiz scenario Brain North has pulled together with a little help from myself. In the process we discovered a couple of bumps in the road that have now ben tidied up. It is based on the Battle of Alcañiz in Spain, May 23rd, 1809, being the first encounter Suchet had with the Spanish after having assumed his new command.
If you would like to see our first play through, it is posted here. This time we had quite a different result, calling the game after Turn 10 as we had run out of time, but with a resolution quite evident.
 |
| Scenario map showing main lines of attack. |
So, after 14 hours of game over two days...
I was slow in getting some photos for the first few turns, but things went sour for the French early. The battle begins with Laval's attack on the Spanish left, meant to be a pinning attack against Areizaga's troops on the Cerro del Pueyo, hopefully drawing Spanish support from their left and centre before Musnier's attack comes in on the centre.
As Wathier’s cavalry charged forward in support of Laval the Spanish guns in the centre swivelled, scoring some telling hits and reducing Wathier's tracked fatigue score to just three, essentially putting his cavalry out of service before the battle had started.
Areizaga throws his Voluntarios de Aragon into the chapel and begins to withdraw his division, largely composed of raw militia, back into the high ground where the cavalry cannot operate.

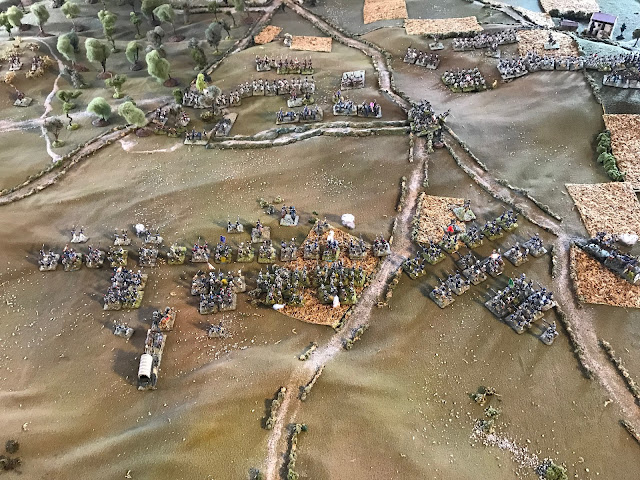
1. Opening moves
Laval tries to clear out the Spanish light infantry in the chapel as he advances both sides (lower right) while Areizaga withdraws into the rough of the high ground (lower left).

2. Storming of the chapel
Laval is killed in the attack and the 1/3 Vistula badly mauled trying to oust Aragon from the chapel.

3. Poles driven back
With Laval dead his second in command (we called him Gerrard) takes over. Wathier's cavalry, having fallen back and regrouped, advance out of line of sight of the Spanish guns on Laval's left, along with Laval's and Wathier's guns, but the guns are never unlimbered. Gerrard suspends the attack in order to regroup and awaits new orders from Suchet.

4. Areizaga on the high ground
Areizaga has withdrawn deep into the rough high ground, safe from the Spanish cavalry. Suchet notes this and sends new orders to Gerrard.
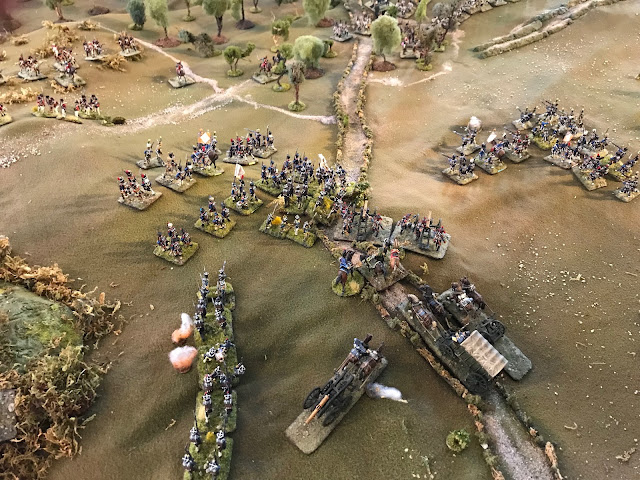
5. Musnier arrives
At this point Musnier's division arrives, along with Suchet's personal guard. Masses of French march towards the Spanish centre while Musnier's two squadrons of Hussars protect the flank from the lurking Spanish cavalry.

6. Taking cannon fire
But the Spanish guns savage the advancing lines and columns with telling fire.

7. Spanish cavalry stuck on far left
Meanwhile, on the far left, Blake sends out a flurry of orders to Ibarrola's cavalry to move to the Spanish left and support Menacha and Roca. But the orders all go astray and Ibarrola sits tight, watching from afar as Blake gnashes his teeth in frustration.

8. Roca shifts to his left
Seeing Musnier's attack bearing down on the Spanish centre Menacha and Roca shift, narrowing the gap between left and centre.

9. French attack shifts to the Spanish left
At the same time Suchet orders Musnier to shift his attack towards the Spanish left, hoping
to outflank the guns. But Musnier's casualties continue to rise as he now tracks to his right across the front of the enemy guns.

10. Wathier's cavalry redeploy to guard Musnier's right
With the Spanish right out of reach in the high ground, Suchet sends Wathier's cavalry galloping to support Musnier's right against the Spanish horse.
11. Laval's brigade shifts attack to the right of the chapel
Meanwhile new orders have arrived for Laval's brigade, now under the able command of the bright young Gerrard (rolled a 4/+1 for Laval's replacement). Ignoring the skirmish fire from the chapel, the French reform to the chapel's right, still seemingly threatening Areizaga but with new orders to attack the Spanish centre trough the dense woods. Suchet rightly judges that Areizaga is so far back on the Spanish right that Gerrard will have enough time to press his attack on the centre before Areizaga can react. At the same time the French guns are brought up and and the two line batteries are combined under Suchet's direct command.
12. Overview
At the bottom left Areizaga is on the high ground of the Cerro del Pueyo. Centre right Laval's brigade under new command forms up to attack through the woods. Top right Musnier advances against the Spanish centre and left.

13. Areizaga creeps forward
With the French massing on his left Areizaga cautiously pushes his troops forward, awaiting new orders from Blake.

14. Spanish centre shifts back
At the same time, seeing the French attack shift to his left, Blake begins to slowly pull back his centre, his guns hand hauled in between salvos.

15. Roca adjusting his lines as he shifts to his right

16. Spanish cavalry finally released
Finally Ibarrola receives orders to attack the French right and moves his cavalry forward in line.

17. And clash with Musnier's Hussars on French right
As Musnier's right flank battalions form square, the 4 Hussards counter charge. A bloody clash breaks both the Hussards and Santiago. Loss of Santiago is enough to send the remaining Spanish horse in retreat, leaving the French infantry free to push forward their attack!

18. Suchet's guard enter woods
Meanwhile, on the French left Suchet has sent his personal guard into the woods to clear it of some pesky guerillas and support Gerrard's attack on the Spanish centre.

19. Followed up by Gerrard's brigade and supported by guns
The French intent is now made clear as Gerrard's Poles move to follow up Suchet while the 14th form a rearguard against Areizaga.

20. Spanish right stalled
Once again the Spanish ADC's have failed to deliver Blake's new orders and Areizaga stubbornly sits tight and holds the high ground as directed.

21. French attack through woods
The French attack through the woods begins to take shape. Although the small band of guerillas continues to cause havoc, Blake is slow to order Lazan to push a blocking force into the dense woods and the French are largely unopposed.

22. Right flank overview
Back on the French right Musnier slowly pushes his troops forward. Again Suchet's orders to push home the attack are slow to arrive and the French are unable to capitalize on the dispersal of the Spanish horse (in retreat on the right) as they are harassed by Menacha's light troops (next to horse). At the upper left the French are finally crossing the Spanish ditch, but continuing to take heavy casualties from the enemy guns now back in action from their new, deeper position on Las Horcas.
At the very bottom Wathier's cavalry can be seen galloping to Musnier's right.

23. Spanish centre falls way back
In a surprise move the Spanish guns are limbered up and taken to the back of Las Horcas, while Lazan's troops cover the withdrawal.

24. Breaching the ditch
Finally breaching the ditch Musnier's battered battalions find their allusive enemy still a long way away!

25. Areizaga cautiously advances
Back on the Spanish right Areizaga, seeing all of the French but the 14th Line in rearguard disappearing into the woods, starts to swing forward. But still, no word from Blake!

26. Spanish centre realigned
Blake manages to get the centre realigned in their new positions, anchored by the Spanish guns on the left and with Hernandez' grenadiers extended to the right into the woods.

27. Spanish left prepares for the onslaught
Roca, too, angles his line so that now one of Blake's batteries enfilades the front of his position.

28. Volleys exchanged in Spanish centre
The Poles, in the lead, form line, exchanging some volleys with the Spanish before closing.

29. Musnier charges Spanish left
Musnier sends his battalions into the attack on Roca. One of Menacha's battalions, having formed square, still manages to beat off a French column!

30. Spanish left holds
The French are driven back with two battalions routed. Roca's Valencians are also broken, but with Menacha's and Andrani's brigades still intact the Spanish left holds.

31. Spanish centre attacked
Fabre's brigade (Musnier) also presses home their attack on the Spanish centre, in conjunction with Gerrard. In both cases, the Vistula, Suchet's best troops, are in the vanguard of the attack.
The Poles overrun both Spanish line batteries and rout 3/America, essentially breaking the Spanish centre but...

32. Routing French
The attack results in the breaking of Musnier's division. One battalion of the 115 is utterly destroyed in a frontal attack on Menacha's half battery and two battalions are routed as the others begin to break off.

33. Spanish right intact
With the Spanish right still intact and finally on the move, Suchet finds himself in an untenable position, with the Spanish still strong on both flanks.

34. Game end
We called the game at the end of Turn 10. Wathier's cavalry had arrived on the Spanish left but, failing to get new orders, were side-lined and dangerously close to being broken regardless as a result of the hits they took early on.
In the end, Musnier’s division is broken, Wathier’s cavalry almost so, so even with the loss of Valencia 1,2&3 Roca’s Spanish left is solid. In the centre, Lazan’s division is now broken while Laval and Suchet’s brigades are in good shape and posed to take Las Horcas. But Arzeiga is untouched and although not being able to begin a counterattack until Turn 12 and still needing to move through the woods, he poses a major threat to the French (but not within the context of the 14 game turns).
Neither side is completely broken, but the French are more precarious although in control of the centre. We decided to call it a draw, but a strategic defeat for Suchet as he is probably forced to retreat at this point.
A really enjoyable read Bill. Looking at this game and your earlier battle this is obviously a tough nut to crack for the French.
ReplyDeleteThanks, Morty. Yes, it is a tough nut and a battle that the Spanish actually won historically! I think if we had played with cumulative fatigue hits the first time around the French may not have triumphed - they are forced to take an awful lot of cannon fire before they can effectively close and it gutted them this game.
Delete