Saturday, July 27, 2019

42nd (Royal Highland) Regiment of Foot


Another project I completed early this summer were these 42nd Highlanders (Black Watch) as the newest addition to my British Peninsular army. I hope to add more Highlander regiments in the future, but I enjoyed painting this first set of Italeri figures. I was a bit daunted by the dreaded kilt but was happy with the result.
The full battalion.
For the most part the figures are straight out of the box, but a lack of command figures in this set had me getting my scalpel and modelling compound out. One of the ensigns is adapted from the drummer (with different legs, as the drummer in this kit is diminutive!) and with the second I got lazy, and decided the ensign has been replaced by one of the sergeants of the colour party, with a fairly easy conversion of a pike-bearing sergeant.
The officer was adapted from the officer in the uninspired Hat British Light Infantry set, receiving a bearskin, officer, sash and claymore, held in a more realistic manner.
All the sergeants received the proper sash, worn over the shoulder, and claymores were added to those in the colour party.
I think future Highlander Regiments may have to wait as the command conversions were fun but a bit time consuming and I have my eye on some of the very nice looking Strelets sets of Highlanders that are now available.

The command stand. The commander was adapted from the Hat light infantry set, the ensign hiding behind the officer started life as the drummer but given new legs and the second ensign simply an adapted pike-bearing sergeant.

The sergeants received their proper sashes but I ran out of steam and only gave claymores to the colour party.

Infantry stand
So a bit of history for this illustrious regiment...

The 42nd (Royal Highland) Regiment

After the Jacobite rising of 1715 Highland militias were raised from clans loyal to the British crown to keep control of Scotland. These six companies of Highlanders, with companies drawn from different clans (one company each coming from Clan Munro, Clan Fraser of Lovat, and Clan Grant and three from Clan Campbell) eventually became known as the Black Watch, probably as a result of how they dressed. Four more were added in 1739 at which time they were officially formed into the 43rd Highland Regiment of Foot.


The first battalion embarked for Portugal in August, 1808 and was present at the battle of Corunna in January 1809. After the first battalion exited Portugal the second was sent to the Portugal under Wellington and fought at the Battle of Bussaco in September 1810. It also fought at the Battle of Fuentes de Oñoro in May 1811, the Siege of Ciudad Rodrigo in January 1812 and the Siege of Badajoz in March 1812. Diminished by the bloody fighting at Badajoz the second battalion returned home to recruit and was replaced again by the first, which saw action at the Battle of Salamanca in July 1812, the Siege of Burgos in September 1812 and the Battle of Vitoria in June 1813. It was engaged in the pursuit of the French Army into France and fought at the Battle of the Pyrenees in July 1813, the Battle of Nivelle in November 1813 and the Battle of the Nive in December 1813. It closed the war with the Battle of Orthez in February 1814 and finally the Battle of Toulouse in April 1814, needlessly fought after peace had been declared in Paris!


Monday, July 22, 2019

Le Mesnil-Patry, June 11, 1944

We played our big summer game up at my friend Phong’s cottage this summer. It turned out to be the hottest, most humid day of the summer, but we still sweated it out around the gaming table for a day and a half, punctuated by good food and jumps in the lake to cool down!
When the fighting got too hot we had this lake to jump into.

As it is the 75th anniversary of the historic events in Normandy in WWII we dusted off our WWII toys to play this scenario, the ill-fated brigade attack on Le Mesnil-Patry on June 11, 1944  by the 2nd Canadian Armoured Brigade in support of the neighbouring forces of 30th Corps. It was a hastily planned attack with no recce and historically was a dismal failure, described by one British journalist as “ the charge of the Light Brigade”. This scenario, written by Paddy Green and Richard de Ferrars as part of their Blood and Honour series, was played in 1/72 scale on a 6’ X 9’ board using Battlefront WWII rules, with some home grown alterations. Toys were a combination of mine and Phong’s with four players - myself, Phong, our friend Ted and Phong’s son Dylan.

Scenario map showing German deployment areas and lines of the Canadian attack. Le Mesnil-Patry was the objective so the arrows, ending at the high water mark, tell it all!

The Battlefield

The battlefield as seen from the Canadian starting line. Norrey is in the foreground, Le Mesnil-Paltry on the high ground at top. Minefields sewn by the Regina Rifles along the Bretteville road (bottom right) block the planned starting line and force a bottleneck as the Canadians have to negotiate through Norrey's narrow streets.
The battlefield as seen from Le Mesnil-Patry (bottom). This town was the Canadian objective.

View from Norrey's railway station.


The chateau and Le Mesnil-Patry.

The chateau.

The Battle

First wave arrives

The 1st Hussars B Squadron with D Co. of the Queens Own Rifles of Canada mounted as tank riders arrive in Norrey. They find their supposed start line blocked by hastily sown minefields, placed there by the Regina Rifles currently in control of the Norrey salient and are forced to detour through the narrow streets of the town to launch their attack.

D Company dismounts

D Co. scrambles off the backs of the Shermans to make their way through Norrey on foot towards the Canadian right flank. 

A Company follows up

A Company in trucks move through the town bottleneck to move up on the left flank, with the Hussars’ C Squadron close behind.

B Squadron forges south out of Norrey and up the main road to Le Mesnil Patry


First Encounter

B Squadron’s lead Shermans encounter the first enemy troops, Panzergrenadiers of the 26th SS. The German company commander is quickly dealt with by the Sherman's machineguns, the last easy success of the battle!

Mortars arrive

Meanwhile, back in Norrey, more of the attacking force enters via the Bretteville road, following C Squadron into the town. The regiments’ mortars dismount from their carriers to emplace in an orchard west of the town while Lt. Col. Spragge takes up HQ’s in the Norrey church spire in an attempt to gain a view of the battlefield over the densely hedged fields. It’s a dangerous perch as it is also the target of continued German shelling as the Allies move through the town, and a direct hit soon leaves the QOR without their commander.

A Co. dismounts east of Norrey


Ambush!

B Squadron tanks on the main road suddenly find themselves the targets of a vicious crossfire by hidden Pak40’s either side of the road. The lead tank is hit and bursts into flames.

Second Pak40

A second Pak40 on the Canadian centre left ambushes tanks.


And a third on the German far right...


A Co. is spotted and shelled as they dismount on the Canadian left


Outflanking German guns

Things heat up as the Hussars engage dug in Paks, infantry guns and panzergrenadiers on the Canadian left. Two more tanks are KO’d before the German guns are silenced.

Linking up

B and C Squadrons continue to drive up the Canadian right, linking up with D Co. advancing on foot from Norrey.

A Co. advances

Meanwhile, on the Canadian left A Co. moves out from the covering hedges to test this flank and try to pin the enemy while the main event goes up the right.

Minefield!

A supporting tank is KO’d on a hidden minefield and German mg’s open up. Suspecting more mines A Co. falls back to their start position to regroup.

German armour arrives

Just as the Canadians start to make some small headway on the right, two German Panzer IV’s (SS Panzer Regiment 12 Hitlerjugend) advance on the Cristot road just north of Le Mesnil-Patry.

Taking on the Panzers

Under cover of smoke the Canadian armour maneuvers to try to dislodge the Panzer IV’s. As the enemy tanks are engaged by Fireflies on the Canadian right other Hussars storm up the main road to close assault. But they are met by enemy Panzershreks hidden in haystacks and behind hedges, and two more casualties are added to the flaming wreckage on the main road.

Panzershreks in every haystack and behind every hedgerow!


A Squadron arrives

Canadian armour continues to pour into Norrey, with A Squadron now moving through the town along with the Queens Own Rifles’ B Co.

Mortars in action

QOR's 3" mortars in action as tanks and B Co. pass by on their way through Norrey

Panzer IV's KO'd

The Hussars’ Fireflies finally find their mark as the two German tanks are KO’d. But the cost has been dear, with eight disabled and burning Shermans dotting the fields and the Canadians still less than halfway to their objective.

Breakthrough

A handful of Shermans manage to breakthrough the enemy lines in and around the chateau causing German mortars to scramble from their positions to escape the advancing tanks. There is now nothing between them and Le Mesnil-Patry but it is late in the game as more élite enemy armour emerges along the Cristot road.

Iron Cross candidate

A lone German Panzershrek holds up any advance by A Squadron out of Norrey along the main road as the Hussars attempt to blast him out of his position. German Panzershreks accounted for at least a half dozen kills in this fight!

Flushing out the enemy

With the Hussars forging ahead, D. Co. finally comes to grips with the bypassed German infantry still dug in north of the chateau.

Didn't see that coming!

One of the lead Shermans behind the chateau is KO’d by an unnoticed enemy tank as the Sherman pulls back seeking a better position. (Markers on board show the plethora of yet uncommitted German engineers of the 12th SS Pioneer battalion still dug in north of Le Mesnil Patry and east of the main road!)


Back where it started!

Tanks of A Squadron knocks out a German Pak before it can unlimber. Both Paks on this flank had been pulled off the line to support the German left, and were now being hurriedly brought back as the Canadian armour late to the battle appear on their eastern flank.

A Company resumes attack

With tanks of A Squadron now on the scene A Co. QOR again sallies out of the orchards east of Norrey. They are met be a devastating artillery strike but the remainder press on, giving close support to A Squadron’s Shermans, who have lost yet another tank to a panzershrek hidden in yet another haystack.

Carrier platoon moves through Norrey 

The QOR’s carriers along with supporting engineers pass through Norrey’s narrow streets but never make it to the fight. 

QOR’s B Co. shelled

In a Quixotic attempt to hustle B Co. (mounted in trucks) up the Canadian right in support of A Co., their transport is spotted by the German FOO. The lead truck is destroyed as its surviving occupants bail out disordered.

Slow going

D Co. trying to clear out the enemy troops north of the chateau as a half dozen shattered tanks burn in the background.

Two more Hussars KO’d 

A second Sherman is KO’d behind the chateau as the enemy tanks close in for the kill, losing one of their own in the process. In the background a Firefly, moving to support these tanks is hit in the flank by a hidden Panzershrek and bursts into flames.

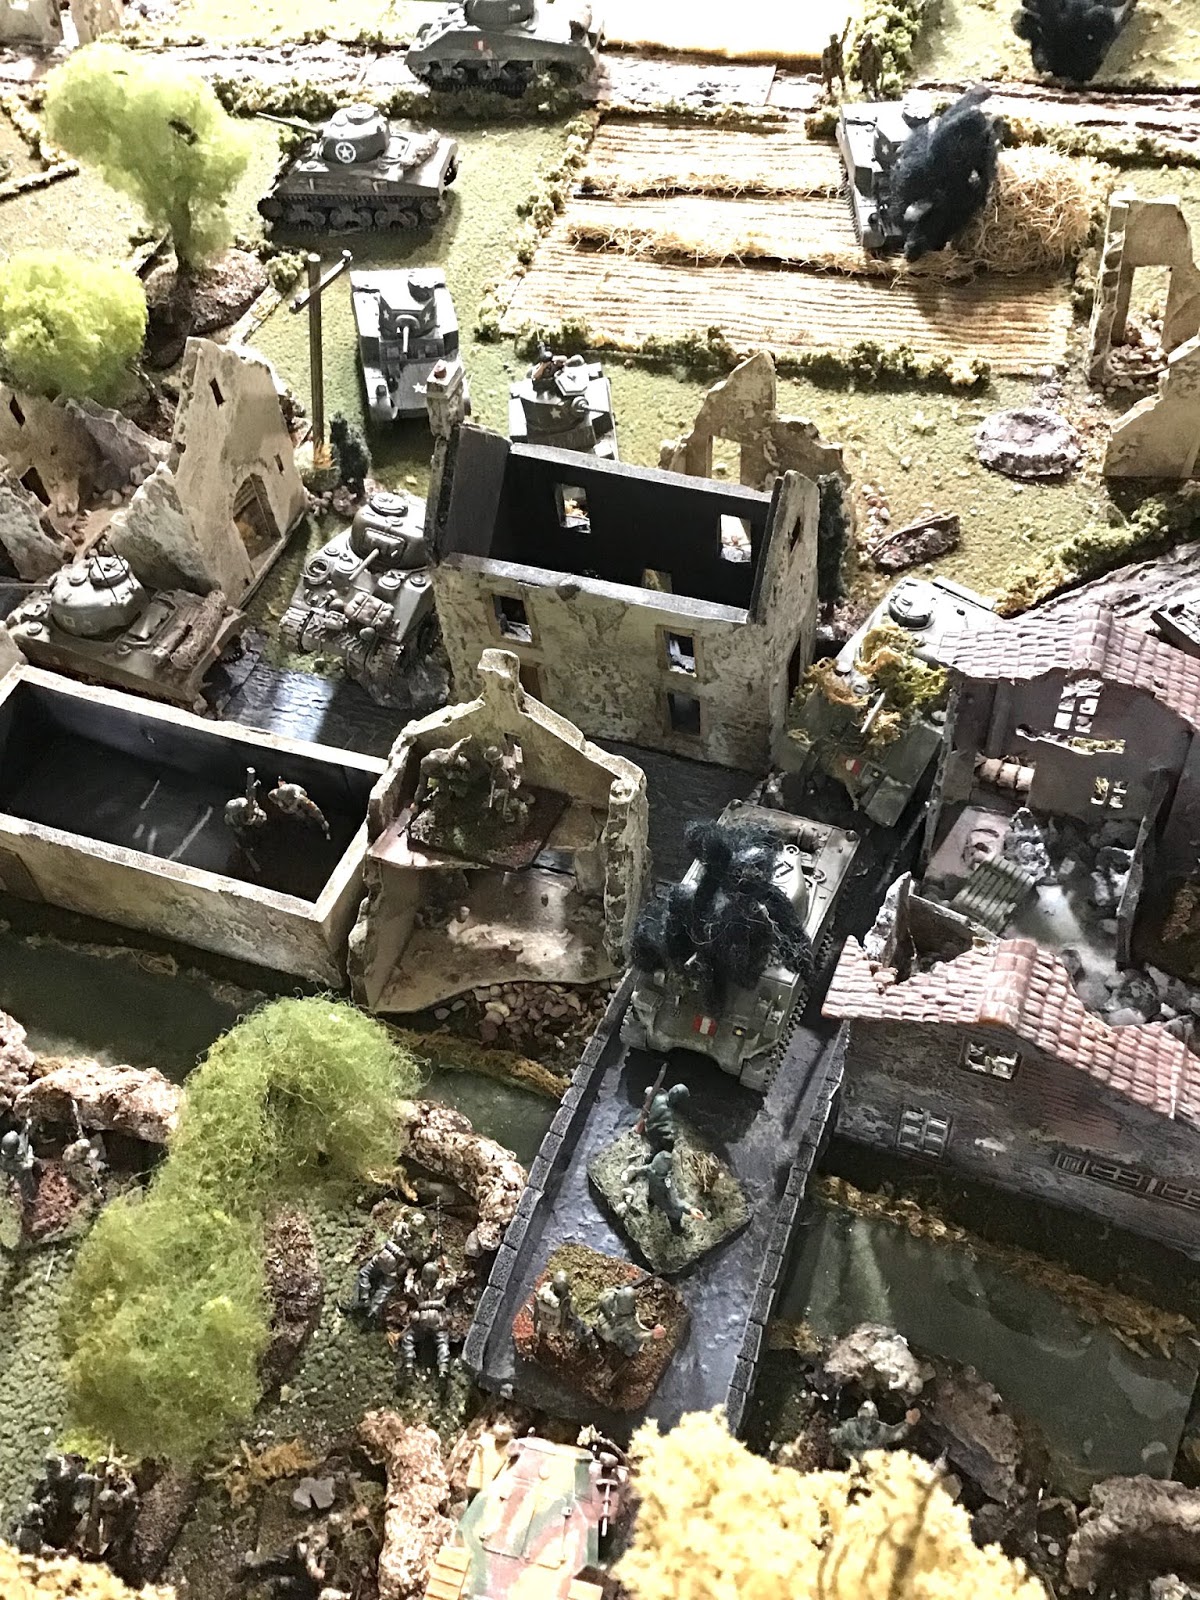
Tank battle around the chateau 

Two Shermans are KO’d along with a Firefly (off photo, bottom left) as the Panzer IV’s move in.

Final Overview as seen from Norrey


With the Canadian tank breakthrough around the chateau snuffed and the way forward to Le Mesnil-Patry blocked by a burning Firefly (previous photo, but around chateau top right), A Squadron, although still relatively intact, (photo centre) is making slow headway up either side of the main road towards Le Mesnil-Patry. B and C Squadrons have both been reduced to less than 50% and are unable to effectively advance (centre right) with many tanks now in full retreat.
The leading Canadian infantry companies (D on the right and A on the left) are both at 50% casualties and B and C companies, along with the carrier platoon and combat engineers are still mired west and within Norrey or just south of their starting line.
With half his armour out of commission and half his infantry companies no longer capable of sustained action, Brigadier Wyman calls off the attack and orders his forces to fall back on the Regina Rifles’ positions around Norrey.

We called the game here but handed the Germans a major victory. There was no way, with almost all of their infantry (the engineer battalion was virtually untouched!) and most of their armour still intact, that the Germans would lose Le Mesnil-Patry, but we decided the Canadians still had enough forces to maintain control of Norrey. So a more or less historical result...


Wednesday, July 3, 2019

Damblainville August 17th 1944

Inspired by the anniversary of the historic events that transpired in Normandy 75 years ago, I decided to dust off my WWII toys and play through some of the battles from the Blood and Honour series created by Paddy Green and Richard de Ferrars for the Battlefront WWII rules. This has always been my favourite WWII ruleset, but it can be a bit fiddly so I wanted to also test out a simplified version that I had developed to see if it still preserved the overall feel of the game.

I had not played the Damblainville scenario, so I tackled that solo, playing the smaller vignette option, which still put a pile of Canadian armour on the board! The game's background is set during the August 1944 attempt to close the Falaise pocket. With Falaise still stubbornly held by the enemy energies had become focussed on clearing an alternate way to Trun. To this end Lt General Simmonds ordered the 4th Canadian Armoured Division to advance on Trun by the most direct route possible. This passed through the village of Damblainville via its bridges that span the River Ante.

The objective for the Canadians is the seizing of the bridges over the Ante and clearing the way for vehicles to cross and exit the board.

The game was played on a 6' X 4' table with 20mm figures, using the Battlefront WWII rules with some home grown tweaking.


The Battlefield

Damblainville as seen from the high ground (bottom) where the Canadians enter. Hedgerow-lined roads and fields made the initial advance difficult, especially under the watchful eyes of German artillery FO’s and armour.

The Objective

The objective for the Canadians is to seize a crossing at Damblainville. The Ante River is spanned by three bridges of indeterminate quality, a railway bridge to the west and two older stone bridges in the town itself.
Lurking in the woods bordering the Ante are German armour and dug in infantry of Kampfgruppe Olboeter, including a Tiger platoon (bottom) with a full view of the hills to the north and the 1st Panzerjager Kp. . A second German SS infantry company holds the town on the north side of the river with orders to fall back if things get too hot. A third ad hoc company of German engineers, supply and administration are held in reserve further back by the railbed (off picture to left).

The German left

On the west side of the town a reduced Panzer IV company (IL/SS Panzer Regt. 12 “Hitlerjugend”) and German AT guns guard this bridge, with good lines of fire up to the heights beyond.

1. The Canadians advance

The Canadians lead with their armour, throwing A and B Companies of the South Alberta Regiment forward, along with its recce Stuarts. Some tanks advance along the west road, but the lead tank is KO’d 9top right) by a hidden German Pak at the west end of Damblainville and erupts in flames, impeding the advance of the following tanks. A Firefly of A Squadron is also knocked out by a long shot from the German Tiger lurking in the woods east of the town by the railway bridge.

2. Carrier platoon on right

On the right flank the Argyll and Sutherland’s carrier platoon quickly advances, with troops dismounting to seize the unoccupied buildings at the blocked crossroads.

3. Nebelwerfers!

As the first wave of armour rolls in the Canadian commander begins to feed A Company cautiously in along the hedgerows bordering the west road. Regardless they are spotted by the German FO, dug in on the bank of the railway bridge, and a nebelwerfer concentration draws first infantry casualties.

4. 6 pdrs. brought forward

Movement is spotted by the Germans along the eastern flank of the Canadian advance as the Highlanders try to move their guns forward to engage the German Tiger. They are slammed by artillery, causing the Highlanders’ anti tank platoon to loose a gun section. Leaving transport behind the remaining guns are cautiously manhandled forward to their positions.

5. Tough going

It’s out of the frying pan into the fire as the tanks and carrier platoon move out of sight of the Tiger only to come under intensive fire from the German positions west of the town. Another tank and a Bren carrier are brewed up as some of the carrier platoon infantry try and fail to fight their way into the houses on the outskirts of Damblainville under cover of smoke.

6. Germans hold tight

German Panzer IV’s and antitank guns on the south side of the river.

7. Centre bridge comes under attack

One of the South Alberta’s Stuarts is first to arrive at the town entrance opposite the centre bridge, only to be brewed up at short range by a hidden German infantry gun.  A second is KO’d by the Tiger (lower left) reducing the recce squadron to half strength in a matter of minutes.

8. Lurking Tiger

The deadly Tiger on the east flank with a clear view up the valley.

9. 9 Kp. re-enters Damblainville

9 Kp., which had begun the fight on the north bank of the river, had withdrawn across the Ante when enemy armour began swirling around the town, leaving a small rearguard of panzerfaust and panzershrek-armed infantry along with an attached infantry gun to hold up the advance.
However, with enemy infantry approaching and the north bank still standing firm (despite the loss of the infantry gun) 9 Kp. re-enters the north bank, supported by a Jagdpanzer which takes up position at the east entrance to the town.
The hope is to hold of the enemy long enough to allow the engineers, newly arrived, to prepare the bridge for demolition.

10. More casualties

Meanwhile at the west end of the town Highlanders’ A Platoon  supported by B begin to fight their way into the outer edge of the town.  C Company was also fed in on this flank but was pasted by a devastating artillery concentration before they made any headway, with three quarters of the company dead and wounded and the remainder falling back to the woods. Fireflies are brought in to try to bring some big guns to bare at close range but one is quickly knocked out before it can fire a shot.

11. Engineers arrive

Back at the centre bridge, as 9 Kp. moves back across to try to hold the enemy at bay, German engineers arrive with explosives to begin wiring the bridge for demolition.

12. South Alberta C Company enters the fray

The Canadian FOO’s, mostly out of action so far as the bad radio reception in the steep Ante valley compromises their ability to make contact with their artillery, finally connect and lay down a big smoke screen on the left flank. Under cover of this the third company of the South Albertans is sent in to try and reinvigorate the stalled attack. 

13. D Company is sent in

The Highlanders’ D Company is pushed up the left flank at the same time.

14. Under cover of smoke…

Under cover of smoke some of the tanks rapidly make it down the road and into close range of the Jagdpanzer IV now sitting on the railway bridge.

15. House to house fighting

Vicious and costly house to house fighting erupts in Damblainville as the Canadian infantry attempt to drive the SS out of the town. Casualties mount on both sides in the slog.

16. Railway bridge shelled

A Mike target is called on the railway bridge, bringing the weight of the entire field regiment down. One of the engineer sections attempting to mine this bridge is knocked out.

17. Another Firefly goes up in flames

The Jagdpanzer at the entrance to the town is KO’d, allowing Shermans to cautiously edge into town in support of their beleaguered infantry. Yet another Sherman is KO’d by one of the two Jagdpanzers still on this flank.

18. Stymied!

A traffic jam develops on the north side of Damblainville as the South Albertans try to sort themselves out. 6 pdrs, are moved up and infiltrated into some of the buildings to try and bring their support to bare.

19. Another Jagdpanzer KO’d

As South Albertan C Company pours in on the Canadian left the preponderance of guns at close range begin to find their mark and the Jagdpanzer on the bridge is knocked out.

20. Saved by the panzerfaust!

Most of the north bank houses are cleared of Germans and Canadian infantry and tanks begin pouring into the town. In an attempt to force the bridge the lead Sherman moves in to close assault the German engineers but is disabled by a lurking panzerfaust as the tank emerges from the south edge of the town.

21. Canadian right

With the north bank secured, here too the South Albertans try to overwhelm the enemy defence by sheer number of guns but as quickly as one tank takes up position it is knocked out.

22. Panzershrek!

On the western bridge the lead Sherman barrels across to engage the Panzer IV’s at close range, but is KO’d by a panzershrek. The tank catches fire and the erupting flames obscure the area in smoke, making it difficult for both sides to find their mark.

23.  Third Jagdpanzer toasted

The Canadians succeed in taking out the third Jagdpanzer but the Tiger (top left), with no more targets available from its original position, lumbers over to help hold back the attackers.

24. Still stuck on the wrong side of the river

On the Canadian right and badly mauled, the remaining Highlanders hunker down waiting for the armour to clear the way. But things have reached an impasse with no way to force the Germans on the south bank out of their positions. 

25. Tiger on the move 

Not yet spotted, the German Tiger eases its way up to the railway embankment.

26. Bridge mined

Explosives are placed on the centre bridge as the engineers prepare to remove themselves in order to detonate.

27. What the hell is going on here??!!

At this moment Lieutenant Colonel Mitchell of the Highlanders weaves his way down through the carnage to the north side of Damblainville to see first hand what is holding up the attack. As panicked reports come in he finds that half his regiment has been lost in the fighting so far and that A, B and C companies are no longer capable of any sustained action, with only D Company left to clear out the SS who are still in control and dug in on the south bank. With almost half the South Albertans disabled and burning in and around Damblainville he sends message back to brigade HQ recommending calling off the attack. As it turns out bridges further north had been seized the night before without a fight regardless and the entire division has already been ordered to side step Damblainville and utilize this approach.

C’est le guerre.

Final Overview

Top bridge: One of the South Albertan Fireflies edges up onto the railway bed to explore this way forward, but the Tiger on the far side will control that access once the Sherman becomes visible on the bridge.

Centre bridge: A second Sherman has been KO’d in an attempt to force this crossing, and with the bridge now wired for demolition this approach will likely be denied. Regardless the panzerfaust responsible for two kills is still in place with a second in the wings.

Bottom bridge: The burning Sherman on the bridge has largely obscured the hull down Panzer IV’s beyond from effective fire, unless the range is closed dramatically. But with a third Panzer IV, 75mm AT gun, 75 mm infantry gun and panzershrek all within range of the bridge, this will be an almost impossible nut to crack.

The only real way forward would be to get some infantry across the river to shake things up in conjunction with a renewed attack by the armour but the Highlander casualties (50% of the regiment) leaves the remainder too casualty shy and without the numbers to take on the two intact German infantry companies dug in on the south side of the river.

Plagued by failed calls for fire and terrible dice, a very difficult scenario for the Canadians was made impossible! Thanks to Paddy and Richard for all their hard work in bringing this scenario together.

Final butcher bill puts the Canadians at about 25 infantry stands, two 6 pdrs. and 12 tanks lost to the German’s 12 infantry stands, one 75mm infantry gun and three Jagdpanzers, and with the south bank entirely in German hands this one definitely goes to the Germans.